Hi everyone! Today I have a wax paper resist step-by-step tutorial to share, using my
Sizzix dies in some really fun ways.
I came up with the idea for this tutorial while I was working on
this card, using an
intricate Thinlits die, which needed a sheet of wax paper between the die and the paper to die cut perfectly. I thought I could use the die cut wax paper for a great wax paper resist technique, inspired by a
challenge I took part in a five years ago (thank you Daria!) and by my own
wax crayon resist tutorial earlier this year.
By die cutting shapes from wax paper, you can get really cool resist effects, and it is a great way of getting even more out of your dies. This technique works best on coated paper. In my examples I used Ranger Specialty Stamping paper, which is a matte coated paper, and their glossy cardstock. Both work equally well, on ordinary cardstock the effect will not be as striking. Let's start!
Die cut the
Moroccan card front - or any other die - from wax paper. I also die cut a
tag from Specialty Stamping paper.
Place your tag on a piece of printer paper and position the wax paper die cut on top. If your wax paper is double-sided, you can place another tag on top and get two in one go. My wax paper only had wax on one side, so I made sure that side was facing the tag. Place another printer paper on top and iron without steam. This transfers the wax to the tag.
Ink the tag with Distress Inks. I wanted to do an autumn tag and used Squeezed Lemonade, Wild Honey, Rusty Hinge and Vintage Photo. Mist a paper towel very lightly with water and wipe the tag off. This removes the ink from the wax impressions. Pretty cool isn't it?
Splatter with a little bit of water and dry with a heat gun. Stamp the tag with a script stamp and Rusty Hinge ink, holding the stamp in your hand for a more random impression. The wax will resist the ink. Wipe off as before (just make sure the ink is pretty dry first, otherwise you will smudge the stamping). Stamp with Potting Soil Archival ink, which will go on top of the wax.
Here you can better see how the wax impression resists the stamped text. I love the distressed look of the wax resist. The
little heart was in my scrap box, die cut from grungeboard covered with sticky-back canvas. I inked it with Vintage Photo.
Ink another piece of Specialty Stamping paper with Squeezed Lemonade. Crumble up a piece of wax paper and place on top of the inked paper. As before, sandwich between two printer papers and iron without steam. This is the more traditional wax paper resist technique.
Ink with orange and brown shades of Distress Ink, which reveals the yellow wax resist pattern in the paper. This reminded me of leaves.
Die cut
leaves from the wax resist paper.
Die cut a
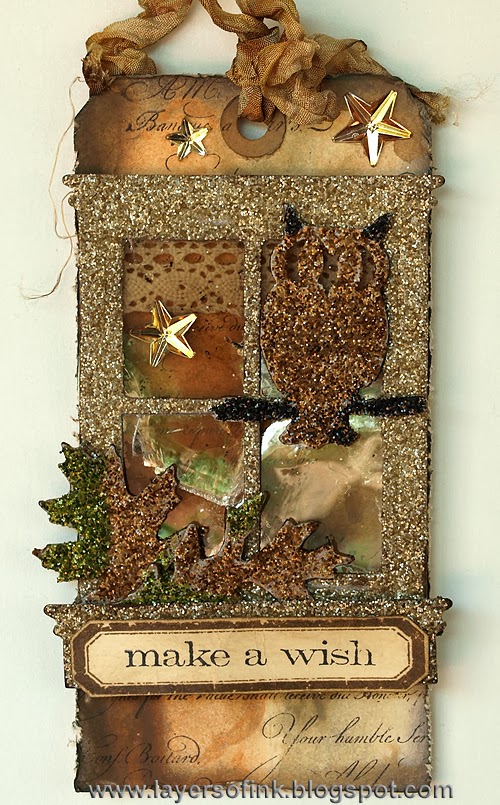
label from cream cardstock and ink with Antique Linen and Vintage Photo. Stamp with a sentiment stamp and Potting Soil ink.
Die cut an
owl from grungeboard and ink with Vintage Photo. Stamp wings with a crackle stamp (check out
this owl, using the same technique). Place a yellow paper behind the eyes. Coat the owl with Glossy Accents and sprinkle a little bit of Rock Candy glitter into the glue, for texture. Leave to dry before adhering to the project.
Adhere the label to the tag and layer leaves and a piece of twine under the owl.
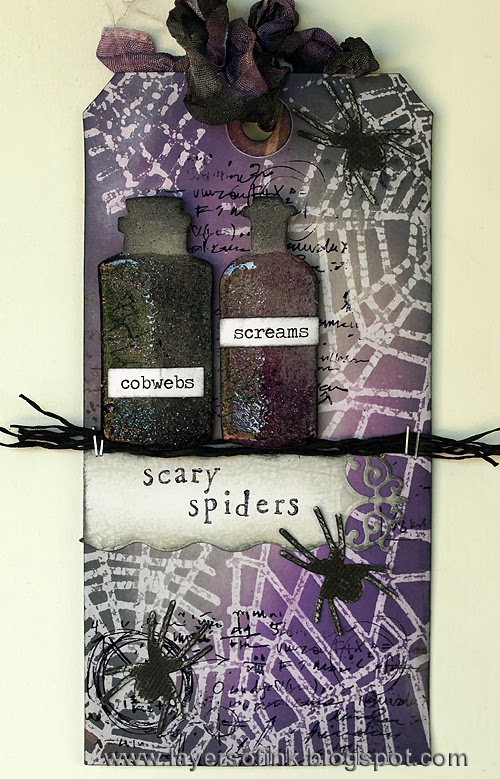
I made a Halloween tag too, because I wanted to do the technique with this spider web die:
Die cut the
cobwebs from wax paper and a tag from glossy cardstock. Iron as explained above.
Ink with Pumice Stone, Dusty Concord and Black Soot and wipe the ink off the wax resist parts.
Stamp with a texture stamp and Black Soot ink and with a text stamp and Jet Black ink - or use Black Soot for both. If you use Black Soot for both, the text will look like it is underneath the web.
Die cut two
bottles from grungeboard and ink one with Dusty Concord and the other with Black Soot. Stamp with a crackle stamp and Archival Jet Black ink. This is the same stamp that I used for the wings of the owl. Coat with Glossy Accents, except for the top, and sprinkle with a little bit of Rock Candy glitter.
Here you can better see the effect of the glitter sprinkled into the Glossy Accents.
Die cut a
label from Specialty Stamping Paper. I placed a piece of wax paper between the paper and the die and even though I didn't iron this, some of the wax transferred to the die cut, which gave a cool effect when I inked it. A happy accident. Ink with Pumice Stone and Black Soot and stamp a sentiment with Jet Black ink.
Die cut
spiders from black Color-Core cardstock and sand lightly. Dye crinkle ribbon with the same inks as used on the tag, but in Distress Stain form instead.
The finished tag. The bottles were adhered with foam dots. I placed Chit Chat stickers on the bottles and a few strands of paper twine underneath them, as a table.
By using other dies and colours, this technique can work for any type of project. I hope you enjoyed this tutorial! Thank you for looking!
Happy crafting!
Anna-Karin
Supplies:
Surfaces: Ranger: Specialty Stamping Paper, Glossy Cardstock; Tim Holtz Core'dinations Color-Core cardstock; Tim Holtz Idea-ology Grungeboard; wax paper
Dies: Sizzix:
Moroccan Card Front,
Mini Owl & Crescent Moon,
Mini Apothecary Bottles,
Cobwebs,
Tag & Bookplates,
Long Labels,
Trick or Treat,
Flower & Heart,
Mini Tattered Leaves
Stamps: Stampers Anonymous Tim Holtz: Simple Sayings, Classics #9, The Chemist, Ultimate Grunge, Urban Tapestry, Fabulous Flourishes; Hero Arts Printer's Lowercase alphabet
Ink: Distress Ink: Antique Linen, Squeezed Lemonade, Wild Honey, Rusty Hinge, Vintage Photo, Black Soot, Dusty Concord, Barn Door, Spiced Marmalade, Pumice Stone; Ranger Archival Ink: Jet Black, Potting Soil
Stain: Distress Stain: Dusty Concord, Black Soot, Vintage Photo, Rusty Hinge
Glitter: Rock Candy Distress Glitter
Embellishments: Tim Holtz Idea-ology: Seasonal Chit Chat stickers, Crinkle Ribbon, Neutral Paper String; twine
Adhesive: Ranger Glossy Accents
