Showing posts with label Prima. Show all posts

Monday, February 3, 2020

Art Stones and Glass Beads

Hello friends! I hope you had a fun weekend! The sun was shining here and we spent a lot of time outdoors, at a favorite playground, at the soccer field and on a beautiful forest walk.


It is the first Monday of a new month and that means that this week the Simon Says Stamp Monday Challenge Blog team showcase a specific designer / company. This week it is Prima Marketing, with all their pretty products. You don't have to use Prima's products to join, but it is always fun if you do. Our theme is Floral Frenzy.

Since it is a new month, we also have a new guest designer. During February Christina, with her blog Rosso Papavero will share her gorgeous creations with us. I hope you will stop by her blog to see what she made for this week's challenge.

Layers of ink - Art Stones and Glass Beads ATC tutorial by Anna-Karin Evaldsson.

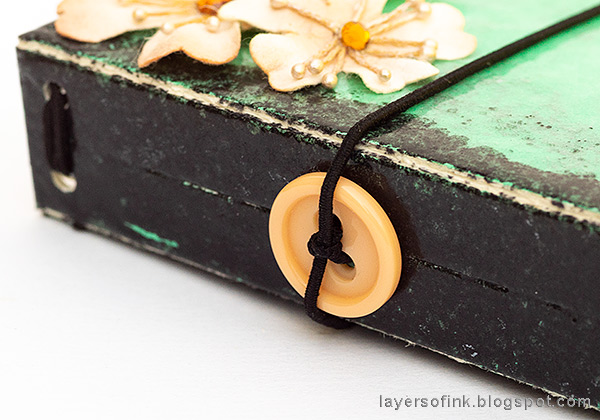
This week, I decided to make an Artist Trading Card, since it is such a fun, small surface to work on. The textured background was created with art stones and glass beads and is very easy to do, as you will see below. 

Layers of ink - Art Stones and Glass Beads ATC tutorial by Anna-Karin Evaldsson. Prima art stones.

Start by cutting a piece of watercolor paper into an ATC size (2.5 x 3.5 in). Coat with gesso. Add some glass beads directly into the gesso and continue with Mini Art Stones. Let dry.

Layers of ink - Art Stones and Glass Beads ATC tutorial by Anna-Karin Evaldsson. Textured background.

Add a layer of gesso on top of the art stones and beads. This prepares the card for the next step, and also acts as a glue.

Layers of ink - Art Stones and Glass Beads ATC tutorial by Anna-Karin Evaldsson. Paint with acrylic paint.

When the gesso is dry, paint with Distress Paints. For a different look, pick other colors. Let dry.

Layers of ink - Art Stones and Glass Beads ATC tutorial by Anna-Karin Evaldsson. Dry brush with metallic paint.

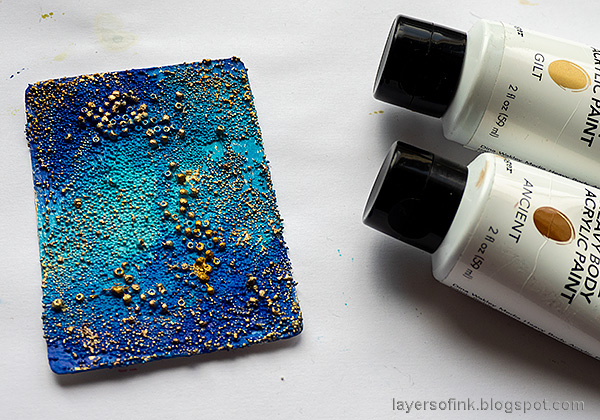
Dry brush the background with a little metallic paint. It will catch on to the textured parts, and makes them more visible. This background would work great for a space theme too, or for something relating to the sea.

Layers of ink - Art Stones and Glass Beads ATC tutorial by Anna-Karin Evaldsson.

I also added three art pebbles, to look like bubbles. The mix of mini art stones and the glass beads makes for a very interesting background, which is really easy to do.

Layers of ink - Art Stones and Glass Beads ATC tutorial by Anna-Karin Evaldsson. Add flowers and glass beads.

The flowers come from Prima's Moon Bay Golden Coast and were dry-brushed with a little metallic paint. I also added more crystal beads to the card.

Layers of ink - Art Stones and Glass Beads ATC tutorial by Anna-Karin Evaldsson.

The gloss medium used to add the clear beads hadn't dried completely when I took these photos. It is now completely clear. For the sentiment, I stamped the Finnabair 4 stamp on a piece of inked paper and added a Clippings Sticker on top.

Layers of ink - Art Stones and Glass Beads ATC tutorial by Anna-Karin Evaldsson. Art pebbles.

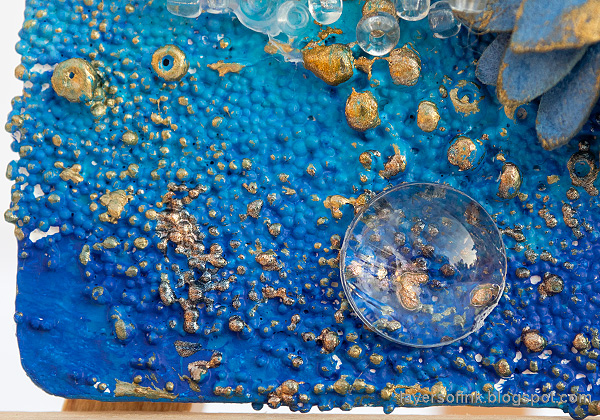
The Art Pebbles work as a magnifying glass, making the art stones look bigger.

I hope you will join us this week in our Floral Frenzy challenge. As always, you have a chance to win a $50 gift voucher to do some fun shopping at Simon Says Stamp. You have until next Monday 8am Ohio time. 1pm UK time, 2 pm CET to join in.


Don't forget to follow Simon Says Stamp on Instagram, they post great stuff daily. 


Do you use Instagram? If so please add #sssmchallenge so we can see your entries there too.


Thank you so much for taking the time to visit my blog today!  

Happy crafting!

Anna-Karin

Supplies:

* Please note: the links are affiliate links, for which I receive a small percentage of sales generated by the link, at no extra cost to you.


Friday, June 7, 2019

Heat Embossed Journal

Hello friends! The sun is shining and it is a beautiful day. I have an Eileen Hull Inspiration Team tutorial to share with you, made with her new dies, inks and embossing powders. 

Layers of ink - Heat Embossed Notebook Journal by Anna-Karin. Made with Eileen Hull Notebook die and Clearsnap inks.

I made a notebook journal, as a gift to a friend. The journal is completely covered in embossing powder, so it has a glass-like finish. It is very quick and easy to do. Just be very careful when using a heat gun so that you don't burn yourself. Never touch melted embossing powder until it is completely cool.

Layers of ink - Heat Embossed Notebook Journal by Anna-Karin. Ink with Blends 2.

Start by die cutting the notebook from mat board. Eileen's new Blends 2 inks by Clearsnap are so fun to use. They come in very handy bottles, which opens up for a whole range of fun techniques. You can paint, splatter, ink with a sponge, and so many other things. I placed two puddles on my craft sheet and applied them to the mat board with a Colorbox Stylus Tool, with an oval sponge. If you have never used the Stylus too before, it is a really awesome inking tool and I have used it for many years, especially for my scenic stamping, since it is great for detailed work. But it is also perfect for larger surfaces, and ergonomic too. You can easily change the sponges, and there is place for a sponge on each side of the tool.


Continue sponging to create an ombre effect.

Layers of ink - Heat Embossed Notebook Journal by Anna-Karin. Emboss with Molten Dimensions powder.

The inks stay wet for a while so you can easily emboss on top of them. I sprinkled some Polished Silver Molten Dimensions and Glistening Glass Molten Dimensions powders on top and then melted. I love the names of these new embossing powders.

Layers of ink - Heat Embossed Notebook Journal by Anna-Karin.

My favorite of the new Blends 2 inks might be the clear ink. Clear ink in a bottle! Imagine the possibilities. I used clear inks to add more powder, once the base layer of ink had dried. You can leave the background like this, and it has a great texture look and feel to it, since the Molten Dimensions powders are chunky.

Layers of ink - Heat Embossed Notebook Journal by Anna-Karin.

I was having such fun with the embossing powders, so I decided to cover the entire surface with clear powder. Just apply the clear ink with a sponge and coat with powder. Again, do not touch the melted powder until is is completely cool.

Layers of ink - Heat Embossed Notebook Journal by Anna-Karin.

On the edges and the spine, I applied more clear ink and sprinkled with Black Magic Molten Dimensions powder.

Layers of ink - Heat Embossed Notebook Journal by Anna-Karin. Bind the journal.

You can bind the journals in different ways. Here I punched two holes at the top and bottom and on third way down. 

Layers of ink - Heat Embossed Notebook Journal by Anna-Karin.

Bind it with a piece of elastic, as shown here.

Layers of ink - Heat Embossed Notebook Journal by Anna-Karin.

I like to tie the string through a button at the spine and then tie it again at the ends to create a closure mechanism.

Layers of ink - Heat Embossed Notebook Journal by Anna-Karin. Make signatures.

Cut papers 6.6 x 4.7 in (12 x 17 cm), fold and score and arrange into signatures of about 6-7 papers, depending on the thickness of the paper. The best thing with making your own journals, is that you can use your favorite papers. Stitch down the center and keep in place with the elastics.

Layers of ink - Heat Embossed Notebook Journal by Anna-Karin. Die cut the sentiment.

The title was die cut with one of the Journaling Words dies, from kraft and black paper.

Layers of ink - Heat Embossed Notebook Journal by Anna-Karin.

Glue the title to the cover with matte medium.

Layers of ink - Heat Embossed Notebook Journal by Anna-Karin. Chunky embossing powder glass-like finish.

Here you can see the glossy effect of the cover. If you want it completely smooth, you can add another layer of clear powder, but I liked the slightly textured look.

Layers of ink - Heat Embossed Notebook Journal by Anna-Karin.

The book was embellished with Prima's Meadows Pretty Pale flowers.

Layers of ink - Heat Embossed Notebook Journal by Anna-Karin.

These journals are such fun to make, and they make great gifts.

Layers of ink - Heat Embossed Notebook Journal by Anna-Karin.

The finished journal is 4 x 5 in. For more notebook inspiration, check out my Watercolor Meadow Notebook.

Thank you so much for taking the time to visit my blog today!  

Happy crafting!

Anna-Karin

Supplies:

* Please note: the links are affiliate links, for which I receive a small percentage of sales generated by the link, at no extra cost to you.


Other supplies:

Clearsnap Eileen Hull: Blends2 ink: Beach, Bay, and Clear

Monday, June 3, 2019

Wedding Card

Hi everyone! I hope you had a fun weekend. I found a walking trail that I had missed on many walks, always thinking that one particular path was a dead end, but instead there was a lovely forest trail hiding around the corner. 


This week at the Simon Says Stamp Monday Challenge Blog we have a Wedding/Anniversary theme. Since it is the first Monday of a new month (I cannot believe it is June already), the team is showcasing products by a specific company or designer, and this week the turn has come to Prima Marketing. You can find Prima's lovely range of products here. You don't have to use their products to join in the challenge, but it is always fun if you do.

Our guest designer for June is Jess, with her gorgeous blog Two Mad Dahlias, be sure not to miss her project and blog. 

Layers of ink - Wedding Card Tutorial by Anna-Karin Evaldsson.

I made a wedding card this week, using mainly neutral colors, with a bit of pink and gold. For the background, I used Prima's Pretty Pale 6 x 6 paper pad, and the papers were all so pretty, that I decided to cut them into squares and create a patchwork effect.

Layers of ink - Wedding Card Tutorial by Anna-Karin Evaldsson, with Birch Press Designs Kaleidoscope Heart.

For the layered heart I used Kaleidoscope Heart Layer dies by Birch Press Design. I had never used this type of layered die before and they create a great effect, which looks stunning both with different colors, or in just one color. The design consists of three layers, and I die cut them from the colors you see above, using SSS Glimmery Cardstock (Ruby Red, White Diamond, and Peach).

Layers of ink - Wedding Card Tutorial by Anna-Karin Evaldsson.

When you layer them together, with layer C in the bottom and you get this cool kaleidoscope effect. If you don't want a heart, you can just use the floral center piece, or you could leave that out and place a photo in the center of the heart.

Layers of ink - Wedding Card Tutorial by Anna-Karin Evaldsson. Prima Marketing Pretty Pale paper patchwork.

The Pretty Pale papers were cut into squares, distressing the edges. Using adhesive in the center of each square only, I adhered them to White Diamond glimmery cardstock and then to vellum, again distressing the edges. Stitch around each square with a sewing machine. Adhere the panel to a folded cardstock base. The card is 6 x 6 in big.

Layers of ink - Wedding Card Tutorial by Anna-Karin Evaldsson. Stamp the background.

Stamp the background here and there with Prima Finnabair 4 clear stamp.

Layers of ink - Wedding Card Tutorial by Anna-Karin Evaldsson. Stamp the inside of the card with Memory Box Rose Bouquet.

For the inside message, I used the Memory Box Rose Bouquet set.

Layers of ink - Wedding Card Tutorial by Anna-Karin Evaldsson. Embellish the card with Prima flowers.

The card was decorated with Prima's Meadows Pretty Pale flowers.

Layers of ink - Wedding Card Tutorial by Anna-Karin Evaldsson. Glimmery paper heart.

I hope you can see the glimmery effect of the papers better here.

Layers of ink - Wedding Card Tutorial by Anna-Karin Evaldsson. Outline gold text.

For the sentiment, I die cut the SSS Outline Congrats word from gold paper. There is also a strip of design tape.

Layers of ink - Wedding Card Tutorial by Anna-Karin Evaldsson.

And more flowers. I like neutral flowers, since you can customize them with ink or paint if you want flowers in a different color.

Layers of ink - Wedding Card Tutorial by Anna-Karin Evaldsson.

Torn edges, layers and stitching give a shabby chic look to the card.

Layers of ink - Wedding Card Tutorial by Anna-Karin Evaldsson.

Here's the inside. I didn't press hard enough on 'every', but decided that it didn't matter, since it is handstamped after all.

I hope you will join us this week in our Wedding/Anniversary challenge. As always, you have a chance to win a $50 gift voucher to do some fun shopping at Simon Says Stamp. You have until next Monday 8am Ohio time. 1pm UK time, 2 pm CET to join in.


Don't forget to follow Simon Says Stamp on Instagram, they post great stuff daily. 


Do you use Instagram? If so please add #sssmchallenge so we can see your entries there too.


Thank you so much for taking the time to visit my blog today!  

Happy crafting!

Anna-Karin

Supplies:

* Please note: the links are affiliate links, for which I receive a small percentage of sales generated by the link, at no extra cost to you.