Showing posts with label Mist. Show all posts

Thursday, August 22, 2024

Dry and heat embossed misted cards

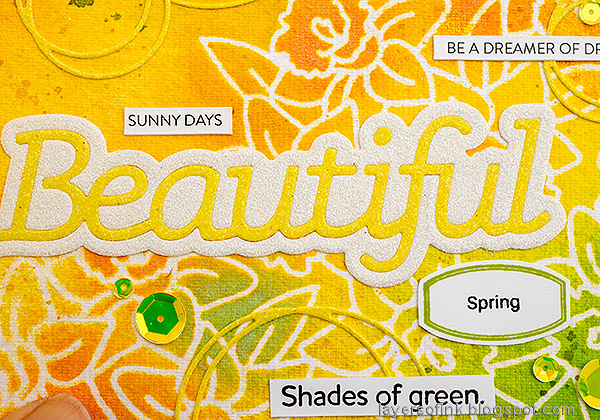
Hello crafters! I have two cards to share today, made with the same embossing folder, but misted with two different types of spray ink. 

Please note: this post has affiliate links, for which I receive a small percentage of sales generated by the link, at no extra cost to you.

Layers of ink - Dry and heat embossed misted cards tutorial by Anna-Karin Evaldsson.

The technique combines dry and heat embossing for a great textured effect. I used the lovely Simon Says Stamp Tumbling Flowers embossing folder for the cards. The folder comes from the Cheering For You release. The card to the left was misted with Distress Spray Stains and the card to the right was misted with Distress Spritz.

Layers of ink - Dry and heat embossed misted cards tutorial by Anna-Karin Evaldsson. Simon Says Stamp Tumbling flowers.

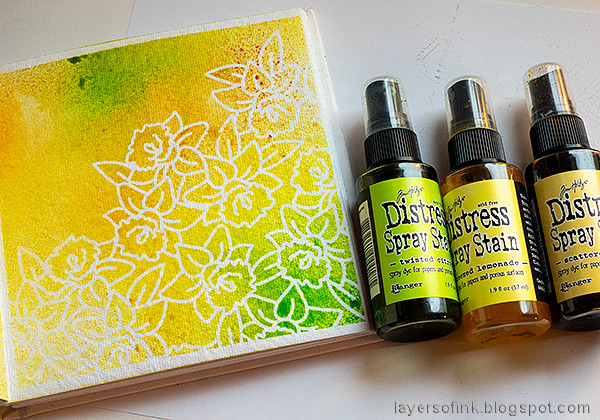
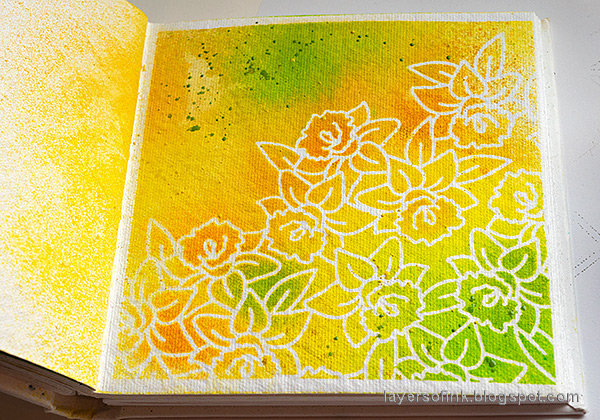
You can use plain white paper, but instead I colored watercolor paper with Antique Linen, Frayed Burlap and a little Pumice Stone. Let the papers dry. Ink the embossing folder with embossing ink. Mist the back of the paper with water and emboss. Cover with clear embossing powder and melt with a heat tool. Always be careful when using a heat tool and do not touch the melted powder until it has cooled down completely.

Layers of ink - Dry and heat embossed misted cards tutorial by Anna-Karin Evaldsson. Mist with Distress Spray Stains.

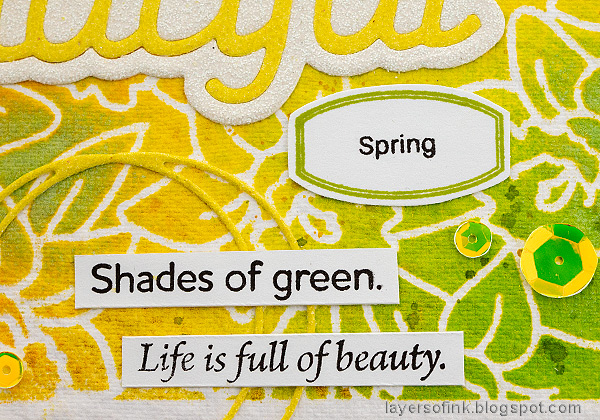
Mist the first card with various Distress Spray Stains. These are vibrant dye inks and they will mix on the paper and create interesting and sometimes unexpected results.

Layers of ink - Dry and heat embossed misted cards tutorial by Anna-Karin Evaldsson. Mist with Distress Spritz.

Mist the second paper with Distress Spritz inks. These inks shimmer a lot. I used a little Ground Espresso Distress Spray Stain around the edges.

Layers of ink - Dry and heat embossed misted cards tutorial by Anna-Karin Evaldsson. Die cut titles.

The titles were die cut from heavystock paper. The Simon Says Stamp Simple Hello was inked with Salvaged Patina and Mustard Seed and then embossed with several layers of clear powder. The Fancy Hello was embossed with Wow! Crusty Copper powder.

Layers of ink - Dry and heat embossed misted cards tutorial by Anna-Karin Evaldsson. Die cut and emboss the title.

Later I changed my mind, and die cut the mat for the title from left-over inky paper.

Layers of ink - Dry and heat embossed misted cards tutorial by Anna-Karin Evaldsson.

To make the title stand out better, I die cut it once from Simon Says Stamp Dark Chocolate cardstock too. The more visible mat is Simon Says Stamp Peacock Teal cardstock. I used the same two papers to create the cardbase.

Layers of ink - Dry and heat embossed misted cards tutorial by Anna-Karin Evaldsson. Sentiment.

The title is shiny and colorful. The second sentiment comes from Simon Says Stamp Season's Greetings.

Layers of ink - Dry and heat embossed misted cards tutorial by Anna-Karin Evaldsson.

Since the clear powder will not cover the background entirely, there will be a lot of texture from where the ink has gotten to the paper.

Layers of ink - Dry and heat embossed misted cards tutorial by Anna-Karin Evaldsson. Add sequins.

I added Simon Says Stamp sequins to the flowers.

Layers of ink - Dry and heat embossed misted cards tutorial by Anna-Karin Evaldsson.

The Distress Spritz card has a more distressed look to it since the colors are muted, but very shimmery and shiny. I added two blue matts to the focal board before mounting on folded black cardstock.

Layers of ink - Dry and heat embossed misted cards tutorial by Anna-Karin Evaldsson.

You can see both the texture of the ink in the background on the watercolor paper (underneath the embossing powder) and the texture of the mist. The shimmer is hard to capture on photo since it looks different from every angle.

Layers of ink - Dry and heat embossed misted cards tutorial by Anna-Karin Evaldsson. Fancy Hello.


Thank you so much for stopping by here today! I will see you again tomorrow! 


Anna-Karin

Supplies:

* Please note: the links are affiliate links, for which I receive a small percentage of sales generated by the link, at no extra cost to you.


Monday, July 29, 2024

Furry Friend Canvas

Hi friends! I hope you are well and had a good weekend with some crafty time. 

Please note: this post has affiliate links, for which I receive a small percentage of sales generated by the link, at no extra cost to you.


This week our theme at the Simon Says Stamp Monday Challenge Blog is 4-Legged Friends. I hope you will join us and don't miss the last project by our July guest designer Laura Cassina

Layers of ink - Furry Friend Mixed Media Tutorial by Anna-Karin Evaldsson.

I made a mixed media canvas board this week, featuring my parents' sweet dog. It will be a gift for my Mom (who hopefully does not read this). I made the background green, with a bit of yellow, to match the colors of the photo. 

Layers of ink - Furry Friend

Apply gesso to the board and let dry. The apply Texture Paste with a palette knife through the Simon Says Stamp Mix and Match Squares stencil. Let dry and repeat to cover the board.

Layers of ink - Furry Friend Mixed Media Tutorial by Anna-Karin Evaldsson. Paint with Distress Paint.

Paint the canvas with Distress Paint and mist with water to blend.

Layers of ink - Furry Friend Mixed Media Tutorial by Anna-Karin Evaldsson. Add details with white pen.

When the paint was dry, I added a white outline to some of the squares with a white paint pen.

Layers of ink - Furry Friend Mixed Media Tutorial by Anna-Karin Evaldsson. Mist with Distress Mist.

I misted the canvas board with Twisted Citron Distress Spritz.


When the mist was dry, I stamped the background here and there with Simon Says Stamp Old Letter.

Layers of ink - Furry Friend Mixed Media Tutorial by Anna-Karin Evaldsson. Die cut Simon Says Stamp You.

The title was die cut with the new You die from the Cheering For You release. I didn't use the particular die cuts on the photo, but ended up cutting the title from blue inky paper and black cardstock instead. 

Layers of ink - Furry Friend Mixed Media Tutorial by Anna-Karin Evaldsson. Add sentiments.

The word 'love' comes from the Simon Says Stamp You stamp set. I also wanted to stamp a small 'you' to complete this sentiment. Rub Antique Linen paint into the Tim Holtz Typed Tags.

Layers of ink - Furry Friend Mixed Media Tutorial by Anna-Karin Evaldsson. Die cut Circle Loops.

I die cut Simon Says Stamp Circle Loops from left-over inky paper, matching the sky in the photo.

Layers of ink - Furry Friend Mixed Media Tutorial by Anna-Karin Evaldsson.

'Are the best' also comes from the Simon Says Stamp You stamp set, which is a great stamp set with so many useful sentiments.

Layers of ink - Furry Friend Mixed Media Tutorial by Anna-Karin Evaldsson.

Here you can see the shimmer of the Distress Spritz a little better.

Join us this week in our 4-legged friends challenge! You have a chance to win a $25 gift voucher to do some fun shopping at Simon Says Stamp. You have until Monday 8am Ohio time. 1pm UK time, 2 pm CET to join in.


Do you use Instagram? If so please add #sssmchallenge so we can see your entries there too.


Thank you so much for stopping by here today! 

Happy crafting!

Anna-Karin

Supplies:

* Please note: the links are affiliate links, for which I receive a small percentage of sales generated by the link, at no extra cost to you.


Monday, February 21, 2022

Daffodils Art Journal

Hi friends! Storm Franklin is bringing us a whole lot of wet snow at the moment, but to cheer that weather up, I have a spring-time art journal page to share.

Please note: this post has affiliate links, for which I receive a small percentage of sales generated by the link, at no extra cost to you.


Our theme this week at the Simon Says Stamp Monday Challenge Blog is Art Journaling. If you have never art journaled before, I hope you will try it. It is very fun, creative and freeing. You don't have to have an art journal, but you can use lose pages instead and bind them later and glue them into a notebook.

Don't miss the beautiful art journal page by our February guest designer Susan Babcock aka Susanbcards.

Layers of ink - Daffodils Art Journal Page Tutorial by Anna-Karin Evaldsson.

We spotted some snowdrops last week, which was the first sign of spring this year, although they are now buried under lots of snow. I love daffodils and made an art journal page featuring the beautiful Off The Edge Daffodils stencil from Simon Says Stamp's new Good Luck Charm release.

Layers of ink - Daffodils Art Journal Page Tutorial by Anna-Karin Evaldsson.

Place the stencil on a page in Dina Wakley's 6x6 in White Journal. Mist with Squeezed Lemonade, Scattered Straw and a little Twisted Citron.

Layers of ink - Daffodils Art Journal Page Tutorial by Anna-Karin Evaldsson.

When dry, place the stencil back again and add a little bit of Distress Oxide ink with ink blending brushes, just to darken some of the areas.

Layers of ink - Daffodils Art Journal Page Tutorial by Anna-Karin Evaldsson.

Splatter a little Twisted Citron spray on the page.

Layers of ink - Daffodils Art Journal Page Tutorial by Anna-Karin Evaldsson.

I die cut the Simon Says Stamp Circle Loops from yellow glitter paper. The sentiments were stamped on white paper and cut into strips. These are from Anna's Flowers and Mixed Labels.

Layers of ink - Daffodils Art Journal Page Tutorial by Anna-Karin Evaldsson.

The Simon Says Stamp Capital B Beautiful die was die cut from white and yellow Memory Box Frosted Glitter paper and pieced together. The stamped label comes from Simon Says Stamp Mixed Labels.

Layers of ink - Daffodils Art Journal Page Tutorial by Anna-Karin Evaldsson. Stamp sentiments.

This type of detailed outline stencil works very well together with mists and gives a really quick background.

Layers of ink - Daffodils Art Journal Page Tutorial by Anna-Karin Evaldsson. Simon Says Stamp Forest Scenery.

Some additional sentiments and sequins to finish the page. 

For more inspiration using the Simon Says Stamp Good Luck Charm release, check out my Black Glossy Background Card and Radiating Squares Art Journal page.

I hope you will join us this week in our Art Journal theme. You have a chance to win a $25 gift voucher to do some fun shopping at Simon Says Stamp. You have until Monday 8am Ohio time. 1pm UK time, 2 pm CET to join in.


Do you use Instagram? If so please add #sssmchallenge so we can see your entries there too.


Thank you so much for visiting my blog today! 

Happy crafting!

Anna-Karin

Supplies:

* Please note: the links are affiliate links, for which I receive a small percentage of sales generated by the link, at no extra cost to you.

Monday, August 23, 2021

Thankful Art Journal Page

Hi friends! I hope you are well and had a good weekend. School has started here and I can hardly believe that my youngest now also goes to the big school.

Please note: this post has affiliate links, for which I receive a small percentage of sales generated by the link, at no extra cost to you.

At the Simon Says Stamp Monday Challenge Blog we have a Spritz and Splatter theme this week. I hope you will join us and don't miss the gorgeous project by our August guest designer Anne Redfern.

Layers of ink - Thankful Art Journal Page by Anna-Karin Evaldsson.

I made an art journal page in Dina Wakley's 6x6 White Journal with lots of splatters.

Layers of ink - Thankful Art Journal Page by Anna-Karin Evaldsson.

I started with a page that was left-over from another project. I had had spray left on a stencil and 'stamped' it on a page in the journal. The stencil is Simon Says Stamp Cosmo Flowers.

Layers of ink - Thankful Art Journal Page by Anna-Karin Evaldsson.

I added some more color with Crackled Pistachio Distress Spray Stain. Since the first layer was done with an acrylic spray, it won't be affected by the Distress Spray.

Layers of ink - Thankful Art Journal Page by Anna-Karin Evaldsson. Stamp with Simon Says Stamp Crackle Background.

Add more texture with the Simon Says Stamp Crackle background and Black Soot ink. I misted the stamp slightly with water before stamping.

Layers of ink - Thankful Art Journal Page by Anna-Karin Evaldsson.

My favorite way of adding splatters is with Scribble Sticks. Dip the stick in water and flick a paint brush against it. This creates great opaque splatters and is relatively mess-free.

Layers of ink - Thankful Art Journal Page by Anna-Karin Evaldsson.

Smear gesso on one of Dina's Persona Chipboard pieces.

Layers of ink - Thankful Art Journal Page by Anna-Karin Evaldsson.

When dry, paint and mist with water. Wait a short while and then dab off some the water to create texture.

Layers of ink - Thankful Art Journal Page by Anna-Karin Evaldsson. Add splatters with Scribble Sticks.

Add more splatters with Scribble Sticks.

Layers of ink - Thankful Art Journal Page by Anna-Karin Evaldsson.

Even on the darker acrylic paint background, the Scribble Stick splatters shows nicely. They are slightly transparent, but opaque enough. I also added some Tim Holtz Design Tape.

Layers of ink - Thankful Art Journal Page by Anna-Karin Evaldsson.

A few sequins and some Clippings Stickers finished the page.

Layers of ink - Thankful Art Journal Page by Anna-Karin Evaldsson.

Thankful was die cut from kraft and white paper.

Layers of ink - Thankful Art Journal Page by Anna-Karin Evaldsson.

Another look at the misted, stamped and splattered texture.

I hope you will join us this week in our Spritz and Splatter challenge. You have a chance to win a $25 gift voucher to do some fun shopping at Simon Says Stamp. You have until Monday 8am Ohio time. 1pm UK time, 2 pm CET to join in.


Do you use Instagram? If so please add #sssmchallenge so we can see your entries there too.


Thank you so much for taking the time to stop by here today! 

Happy crafting!

Anna-Karin

Supplies:

* Please note: the links are affiliate links, for which I receive a small percentage of sales generated by the link, at no extra cost to you.