Showing posts with label Baby. Show all posts

Monday, January 20, 2020

Vintage Photo Frame

Hello friends! I hope you had a nice weekend! We had some much needed sunny skies yesterday and spent time outdoors.


At the Simon Says Stamp Monday Challenge Blog we have a Home Decor theme this week. I hope you will join us! And don't miss the pretty project by January guest designer Claudia, with her blog Von Pappe II.

Layers of ink - Vintage Photo Frame Tutorial by Anna-Karin Evaldsson.

Lately, my Mom and I have discovered many unknown facts about the family history on her side. That part of the family moved around a lot, all over the country, even back in the 1800s, and much information about where they lived have been forgotten or never retold. Funnily enough, my grandfather was born not far from where I live now, and they lived in quite a number of locations close by, while originating far away from here and ending up far away from here (where my Mom was born and I grew up). It is such a coincidence that my grandfather and his parents lived in places close by and visited places close by, while I thought that no ancestors had almost ever been to this area. When this photo was taken, my great grandfather was a foreman on a farm and they lived in a humble little house that I recently visited. My grandfather later had this photo in a frame that he made in school, and I scanned and printed it for this project.

Layers of ink - Vintage Photo Frame Tutorial by Anna-Karin Evaldsson. Tim Holtz cabinet frame.

Distress the Sophisticate Cabinet Card Frame with sand paper and a Craft Scratcher tool.

Layers of ink - Vintage Photo Frame Tutorial by Anna-Karin Evaldsson.

Ink with brown ink. The ink sticks to the distressed areas, and can be wiped off from the glossy areas.

Layers of ink - Vintage Photo Frame Tutorial by Anna-Karin Evaldsson. Tim Holtz Stacked Baroque.

I wanted a lighter frame around the photo and die cut one with Tim's Stacked Baroque set.

Layers of ink - Vintage Photo Frame Tutorial by Anna-Karin Evaldsson. Metal flowers.

I also colored some metallic idea-ology embellishments with alcohol ink, as well as a Gumdrop Heart.

Layers of ink - Vintage Photo Frame Tutorial by Anna-Karin Evaldsson.

For the base, I glued a Worn Wallpaper to mat board and inked the wallpaper a little. I imagined the photo hanging on a wall, or standing on the little shelf beneath it. The title was stamped with Tim's Simple Sayings set.

Layers of ink - Vintage Photo Frame Tutorial by Anna-Karin Evaldsson.

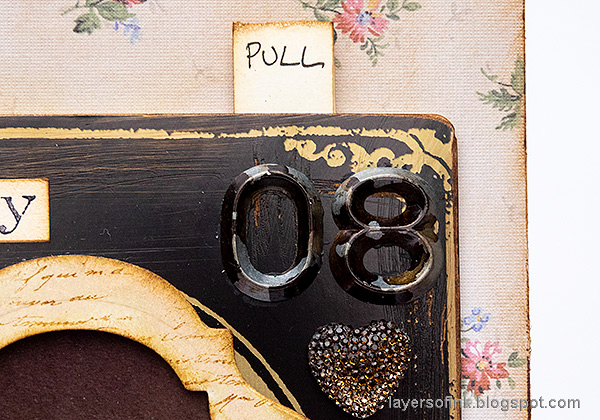
There is a pull tab, and journaling is written behind the photo. I used Numeric Numbers for the year.

Layers of ink - Vintage Photo Frame Tutorial by Anna-Karin Evaldsson.

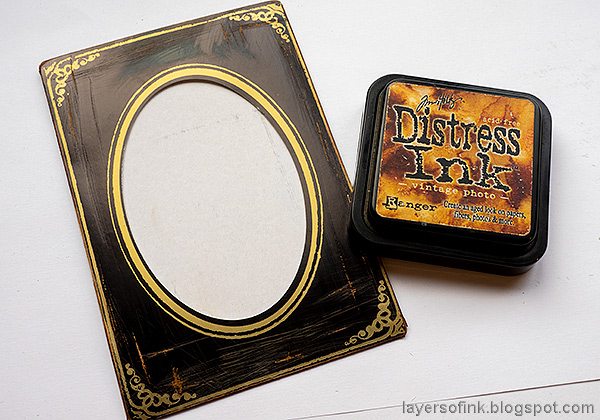
The frame was inked with Pumice Stone and Frayed Burlap and stamped with a script stamp. The flower comes from the Floral Adornments set.

Layers of ink - Vintage Photo Frame Tutorial by Anna-Karin Evaldsson. DIY miniature book.

The shelf was made by cutting two strips from a piece of Salvaged Baseboard and glueing them together. I also added a postcard and a pen nib, with black ink at the top.

Layers of ink - Vintage Photo Frame Tutorial by Anna-Karin Evaldsson. Letterpress letter.

The little book was made from kraft core cardstock and leftover old book paper. The green label comes from the Curiosities Sticker Book.

Layers of ink - Vintage Photo Frame Tutorial by Anna-Karin Evaldsson.

I painted the letterpress M and sanded it slightly when dry. Ink the edges of the shelf with brown ink.

Layers of ink - Vintage Photo Frame Tutorial by Anna-Karin Evaldsson. Pocket watch.

I also found an idea-ology watch cameo frame in my stash and added a stamped clock face to it and a game spinner.

I hope you will join us this week in our Home Decor challenge. As always, you have a chance to win a $50 gift voucher to do some fun shopping at Simon Says Stamp. You have until next Monday 8am Ohio time. 1pm UK time, 2 pm CET to join in.


Don't forget to follow Simon Says Stamp on Instagram, they post great stuff daily. 


Do you use Instagram? If so please add #sssmchallenge so we can see your entries there too.


Thank you so much for taking the time to visit my blog today!  

Happy crafting!

Anna-Karin

Supplies:

* Please note: the links are affiliate links, for which I receive a small percentage of sales generated by the link, at no extra cost to you.


Saturday, November 23, 2019

Cute Watercolor Critters Tutorial

Hello friends! I had a busy week, but mainly with fun things luckily. Today I have two sweet little cards to share. 

Layers of ink - Cute Watercolor Critters Tutorial by Anna-Karin Evaldsson.

Our neighbours recently got a grandchild, and I made a little welcome baby card. While I was busy, I made a second card too, which is more of a general winter card. All you need for these cards is some stamps, Distress Inks or watercolor paint, and a scalloped die. Or you could just make square cards and skip the scallops.

Layers of ink - Cute Watercolor Critters Tutorial by Anna-Karin Evaldsson. With Simon Says Stamp Woodland Whimsy stamps.

I used the new super sweet Woodland Whimsy set by Simon Says Stamp. It was a part of the November Card Kit. The card kit is sold out, but you can buy the stamp set on its own. I love it. There are so many great stamps: the animals, the birch trees (one of my favorite trees), the branches and leaves and the sentiments. After die cutting a watercolor card with the Simon Says Stamp 3-Sided Scallop die, ink the hedgehog with Ground Espresso, mist about four times with water and stamp.

Layers of ink - Cute Watercolor Critters Tutorial by Anna-Karin Evaldsson. Watercolor with Distress Ink.

Smear Distress Inks on a craft sheet, mist with water and pick up with a paint brush. Use more water for a lighter shade, and less for a darker shade. Drop in darker colors before the lighter colors are dry.

Layers of ink - Cute Watercolor Critters Tutorial by Anna-Karin Evaldsson.

Paint a shadow to ground the hedgehog to the background.
 Layers of ink - Cute Watercolor Critters Tutorial by Anna-Karin Evaldsson. Stamp the deer on the card and on masking paper.

Stamp the sweet deer on the card and then again on masking paper. Cut out.

Layers of ink - Cute Watercolor Critters Tutorial by Anna-Karin Evaldsson. Stamp the birch trees.

This stamp set is perfect for some masking techniques. Place the mask over the deer and then stamp three birch tree trunks.

Layers of ink - Cute Watercolor Critters Tutorial by Anna-Karin Evaldsson.

Remove the mask and two of the trunks will now appear to be placed behind the deer.

Layers of ink - Cute Watercolor Critters Tutorial by Anna-Karin Evaldsson. Watercolor the deer and trees.

Watercolor with Distress Inks as before. You can of course also use watercolor paint.

Layers of ink - Cute Watercolor Hedgehog Tutorial by Anna-Karin Evaldsson.

As a final touch, splatter a tiny bit of ink in the shadow area, and stamp a heart with brown ink. Watercolor it with Vintage Photo, which is such a nice warm brown.

Layers of ink - Cute Watercolor Critters Tutorial by Anna-Karin Evaldsson.

The sentiment stamps can be shaped on the acrylic block, so that they fit the banner. If you stamp the banner the other way around, the sentiment is already shaped right, but if you want the banner as I stamped it, you can still use the sentiment stamps.
 Layers of ink - Cute Watercolor Hedgehog Tutorial by Anna-Karin Evaldsson.

I left some areas white on the hedgehog, for highlights.

Layers of ink - Watercolor Deer in Birch Forest Tutorial by Anna-Karin Evaldsson.

This deer stamp is so sweet. I painted the sky light blue and added some Pumice Stone to the snow area, making it a little darker under the deer. The sentiment was stamped and cut out.

Layers of ink - Watercolor Deer in Birch Forest Tutorial by Anna-Karin Evaldsson.

You can also add Glossy Accents to the nose and maybe the dots on the back

Layers of ink - Watercolor Deer in Birch Forest Tutorial by Anna-Karin Evaldsson.

I used a pencil to add some color to the branches.


Thank you so much for taking the time to visit my blog today!  

Happy crafting!

Anna-Karin

Supplies:

* Please note: the links are affiliate links, for which I receive a small percentage of sales generated by the link, at no extra cost to you.


Monday, January 1, 2018

Framed Animals Baby Gift

Hello and welcome to the first post of 2018! It's a new year and I hope it will be a very good one. Both kids managed to stay awake until midnight yesterday. Anton painted two cups for them that they can keep as a memory. They are in the oven as I am typing this. 

It is special that the first day of the year also is a Monday, because that means that we are kicking off a new Simon Says Stamp Monday Challlenge on the very first day of the year. Aptly, our theme is Something New. It could be a new product, a new baby, a new year, or anything else you can think off. Since it is also the first Monday of a new month, the team is showcasing products by a specific company / designer, and this month it is Simon Says Stamp exclusive products. You don't have to use them to join, but it is always fun if you do. 


Our January guest designer is Amber Sheaves, don't miss her creative post.

Layers of ink - Framed Animals Baby Gift by Anna-Karin Evaldsson with Simon Says Stamp Picture Book dies

I made a gift for a new born baby, my little nephew and the boys' youngest cousin, whom we met for the first time at Christmas. The wall-hanger was decorated with some brand new SSS Picture Book dies. This frame was kept quite plain and simple, since my sister likes that. 

I used a Tim Holtz Mini Framed Panel as my base and painted it with gesso. It was dry brushed with blue and brown paints when dry.

Layers of ink - Framed Animals Baby Gift by Anna-Karin Evaldsson with Simon Says Stamp Picture Book dies

The Picture Book Elephant and Zebra comes from the new Friends collection. That elephant is so cute, and as you might know, I love elephants. You read right, the second animal it is supposed to be a Zebra, but I thought the die worked just as well for a giraffe, so I turned mine into a giraffe instead. The animals were die cut from felt. Most of it is wool felt, but I didn't have it in all colors, so some is ordinary felt. The eyes were die cut from white paper and I added a black dot to them. 

Layers of ink - Framed Animals Baby Gift by Anna-Karin Evaldsson with Simon Says Stamp Picture Book dies

I also used the Picture Book Panda, which is always a favorite with babies. The background was done by smearing texture paste through the Latticework stencil and when dry, painting it white. It gave a bit of texture, while still being very neutral.

Layers of ink - Framed Animals Baby Gift by Anna-Karin Evaldsson with Simon Says Stamp Picture Book dies

I finished the frame with a piece of lace trim and linen ribbon. The hearts were die cut from felt too, with the Clipping Heart die. I don't know if you can see it, but I used a little Crazing Medium on the frame too.


I hope you will join us this week in our Something New challenge. As always, you have a chance to win a $50 gift voucher to do some fun shopping at Simon Says Stamp. You have until next Monday 8am Ohio time. 1pm UK time, 2 pm CET to join in.


Don't forget to follow Simon Says Stamp on Instagram, they post great stuff daily. 


Do you use Instagram? If so please add #sssmchallenge so we can see your entries there too.


Thank you for taking the time to stop by my blog today! 

Happy crafting!

Anna-Karin

Supplies


Simon Says Stamp PICTURE BOOK ELEPHANT
[ SSS ]
Simon Says Stamp PICTURE BOOK ZEBRA
[ SSS ]
Simon Says Stamp PICTURE BOOK PANDA
[ SSS ]
Simon Says Stamp CLIPPING HEART
[ SSS ]
Simon Says Stamp Wool Felt Sheets OCEAN WAVES
[ SSS ]
Simon Says Stamp Wool Felt Sheets BLACK
[ SSS ]
Simon Says Stamp Wool Felt Sheets NIGHT SKY
[ SSS ]
Simon Says Stamp Wool Felt Sheets White Felt
[ SSS ]
Tim Holtz Idea-ology MINI FRAMED PANELS
[ SSS ]
Tim Holtz Layering Stencil LATTICEWORK
[ SSS ]
Tim Holtz Distress Paint TUMBLED GLASS
[ SSS ]
Tim Holtz Distress Paint GROUND ESPRESSO
[ SSS ]
Dina Wakley Ranger WHITE
[ SSS ]
Tim Holtz Distress Collage Medium CRAZING
[ SSS ]
Dina Wakley Ranger WHITE GESSO
[ SSS ]
Ranger TEXTURE PASTE
[ SSS ]
Tim Holtz Idea-ology LINEN RIBBON
[ SSS ]
Tim Holtz Idea-ology LACE
[ SSS ]
Sizzix MULTIPURPOSE PLATFORM STANDARD FOR WAFER THIN DIES
[ SSS ]
Sizzix PURPLE WITH SILVER GLITTER
[ SSS ]
Sizzix BIG SHOT MACHINE
[ SSS ]
Dina Wakley Ranger PALETTE KNIFE
[ SSS ]
Ranger Inkssentials Non Stick CRAFT SHEET 15 X 18
[ SSS ]


* Please note: the links are affiliate links, for which I receive a small percentage of sales generated by the link, at no extra cost to you.

Sunday, January 15, 2017

CSI Case File #222 Guest Designer

Hello everyone and welcome to my blog! This month the CSI: Color, Stories, Inspiration challenge celebrates its five years anniversary. If you have never checked out this wonderful challenge, please do, particularly if you scrapbook. It is created by Debbi Tehrani, and the combination of a colour combo, journaling prompts and product/technique prompts, is really fun. 


I was on the CSI design team from the start in January 2012, and for almost three years, and really enjoyed it. A lot of scrapbooking layouts were created in the process. When Debbi asked me if I wanted to come back as a guest designer this month, to celebrate the anniversary, I thought it was a great idea. It was such fun to work with a case file again. Above you see case file #222.

Layers of ink - CSI case file 222 Winter Layout by Anna-Karin

Looking through my photos I came on these photos of Leo from last winter, and I knew I wanted to document the story of his cozy blue overalls, that my Mom got for him. He wore it on basically all outings and walks from autumn to early spring. It was a perfect baby overall, soft and warm. 

From the evidence, I used: chevron, snowflakes, stars, something fuzzy, decorative borders, ribbons, bows, stamps and glitter. From the testimony: document something about winter, add jewels to your journaling spot, and the layout was inspired by fashion (or clothes rather). I also used the sketch that you'll find in case file #121.

The journaling was written on three die cut tabbed cards and stapled to the background. You can flip the pages to see the rest of the journaling. It is about the outfit and all the outings and many many walks during which Leo used it.

Layers of ink - CSI case file 222 Winter Layout by Anna-Karin

I used sticky-back canvas for the background, to add a soft touch to the layout and tore the edges a little. It is layered on a dotty paper. The snowflakes were sponged with grey paint through a lovely StencilGirl Decorative Filigree Ornament stencil by Gwen Lafleur. The German Scraps come from Prima.

Layers of ink - CSI case file 222 Winter Layout by Anna-Karin

The background was splattered with blue paint, for added texture.

Layers of ink - CSI case file 222 Winter Layout by Anna-Karin

Behind the photos there are some layers: a paper embossed with stars and a piece of vellum embossed with dots and glittered at the top (it was a left-over from this Winter Wonderland layout). There is also a die cut film frame, some stickers and bows.

Layers of ink - CSI case file 222 Winter Layout by Anna-Karin

The title was stamped with red ink on a die cut Tattered Curvy Banner, and I used stickers to complete it (Winter Overalls).

Layers of ink - CSI case file 222 Winter Layout by Anna-Karin

The bottom third of the layout consists of a piece of watercolour paper. I stamped and white embossed a chevron background stamp on it, aiming for a non-perfect look. Then it was misted with Distress Spray Mists.

Layers of ink - CSI case file 222 Winter Layout by Anna-Karin

The snowflakes were die cut from red Deco Sheet using the Paper Snowflakes die set.

Layers of ink - CSI case file 222 Winter Layout by Anna-Karin

There is also a dotted ribbon that I happened to find in a box I hadn't looked in for a long time. The bows come from a DCWV paper pad called DIY Project Stack Gift Decor.

Thank you for stopping by here today. I hope you will join the celebrations at CSI. There are also lots of prizes to be won.

Happy crafting!

Anna-Karin

Supplies (affiliate links):