Showing posts with label Stitching. Show all posts

Monday, July 14, 2025

File Folder Ephemera Card

Hi crafters! It is a new week and we have a new Simon Says Stamp Monday Challenge for you you.

Please note: this post has affiliate links, for which I receive a small percentage of sales generated by the link, at no extra cost to you.


This week our theme at the Simon Says Stamp Monday Challenge Blog is Stitch It. Fun! Stitching adds such a nice tactile feel to projects and can be used instead of adhesive too. Don't miss the gorgeous project by our July guest designer Thom Santilla.

Layers of ink - File Folder Ephemera Card Tutorial by Anna-Karin Evaldsson.

I made a card this week with three file folders and four double-sided tags. The folders were handstitched. I used lots of words, ephemera, fibers, stamping and stencilling. 

Die cut with Tim Holtz Vault Noteworthy.

Start by die cutting the file folders from Ranger Heavystock cardstock using Tim Holtz Sizzix Vault Noteworthy set. 

Stamp and stencil the file folders.

Ink them with Distress Ink and then use stencils to add a pattern to the front of each folder. I also stamped them partially with stamps from Tim Holtz School Desk and Ultimate Grunge, using black and Red Geranium Archival Ink.

Stamp the background paper.

For the background I used a piece of Tim Holtz Backdrops paper and stamped it with the same stamps as the folders, as well as Simon Says Stamp Crackle Background. 

Stitch the edges of the folders.

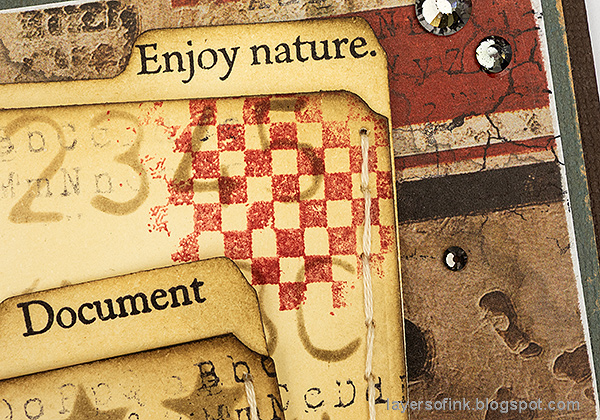
Pierce holes down the sides of the folders and stitch with DMC floss. 

Cut and embellish the tags.

Cut labels from various Backdrops papers. Add a tag circle and punch a whole. Stamp sentiments, sand and ink the edges. Then add ephemera and stickers. 


Embellish the back of the tags too.

Stamp a sentiment.

I stamped a sentiment from Tim Holtz Warehouse District on the most visible folder.


Round the corners with a We R Memory Keepers Corner Chomper. Mount the background on cardstock and then again on folded brown cardstock. Adhere the three folders. As you can see, I also stamped sentiments on the label part of the folders. Most of them come from Simon Says Stamp Mixed Labels.


I added words from AALL & Create Mindful Moments to the folders and to the tags.

Add Simon Says Stamp Pawsitively Dazzling Gunmetal Gems.


Tags made from ephemera and stamping.

I tied a fibers and twine to the tags. These are the fronts of the four tags (except for the first one).

Add Tim Holtz idea-ology ephemera.

I had fun picking out ephemera pieces that fit together. 


All the tags have postage stamps on them from Tim Holtz Postmarked. The stamped sentiment comes from Simon Says Stamp Mixed Labels.

Stamp with Stamper's Anonymous Classics 1.

This sentiment comes from Stamper's Anonymous Classics #5.


More details.


The backs of the four tags look like this, more words, ephemera and stamps.


I sanded the edges of all the tags and left some almost without ink, so that the white paper shows.


This tag was cut so that the word 'colour' would be visible.


I found a couple of Swedish stamps on Tim's Postmarked set and used them.


An interesting background paper.


I hope you enjoyed this tutorial! 

Join us this week in our Stitch It challenge! You have a chance to win a $25 gift voucher to do some fun shopping at Simon Says Stamp. You have until Monday 8am Ohio time. 1pm UK time, 2 pm CET to join in.


Do you use Instagram? If so please add #sssmchallenge so we can see your entries there too.


Thank you so much for visiting today! 

Happy crafting!

Anna-Karin

Supplies:

* Please note: the links are affiliate links, for which I receive a small percentage of sales generated by the link, at no extra cost to you.


Thursday, January 30, 2025

Paint Sampler Notebook

Hi friends! I hope you are well! Today I have a notebook tutorial to share using mainly patterned papers. You can easily turn it into a sketchbook instead, by just using different papers for the inside.

Please note: this post has affiliate links, for which I receive a small percentage of sales generated by the link, at no extra cost to you.

Layers of ink - Paint Sampler Notebook Tutorial by Anna-Karin Evaldsson.

I really like the papers in Tim Holtz various Backdrops paper packs and they are great when it comes to making your own notebook or sketchbook. Here I mainly used papers from the Christmas Backdrops pack. The cover was embellished with stamping, sentiments and sequins.

Prepare patterned papers for the journal.

Start by deciding which papers that you want to use. I cut out some of the paint samplers. 

Stamp with Simon Says Stamp Create.


Stamp with Tim Holtz School Desk.

Stamp the cover here and there with the alphabet stamp from Tim Holtz School Desk set and a coffee stain stamp. I stamped both the back and the front cover.

Bind the notebook.

Cut pages for the inserts. One of my favorite things with making my own notebooks is that I can use my favorite papers. Here I used fairly thin notebook paper, but I often use watercolor paper instead. Make a template and attach it to the cover and the inserts as show. Pierce holes.


Stitch the spine with embroidery floss. 

Use your favorite paper for the inserts of the journal.

Tie the floss on the inside and trim the cover with a craft knife.


I distressed and tore some of the edges. 


These paint samples are great. You can also use them to cover the entire notebook. The smaller sentiments come from Simon Says Stamp Create and were stamped with brown ink and die cut with the coordinating dies.

Stamp a sentiment for the notebook.

I like how the patterned paper shows through the stamped title. I also glued a bunch of sequins to the background.


Stamp a ticket from Simon Says Stamp Mixed Labels and die cut with the coordinating die. Fold the ticket over the edge of the cover and add a stamped and die cut sentiment. 


The Backdrops papers are double-sided, so inside covers are patterned too.

Layers of ink - Paint Sampler Notebook Tutorial by Anna-Karin Evaldsson.

Handmade notebooks are great gifts and I like having one in my bag at all times.

Layers of ink - Patterned Paper Notebook Tutorial by Anna-Karin Evaldsson.

I hope this inspired you to make your own notebook. It is a great way to use your favorite patterned papers. 


Thank you for visiting!

Happy crafting!

Anna-Karin

Supplies:

* Please note: the links are affiliate links, for which I receive a small percentage of sales generated by the link, at no extra cost to you.


Friday, January 24, 2025

Anemone Card Tutorial

Hi stampers! I hope you are well! Today I have a card tutorial to share with stamped and watercolored flowers.

Please note: this post has affiliate links, for which I receive a small percentage of sales generated by the link, at no extra cost to you.

Layers of ink - Anemone Watercolor Card Tutorial by Anna-Karin Evaldsson.

Watercoloring flowers is one of my favorite things and for this card I used Simon Says Stamp Anemone Wreath from the To Love release. These flowers are so pretty and the center of the stamp is a perfect place for a sentiment.

Stamp Simon Says Stamp Anemone Wreath flower.

Stamp the Anemone Wreath on watercolor paper with Ranger Archival Ink Jet Black.

Paint with watercolors.

Watercolor the flowers loosely, leaving areas white for highlights.


Add another layer of watercolor paint, darkening some areas of the flowers and leaves.

Paint the background.

Paint the background with a light brown mix.

Ink edges with Distress Ink.

When dry, ink the edges and splatter some Distress Ink on the paper here and there, for a bit of texture.

Die cut a sentiment from gold paper.

Simon Says Stamp Simple Hello was die cut from gold kraft-stock and black paper. Stamp a sentiment and cut into a strip.


I also added some lines and dots with a white gel pen to the flowers. You can also use the gel pen to whiten areas where you might have forgotten to leave a highlight.

Splatter ink on the background.

I stitched around the panel with embroidery floss.


By varying the amount of water, you can get many shades from one color. I used just one color red here and in one mix I added a tiny bit of yellow.


Thank you for visiting!

Happy crafting!

Anna-Karin


Supplies:

* Please note: the links are affiliate links, for which I receive a small percentage of sales generated by the link, at no extra cost to you.