Monday, February 24, 2014

Textured Window Canvas Tutorial

Hello everyone!! This week we have another fabulous challenge at Simon Says Stamp Monday Challenge Blog, Paste Mediums (embossing paste, gel medium, gesso and more). I am very fond of adding texture to my pages and different kinds of paste is one of my favourite supplies.
 
This week, I used a lot of paste, and made a canvas that consists mainly of Wendy Vecchi's White Embossing Paste. Love this stuff, it has the greatest texture and is light-weight and non-sticky, perfect for papercrafts, and for any kind of mixed-media work. I use it often together with stencils and for backgrounds, but this week I wanted to try something different, namely to cover a canvas with a thick layer and carve a pattern into the paste. I took some step photos.

I used a deep edge 4 x 4 in canvas and coated the front with a thick layer of paste using a palette knife, maybe about 8 mm thick. You need to work one side at a time. It is a good idea to start on one of the sides first, to figure out how long you have to wait for the paste to start drying before making impressions into it. I wished I had started with a side, because the bricks on the sides of my canvas are neater than the ones on the front, since I timed it better.

You need to wait until the paste starts to dry a little bit, and particularly until the surface starts to dry. The time will differ depending on the climate where you live. I think I waited about 30 minutes. The paste still needs to be soft, but not completely soft. I used a plastic palette knife to make impressions. I made the impressions a bit early on the front, if I had started with a side, I would have known to wait longer. Complete all the sides of the canvas, one at a time. If you are careful, they don't have to dry fully before you do the next side. Leave to dry completely.

I painted the windows with Antique Linen and the rest of the canvas with Pumice Stone, also adding Pumice Stone between the windows. Leave to dry. (The orange shouldn't have been here, I just forgot to take this photo until I had started with the orange).

I wanted a terracotta window and painted the bricks with Rusty Hinge, leaving the area in between them, the grout, Pumice Stone. Leave to dry. 
 
Dry-brush Walnut Stain on the window to distress it and to add more texture and character.
 
I wanted to add a sentiment too and love this stamp by Wendy Vecchi, but it was too large to fit a single window pane. Instead, I stamped it on tissue paper and tore into strips. I glued the strips down with gel medium, which makes the tissue paper disappear. Check out this tutorial of mine for more inspiration on tissue paper stamping.  

I wanted a branch in front of the window and reached for my trusted Branch Tree die. It was die cut from grungeboard and coated with Embossing Paste. I love using paste to add textures to die cut embellishments. Leave to dry.
 
When the paste is dry, paint the branch with Walnut Stain and Forest Moss Distress Paint, using a paint brush.

The flowers were die cut from Bazzill Antique papers with the Tattered Flower Garland die, inked and layered.

I used a resin embellishment to add a bit of life to my scene. (Sorry, I just saw that it got out of stock right after I got it). You could also make a clay bird using a Martha Stewart mold. 
 

Love the texture of this piece. You just want to reach out and touch it.

Since the canvas has a thick edge, it looks great to extend the brick texture to the edges.
 
I hope you will join us this week! We love looking at all the submissions every week. As always, one random participant wins a $50 gift voucher from Simon Says Stamp.

http://www.simonsaysstamp.com/servlet/StoreFront

Thank you for looking!!

Happy Crafting!!

Anna-Karin

Supplies:
Surfaces: Tim Holtz Idea-ology Grungeboard; Bazzill Antique 6 x 6 pad; 4 x 4 deep edged canvas
Dies: Sizzix: Branch Tree, Tattered Flower Garland
Stamps: Stampers Anonymous Wendy Vecchi: Art Comforts
Ink: Archival Ink: Jet Black; Distress Ink: Gathered Twigs
Paint: Distress Paint: Antique Linen, Pumice Stone, Frayed Burlap, Gathered Twigs, Rusty Hinge, Walnut Stain, Forest Moss
Medium: Wendy Vecchi Stampers Anonymous: White Embossing Paste
Embellishments: Webster's Pages: Resin Nesting Birds; Kaisercraft Pearls

Thursday, February 20, 2014

Flower Window Tutorial

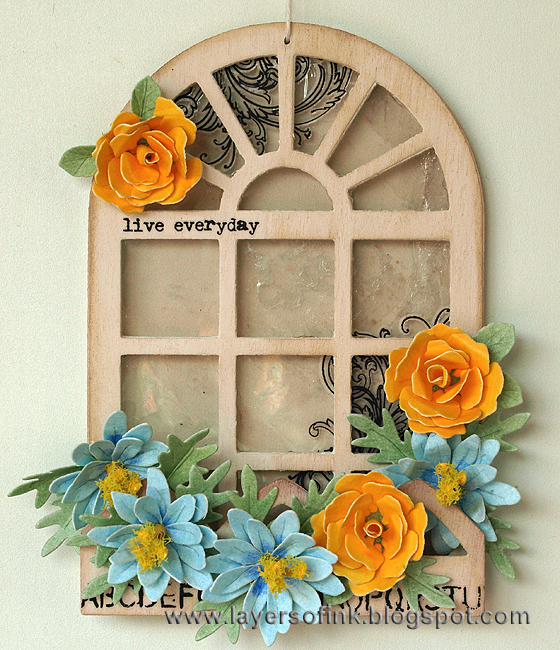
Hi everyone! Today I have a Sizzix step-by-step tutorial to share with you, for a window ornament with 3D flowers, made with Susan's Garden dies.
 
Susan's Garden dies by Susan Tierney-Cockburn make such gorgeous and real looking flowers and they look great showcased in the Conservatory Window. This is a great gift, or make it for yourself. It doesn't have to be a décor piece, you can also attach it to a card or a scrapbooking page. By using other flowers and colours you can easily turn it into a project for any season, but I was in a spring mood.
 
The Conservatory Window die is wafer-thin and works great together with the Magnetic Platform. First, I die cut it from wood veneer paper.

I wanted the window to be thick and dimensional, and die cut it quite many times from thin chipboard. Since this is a thin die, it can't handle thick material such as mat board or grungeboard, but that doesn't mean you can't make a sturdy piece.

Glue all the windows and window boxes together, add more if you want it even thicker. Leave one window piece for later.

You can leave the wood veneer as is, but I wanted a white-washed look and painted it with Picket Fence Distress Paint. Do the same on the window box.

 When the paint is dry, ink the edges with Gathered Twigs. I also added a rub-on sentiment.

For a window, I used a mica sheet, first adding a rub-on flourish (cut in two). Cut the mica to fit the window and sandwich between the window and the last window piece that you saved.

Now to the flowers, I coloured some smooth cardstock with Pan Pastels, on both sides, using two shades for each paper. This is a very quick colouring method.

 For the leaves, I used two shades of green.

Starting with the roses, die cut the petals from the yellow paper and the leaves and calyx from the green paper. The Magnetic Platform works really well together with these dies, saving me paper since it doesn't shift.

I used a darker orange Pan Pastel to add some colour to the inside part of each petal. The petals were shaped using Susan's Garden tools. You can find the basic technique in this and this video by Susan. These are the pieces you need to make one rose. Here's a video that explains how to assemble the flower.

Colour smooth cardstock with blue Pan Pastels and die cut the petals for the Mini Daisy. Use the same green cardstock you coloured earlier for its leaves. Vein and shape the petals for the Mini Daisy and assemble the flower. I used some yellow Flower Soft on the stamen. You can find Susan's video about this flower here.

Glue the flowers to the window, tucking the leaves in here and there. 
 
I used leftover strips of mat board behind the box, to give it dimension and so that there would be space for some of the flowers behind the box.

The mica looks wonderful as window glass. The effect is hard to photograph, but here you can see that it is transparent, but not totally clear. You can also use a transparency and age it a with alcohol ink, or try vellum for a frosty effect.

Thank you for looking!!

Anna-Karin

Supplies:
Surfaces: Neenah Smooth Solar White Cardstock; Simon Says Stamp Birch Wood Veneer Paper; thin chipboard
Dies: Sizzix: Conservatory Window, Mini Petals, Mini Daisy
Ink: Distress Ink: Gathered Twigs
Paint: Distress Paint: Picket Fence
Pastel: Pan Pastels: Flower Colouring Kit Set, Mixed Media 1, Mixed Media 2
Embellishments: Tim Holtz Idea-ology Words Remnant  Rubs, Elements Remnant Rubs; Flower Soft: yellow; US ArtQuest Mica Sheet
Tools: Sizzix: Big Shot, Magnetic Platform, Susan's Garden Tool Kit

Tuesday, February 18, 2014

12 tags of 2014 February

Hi everyone! Here's my version of Tim Holtz 12 tags of 2014 February. I finished it at the beginning of the month, but didn't get a chance to post until now.
 
I liked the embossed stencil pattern in the background, but used another stencil than Tim did. I also stamped the background with a script stamp, after inking and embossing. The embossed pattern resists the script stamping, making it look as if it is behind the harlequin pattern.

Here you can see the background better. I also stamped a small Blueprint playing card on watercolour paper and watercoloured with Distress Inks, for an extra embellishment.

A ticket was die cut from black smooth cardstock and I did Tim's chalkboard technique on top. The heart and number were die cut from grungeboard, inked and coated with Distress Glitter. Finally, I also added some cheese cloth.

Thank you for looking!!

Anna-Karin

Supplies:
Surfaces: Ranger Manila Tag; Tim Holtz Idea-ology Grungeboard
Dies: Sizzix: Mini Hearts, Mini Tickets, Cargo Stencil Numbers
Stamps: Stampers Anonymous Tim Holtz: Mini Blueprints 2, Classics #9, Love Struck
Ink: Distress Ink: Worn Lipstick, Barn Door, Fired Brick, Pumice Stone, Antique Linen, Frayed Burlap, Gathered Twigs; Archival Ink: Jet Black
Embossing powder: Ranger Frosted Crystals
Glitter: Distress Glitter: Pumice Stone, Barn Door
Stencils: Stampers Anonymous Tim Holtz: Harlequin
Embellishments: Tim Holtz Idea-ology: Industrious Border Stickers, Red & Cream Trimmings

Monday, February 17, 2014

Vintage Cameo Card

Hi everyone! A new week and a new challenge at Simon Says Stamp Monday Challenge Blog, A Cameo Appearance. Such a fun theme!

My grandmother had a vintage cameo brooch, which I can remember very well. I thought the Henry & Harriet stamp by Darkroom Door fit well with this theme and decided to make a card with it as a focal piece. You can use any cameos to embellish the card.

For the background, I aged a piece of manila cardstock with Tsukineko Walnut Ink Crystals, which give a really nice effect. Dilute the crystals in warm water. While the paper was still wet, I sprinkled some dry crystals on the paper. The background was stamped with Darkroom Door splatter stamps and script stamp.

I stamped the image with Archival Ink and coloured it with Derwent Inktense pencils. It was also splattered with some Walnut Stain Distress Ink. 

Love this pen nib stamp, which has seven different pen nibs. I stamped them on leftover walnut stained paper and cut three of them out.

I hope you will join us this week! As always, on random participant wins a $50 gift voucher from Simon Says Stamp.

http://www.simonsaysstamp.com/servlet/StoreFront

Thank you for the visit!

Anna-Karin

Supplies:
Surfaces: Ranger Manila Cardstock; Core'dinations Tim Holtz Kraft-Core cardstock; Neenah Smooth Classic Cream
Stamps: Darkroom Door: Henry & Harriet, Paint Splats, Pen Nibs, Love Letters Vol. 1
Ink: Ranger Archival Ink: Jet Black, Potting Soil; Distress Ink: Gathered Twigs, Walnut Stain
Walnut Crystals: Tsukineko Walnut Ink Antiquing Crystals
Pencils: Derwent Inktense Coloured Pencils
Embellishments: Jolee's Boutique French General Layered Metal Resin Cameos

Sunday, February 16, 2014

Misty Cabin

Hello stampers! We are continuing our February Favorite Technique theme at Craft a Scene.
 
Two weeks ago, I shared a tutorial for a black and white scene. This week I continue the same theme with another favourite colouring technique of mine, black and white plus one colour. If you look at the tutorial, the technique is basically the same, except that I started with Adirondack Aqua, which is a great light ink. Then I continued with the grey and black inks, again making sure to leave some areas lighter. Finally, I added some more Aqua, and a little bit of Peacock Feathers Distress Ink, to increase the teal colour in places.

The Water Pattern was stamped with Aqua and Weather Vane, and the birds were also stamped with Weather Vane. Again, highlights were added with a white gel pen and quite a bit of mist by dry brushing white pigment ink on the scene.

Here are more examples of this colouring technique: Winter Covered Bridge, The Coming Storm, Down at the Farm, Winter Walk to the Cottage, A Fairy Tale, and Blue Archipelago.

Thank you for stopping by! There is still plenty of time to join us.

Happy stamping!

Anna-Karin

Supplies:
Stamps: Stampscapes: Migrating Birds 152D, Water Pattern 231C, Prickly Branches 272G, Bayou Shack Sm. 344E, Cypress Sm. 346F, Cypress Knees 347C, Cypress Knees Sm. 348B, Cypress Cluster 349F
Ink: Distress Ink: Peacock Feathers, Black Soot; Adirondack, Slate; Aqua; Jenni Bowlin: Weather Vane; Archival Ink Jet Black; Colorbox Frost White
Surface: Kromecote glossy cardstock

Saturday, February 15, 2014

CSI case file #110 - You

Hi everyone! A new challenge is up at CSI:Color, Stories, Inspiration. Here is this week's case file:
 
 
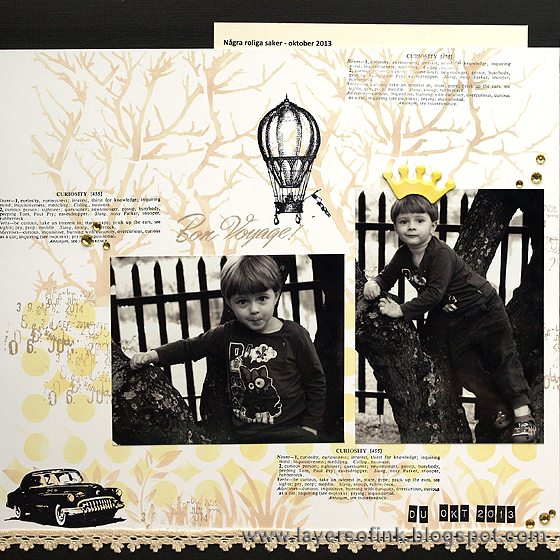
My layout: 
 
From the evidence I used: lace, jewels, crown and from the testimony. My journaling is printed on the paper tucked behind the white panel and is taken from the notebook I have where I write down funny things my son says and does, all from October last year. I first picked out three interesting things, but then I added a few more, because I didn't want to limit the journaling. But there are three major things and several smaller ones. I didn't follow the sketch as closely as I normally do (while I was busy working on the layout, the sketch suddenly somehow slipped my mind and the layout took its own course).

The background is Specialty Stamping paper. Since the photos are taken in a tree I used a tree stencil for the background, with two brown inks to get the right shade. The background was stamped with a curiosity definition stamps and some other stamps.

The crown was die cut from mat board, inked yellow and coated with Glossy Accents.

Dye ink looks lovely on Specialty Stamping paper. The dots were sponged through a Simon Says Stamp stencil and the numbers were stamped on top.

I used a Wendy Vecchi stencil for the border and also added a lace and a vintage car stamp.
 
Thank you for looking! I hope you will join us this week!
 
Anna-Karin
 
Supplies:
Surfaces: Ranger Specialty Stamping Paper
Die: Sizzix: Heart Wings
Stamps: Stampers Anonymous Tim Holtz: Curiosities, Travel Ways, Paris to London, Ultimate Grunge
Ink: Distress Ink: Frayed Burlap, Antique Linen, Squeezed Lemonade; Archival Ink Jet Black; Memento: Desert Sand
Stencils: Simon Says Stamp: Blocked Circles; Wendy Vecchi Stampers Anonymous: From the Garden; Crafter's Workshop: Mini Branches Reversed
Embellishments: Tim Holtz Idea-ology: Label Letters

Friday, February 14, 2014

Craft Stamper March 2014

Hi! I am very happy to have one of my cards as the main card on the cover of the March 2014 issue of the Craft Stamper.
 
I have a master class with ideas (and step photos) about how to create texture on your projects. I hope you will check the magazine out!

Happy crafting!

Anna-Karin

Thursday, February 13, 2014

Spring Forest

Hello everyone! I am sharing a card on the Sizzix blog today, made with new Vintaj Products.
 

The Lovely Arching Trees Frame embossing folder made me think of a fairy tale forest and the bird and butterflies worked real well together with that theme. I did my gesso dry embossing technique on the background.

For more photos and details, head over to the Sizzix blog.

Thank you for stopping by!

Anna-Karin

Monday, February 10, 2014

Be True Art Journal Page

Hi everyone! We love stamps at Simon Says Stamp Monday Challenge blog, and this week the challenge is all about stamps.

One of my favourite and most used types of stamps are script and text stamps. I love to use them for backgrounds and on embellishment. They give great texture and I also like if you can spot a word here and there. Usually, I would only use one text stamp on a background, but on this journal page I used two. Because the size of the font is different and because I stamped them in different colours they work real well together. I worked in my Small Creative Journal, on a Distress Ink background.

One of the text stamps I used, is an ad for the New York School of Art, from a Wendy Vecchi set. It was stamped with orange ink, for a tone on tone effect. I held the cling stamp in my hand instead of mounting it on a block, for that random impression. 'Based on a true story' comes from a stamps saying 'this art is based on a true story'. I stamped it on sticky back canvas and cut it apart. The title letters were die cut with the Vintage Market Sizzlits die.

For the flowers, I used another favourite stamping technique of mine, watercolour stamping. I inked them up with Tumbled Glass and Salty Ocean for the flower, and Shabby Shutters, Crushed Olive and Peeled Paint markers for the stems. The stamp was misted with water about four times before stamping. The second text stamp is a train table from the Metro Art set. It was stamped with Archival Jet Black using both first and second generation stamping. Love the layered look of the faint text over the flower.

Speaking of favourite stamps, I had to use the bird stamp from Tim Holtz Mini Ornates set, one of my all time favourite stamps. It was also stamped with the watercolour technique. The hearts were die cut with Simon Says Stamp Mini Hearts set.

The grasses and stems were inked with Distress Markers, misted with water and stamps. I stamped another sentiment on a die cut sticky-back canvas circle.

I hope you will join us in our stamp challenge. As always, one random winner is drawn from the participants and will win a $50 gift voucher from Simon Says Stamp.

http://www.simonsaysstamp.com/servlet/StoreFront

Happy crafting!

Anna-Karin

Supplies:
Surface: Ranger Small Dylusions Creative Journal; Claudine Hellmuth Sticky-Back Canvas
Stamps: Stampers Anonymous Wendy Vecchi: Forever Art, Metro Art, New York Art, The Purpose of Art, Art Comforts; Stampers Anonymous Tim Holtz:  Mini Ornates
Ink: Distress Ink: Salty Ocean, Tumbled Glass, Shabby Shutters, Wild Honey, Spiced Marmalade; Ranger Archival Ink: Jet Black
Markers: Distress Markers: Shabby Shutters, Crushed Olive
Dies: Simon Says Stamp: Mini Hearts; Sizzix: Sized Circles, Vintage Market