Friday, May 31, 2024

Open Landscapes Journal Page

Hi crafters! It is the last day of May. This month went by so fast and saw nature transform very quickly, almost by the day. Today I have an art journal page to share celebrating nature.

Please note: this post has affiliate links, for which I receive a small percentage of sales generated by the link, at no extra cost to you.

Layers of ink - Open Landscapes Journal Mixed Media Tutorial by Anna-Karin Evaldsson.

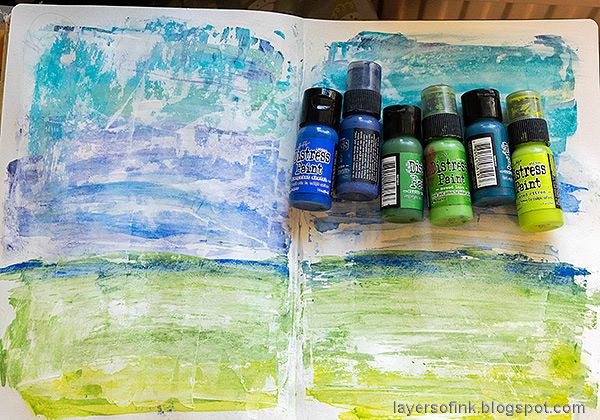
This started out as a page where I used up left-over paint and it ended up looking like an open landscape, almost (but not completely) by accident. It made me think of a clear, but windy, day, and an open landscape not too far from the sea. Somewhere in the distance the sea is hiding. I used Distress Paint, stencils and stamps to create the page. It was done on double page in my large Dylusions Journal. It is 11.5 x 16.5 in.

Layers of ink - Open Landscapes Journal Mixed Media Tutorial by Anna-Karin Evaldsson. Paint with acrylic paint.

The page had been coated with gesso already. I try to have a few pages in my journals already prepared with gesso. Using paints left over from another project, I applied the paint with a palette knife, scraping pretty much to cover all the surface with the fairly little paint that I had. 

Layers of ink - Open Landscapes Journal Mixed Media Tutorial by Anna-Karin Evaldsson. Stamp with Simon Says Stamp All Seasons Tree.

Stamp trees from Simon Says Stamp All Seasons Tree with green and brown Archival Inks.

Layers of ink - Open Landscapes Journal Mixed Media Tutorial by Anna-Karin Evaldsson. Apply paint through stencil.

Add clouds to the sky with Simon Says Stamp Clouds for Days and texture to the grass with Tim Holtz Burlap stencil.

Layers of ink - Open Landscapes Journal Mixed Media Tutorial by Anna-Karin Evaldsson.

Stamp birds in the sky with Hero Arts Sunset Over Waves set and the little dog with Potting Soil ink.

Layers of ink - Open Landscapes Journal Mixed Media Tutorial by Anna-Karin Evaldsson. Stamp sentiments.

Stamp a title with Tim Holtz Worn Text and a whole bunch of sentiments.

Layers of ink - Open Landscapes Journal Mixed Media Tutorial by Anna-Karin Evaldsson.

Apply texture paste through Tim's Bubble stencil with a palette knife.

Layers of ink - Open Landscapes Journal Mixed Media Tutorial by Anna-Karin Evaldsson. Add shading.

Add shading under the trees and to some areas of the sky. Apply green to the trees with a tooth pick. Add some grass around the trees with a black and a white pen.

Layers of ink - Open Landscapes Journal Mixed Media Tutorial by Anna-Karin Evaldsson.

Stamp Simon Says Stamp Crackle Background in the foreground with Potting Soil ink.

Layers of ink - Open Landscapes Journal Mixed Media Tutorial by Anna-Karin Evaldsson. Add green paint to the trees.

I also added flowers with acrylic markers. Here you can see the leaves of the trees better, applied sparingly with a tooth pick and with an acrylic marker. 

Layers of ink - Open Landscapes Journal Mixed Media Tutorial by Anna-Karin Evaldsson.

This sentiment comes from Tim Holtz Life Quotes.

Layers of ink - Open Landscapes Journal Mixed Media Tutorial by Anna-Karin Evaldsson.

Shades of green is my best description of this time of the year. The stamp is from Simon Says Stamp Forest Scenery. I also used a few strips of Design Tape Trims.

Layers of ink - Open Landscapes Journal Mixed Media Tutorial by Anna-Karin Evaldsson.

The texture in the sky acts as clouds, together with the stenciled dots and the stenciled clouds. The sentiment comes from Simon Says Stamp Document It.

Layers of ink - Open Landscapes Journal Mixed Media Tutorial by Anna-Karin Evaldsson.

Here is a better look at the wind-worn texture of the background.

Layers of ink - Open Landscapes Journal Mixed Media Tutorial by Anna-Karin Evaldsson.

Don't worry if the stamping isn't perfect, such as the one bird here, it will just look like it is further away.

Layers of ink - Open Landscapes Journal Mixed Media Tutorial by Anna-Karin Evaldsson.

If you want to, you can make the cloud patterns more pronounced by using darker colors, but I only wanted a hint of them. 

Layers of ink - Open Landscapes Journal Mixed Media Tutorial by Anna-Karin Evaldsson.

The title was stamped with Tim Holtz Worn Text using Jet Black Archival Ink.

Layers of ink - Open Landscapes Journal Mixed Media Tutorial by Anna-Karin Evaldsson.

The little dog is filled with joy at the sight of this big field.

Layers of ink - Open Landscapes Journal Mixed Media Tutorial by Anna-Karin Evaldsson.

Adding a little blue from the sky also to the grass brings the scene together. The blue might be puddles or it might be flowers.

Layers of ink - Open Landscapes Journal Mixed Media Tutorial by Anna-Karin Evaldsson.

I hope you enjoyed this project and that it inspired you to make a random background from left-over paint and ink and then use it.


Thank you so much for stopping by here today! 


Anna-Karin

Supplies:

* Please note: the links are affiliate links, for which I receive a small percentage of sales generated by the link, at no extra cost to you.


Tuesday, May 28, 2024

Color Wheel Art Journal Page

Hello crafters! Today I have a fun color wheel tutorial to share, made with Distress Paints in one of my art journals. 

Please note: this post has affiliate links, for which I receive a small percentage of sales generated by the link, at no extra cost to you.

Layers of ink - Color Wheel Art Journal Page by Anna-Karin Evaldsson.

I worked in my Small Creative Journal, but you can also work on different surfaces, or make a large card. The color wheel was made with Tim Holtz new Wheel stencil och painted with Distress Paints. This was a fun project to work on! I added stamped words and sentiments, die cut arrows, background stamping and splattering.

Layers of ink - Color Wheel Art Journal Page by Anna-Karin Evaldsson. Add paste through Tim Holtz Wheel stencil.

Start by coating a double page spread with gesso. Let dry and then apply texture paste through the Wheel stencil. Let the paste dry before you do the other side. Don't worry if there is a small gap in the center. 

Layers of ink - Color Wheel Art Journal Page by Anna-Karin Evaldsson. Paint with Distress Paint.

I used Distress Paint for the coloring, one color per wedge. Start with the outer rim and add more water to the mix to make continuously light shades as you come further into the wheel. 

Layers of ink - Color Wheel Art Journal Page by Anna-Karin Evaldsson. Paint the color wheel with acrylic paint.

Continue with the blue and green shades.


Stamp the title with Tim Holtz Worn Text and stamp sentiments, words, and birds here and there on the background.

Layers of ink - Color Wheel Art Journal Page by Anna-Karin Evaldsson. Stamp with Simon Says Stamp Stained Glass.

I wanted just a little bit of texture and stamped Simon Says Stamp Stained Glass Background with Shadow Grey ink here and there around the circle.

Layers of ink - Color Wheel Art Journal Page by Anna-Karin Evaldsson. Splatter with Tim Holtz Watercolor pencils.

After a day or two, I decided that I wanted a hint of color on the background too, and splattered with Distress Watercolor Pencils. Dip the pencil in water and flick a paint brush against it.

Layers of ink - Color Wheel Art Journal Page by Anna-Karin Evaldsson.

I added a border around the page with a black pen.

Layers of ink - Color Wheel Art Journal Page by Anna-Karin Evaldsson.

I used mainly the pure shades of paint, but in a few places, I mixed a little bit of one of the neighbouring colors into the paint.

Layers of ink - Color Wheel Art Journal Page by Anna-Karin Evaldsson. Stamp sentiments.

I needed the word 'in' in the title and cut the letters from one of Simon Says Stamp Sentiment Sheets. The arrows are die cut with Tim Holtz Sizzix Vault World Travel set.

Layers of ink - Color Wheel Art Journal Page by Anna-Karin Evaldsson.

Splatters are always fun. 

Layers of ink - Color Wheel Art Journal Page by Anna-Karin Evaldsson.

This is a great exercise to see how many shades you can get from one color paint, by just varying the amount of water. 'Magical' comes from Simon Says Stamp Forest Scenery.

Layers of ink - Color Wheel Art Journal Page by Anna-Karin Evaldsson.

And the greens.

Layers of ink - Color Wheel Art Journal Page by Anna-Karin Evaldsson.

The blues. I hope this project inspired you to make your own color wheel. You can also use other coloring media. 


Thank you so much for stopping by here today! 


Anna-Karin

Supplies:

* Please note: the links are affiliate links, for which I receive a small percentage of sales generated by the link, at no extra cost to you.


Monday, May 27, 2024

Pastel Textured Card

Hi friends! I hope you weekend was good! Here it was Mother's Day yesterday and I got two pretty Lego roses from the boys. 

Please note: this post has affiliate links, for which I receive a small percentage of sales generated by the link, at no extra cost to you.


This week we have a Lots of Texture theme at the Simon Says Stamp Monday Challenge Blog. I hope you will join us! I love texture and add a lot of it to most of my projects. There are so many different ways in which you can add texture. 

Don't miss the last project by our May guest designer Wanda Hentges.

Layers of ink - Pastel Textured Card Tutorial by Anna-Karin Evaldsson.

I made a card with more subtle, pastel textures, than what I normally do. Texture was added in different ways: to the background with water and stamping, by using papers with different textures, die cut textures, a ribbon and the texture from the old book paper. The background paper is Ranger's Specialty Stamping Paper which has a lovely matte texture with a very smooth finish.

Layers of ink - Pastel Textured Card Tutorial by Anna-Karin Evaldsson. Ink the paper with Distress Ink.

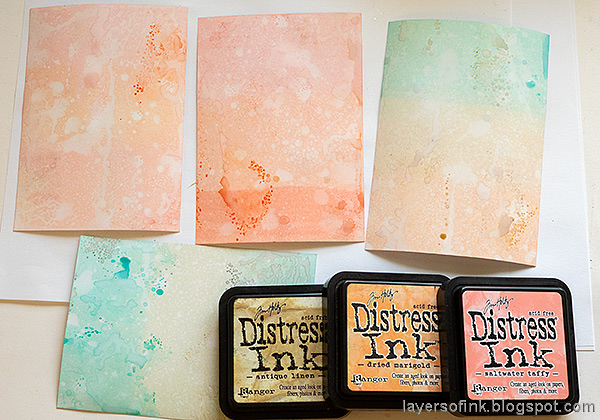
Start by dragging Distress Ink across the Specialty Stamping Paper. I made several different backgrounds. Smooth the ink out with an ink-blending tool.

Layers of ink - Pastel Textured Card Tutorial by Anna-Karin Evaldsson. Mist with water.

Mist with both fine mist and splatters. Dabb off with a paper towel to get this beautiful texture.

Layers of ink - Pastel Textured Card Tutorial by Anna-Karin Evaldsson.

Smear Distress Ink on a non-stick craft sheet and mist with water. Press the papers into the ink here and there. 

Layers of ink - Pastel Textured Card Tutorial by Anna-Karin Evaldsson. Stamp with Simon Says Stamp Old Letter Background.

When the paper is dry, stamp with Simon Says Stamp Old Letter Background and Latte Pawsitively Saturated ink. Aim for an uneven look.

Layers of ink - Pastel Textured Card Tutorial by Anna-Karin Evaldsson. Die cut roses with Vault Boutique.

The roses were die cut from left-over watercolor paper that had been colored with Paper Artsy Infusions Colored Stains. The doily was die cut from inky paper. The dies come from Tim Holtz Vault Boutique set.

Layers of ink - Pastel Textured Card Tutorial by Anna-Karin Evaldsson. Assemble the paper roses.

Assemble the flowers using the tweezers from Tim Holtz Shaping Tool Kit. Fold down the petal with the tweezer once the glue is dry.

Layers of ink - Pastel Textured Card Tutorial by Anna-Karin Evaldsson.

Stamp sentiments with Simon Says Stamp Pawsitively Saturated Cappuccino ink and cut into strips. Glue the roses to the background and add idea-ology Bouquet Findings flowers and pearls.

Layers of ink - Pastel Textured Card Tutorial by Anna-Karin Evaldsson. DIY paper roses.

The leaves were die cut from old book paper.

Layers of ink - Pastel Textured Card Tutorial by Anna-Karin Evaldsson.

Glue the flowers at an angle to add dimension.

Layers of ink - Pastel Textured Card Tutorial by Anna-Karin Evaldsson.

Ink the edges and mount on kraft, peach and cream papers. Here you can see the background texture better, all those little dots and splotches of water and ink.

Layers of ink - Pastel Textured Card Tutorial by Anna-Karin Evaldsson.

The second application of ink and water will give interesting and often unexpected results. 

Join us this week in our Lots of Texture challenge! You have a chance to win a $25 gift voucher to do some fun shopping at Simon Says Stamp. You have until Monday 8am Ohio time. 1pm UK time, 2 pm CET to join in.


Do you use Instagram? If so please add #sssmchallenge so we can see your entries there too.


Thank you so much for stopping by here today! 

Happy crafting!

Anna-Karin

Supplies:

* Please note: the links are affiliate links, for which I receive a small percentage of sales generated by the link, at no extra cost to you.