
Hello crafters! Today I have a Lily of the Valley tag to share made with Simon Says Stamp new Sunny Vibes release.
Please note: this post has affiliate links, for which I receive a small percentage of sales generated by the link, at no extra cost to you.

Sunny Vibes is a big release filled with dies, stamps, stencils, paper products and tools, perfect for summer time crafting.

I love Lily of the Valley flowers and particularly when areas of the forest are filled with them. I made a tag with shades of green, a bit of blue and three plants. The hill for the flowers was made with the Happy Rainbow stencil set, also from the Sunny Vibes release.

Start by die cutting three Lily Of the Valley Stems from watercolor paper.
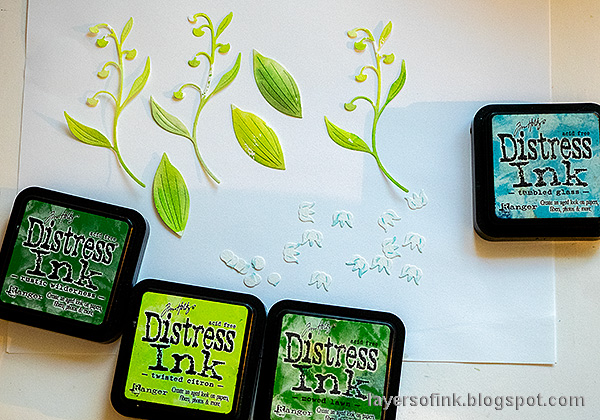
Smear green shades of Distress Ink on a non-stick craft sheet, mist with water and press the stems into the ink. Watercolor the flowers with just a tiny bit of Tumbled Glass Distress Ink.

Let dry and repeat until you are happy with the look. Add a tiny bit of Twisted Citron Distress Oxide Ink to the last layer.

Shape the flowers and buds with Tim Holtz Shaping Kit on a Simon Says Stamp Perfect Craft Pad.

Ink a heavystock tag with Distress Ink.

Drop some water on the tag.

When dry, ink through one of the Happy Rainbows stencils with Unchartered Mariner och Rustic Wilderness. Add some of the dots to the top of the tag too. This is a very versatile stencil set. The stencils are 6x9 in.

Ink the edges of the tag.

For a little more texture, stamp with Simon Says Stamp Stained Glass Background.

Shape the larger leaves too and then glue the flowers to the tag. Use foam tape for some of the flowers.

Dye May Arts Wrinkled Faux Silk Ribbon with Distress Ink.

This Lilly Of the Valley stem die creates such sweet flowers. You can add more buds if you want too, or leave them out all together.

The sentiments come from the Simon Says Stamp Beachcombing set, also from Sunny Vibes. They were white embossed on Simon Says Stamp vellum.

The Distress Oxide adds an interesting effect to the leaves. Even though it was Twisted Citron, it created an opaque blue color.

I hope you enjoyed this tutorial! You can of course make a card instead of a tag. Don't miss the inspiration gallery for the Sunny Vibes release.

Thank you so much for stopping by here today! See you again tomorrow!
Anna-Karin
Supplies:
* Please note: the links are affiliate links, for which I receive a small percentage of sales generated by the link, at no extra cost to you.
* Please note: the links are affiliate links, for which I receive a small percentage of sales generated by the link, at no extra cost to you.
No comments:
Post a Comment
Thank you so much for leaving a comment! Happy Crafting!