Monday, April 20, 2020

Dinosaur Slider Card Tutorial

Hello friends. I hope you are well and healthy. We had a quiet weekend. The boys helped me spring wash the windows, which always makes such a difference. And there are now butterflies flying around. Mysteriously all my patterned duct tape disappeared and ended up as an art project instead. Tape is one of the favorite crafting products for the boys.



This week at the Simon Says Stamp Monday Challenge Blog we have a Create A Scene challenge. Fun! A scene can be so many different things and I am looking forward to seeing all the submissions. Don't miss the beautiful project by our April guest designer Tracey Sabella, with her blog Garden of Grace.

Layers of ink - Dinosaur Slider Card Tutorial by Anna-Karin Evaldsson.

I love to make little scenes, either in the form of scenic stamping, or using a variety of stamps, dies and stencils. For today, I decided to make a scene with a cute dinosaur in a green jungle setting. It's a slider card, so the dinosaur can move across the scene. Leo immediately claimed the card as his, which was my plan all along, since he loves dinosaurs. I used dies by Simon Says Stamp, watercolor paper and Dina Wakley's Scribble Sticks, which are very versatile and easy to work with.


Here's a little video where you can see the slider effects. Step-by-step photos follow below.

Layers of ink - Dinosaur Slider Card Tutorial by Anna-Karin Evaldsson. Picture book Brontosaurus.

Start by die cutting the Picture Book Brontosaurus from watercolor paper.
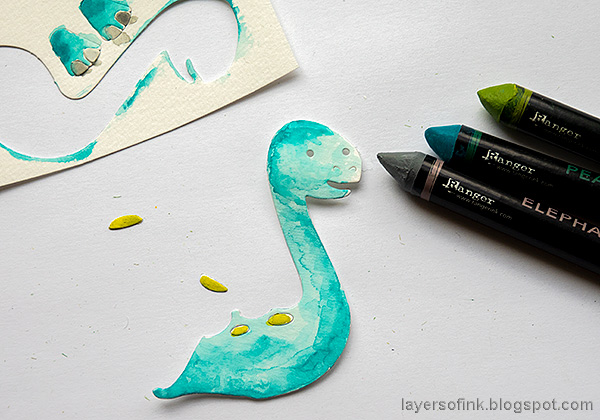
Layers of ink - Dinosaur Slider Card Tutorial by Anna-Karin Evaldsson. Color with Scribble Sticks.

Color her by picking up color directly from a Scribble Stick with a paint brush.

Layers of ink - Dinosaur Slider Card Tutorial by Anna-Karin Evaldsson.

Die cut the dinosaur again, but this time using either thicker paper, or adjusting the die cutting sandwich, so that it doesn't cut through completely. You can also use the die as a template and cut out the second dinosaur with a pair of scissors. Color the eyes. Then glue the colored dinosaur on top. The purpose is to create a stronger dino and to have somewhere to glue the dots on the back to.
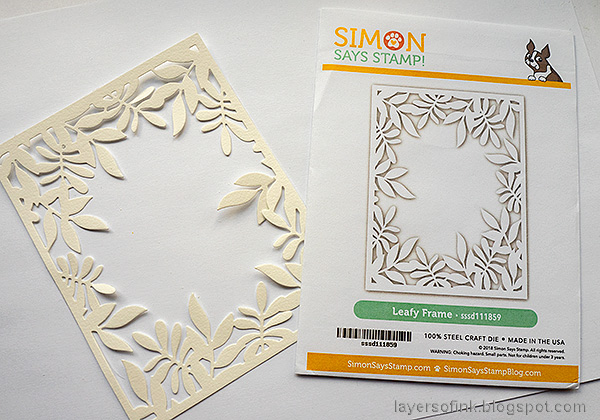
Layers of ink - Dinosaur Slider Card Tutorial by Anna-Karin Evaldsson. Leafy Frame.

Die cut the Leafy Frame from watercolor paper.

Layers of ink - Dinosaur Slider Card Tutorial by Anna-Karin Evaldsson.

Use three shades of green Scribble Sticks and color the leaves. I used both the Scribble Sticks 1 and the Scribble Sticks 2 sets.

Layers of ink - Dinosaur Slider Card Tutorial by Anna-Karin Evaldsson.

Use a paint brush and clean water to turn it into watercolor and blend the colors.

Layers of ink - Dinosaur Slider Card Tutorial by Anna-Karin Evaldsson.

Dip a Scribble Stick in water and then flick a paint brush against it to create splatters. I love this technique. You get a different effect depending on if the background is dry or still wet. I used a combination of both.

Layers of ink - Dinosaur Slider Card Tutorial by Anna-Karin Evaldsson.

Die cut the Woodgrain Block three times from watercolor paper.

Layers of ink - Dinosaur Slider Card Tutorial by Anna-Karin Evaldsson. Woodgrain blocks.

Color in the same way as the Leafy Frame, but add brown and splatter even more pigment.

Layers of ink - Dinosaur Slider Card Tutorial by Anna-Karin Evaldsson.

When dry, I mixed an ice cream stick scoop of Perfect Pearls Confetti White into water to make my own glimmer mist and sprayed on the panels.
Layers of ink - Dinosaur Slider Card Tutorial by Anna-Karin Evaldsson.

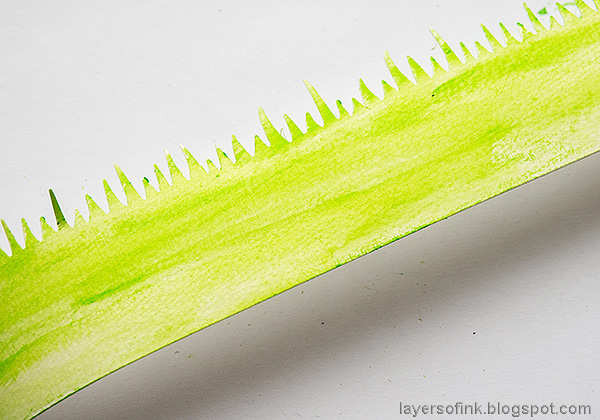
Die cut a watercolor strip with one of the Grassy Edges dies. Color with a light green Scribble Stick. It was at this stage that I decided to make a slider card.

Layers of ink - Dinosaur Slider Card Tutorial by Anna-Karin Evaldsson.

I simply cut a slot in the grass, measuring so that it would be approximately where the opening in the Leafy Frame would be. As you can see, I cut a bit too far on the one end. Then I cut a little circle and added a foam strip to it. You can work directly on the long slider tag instead, but I hadn't yet decided how to do with that part.
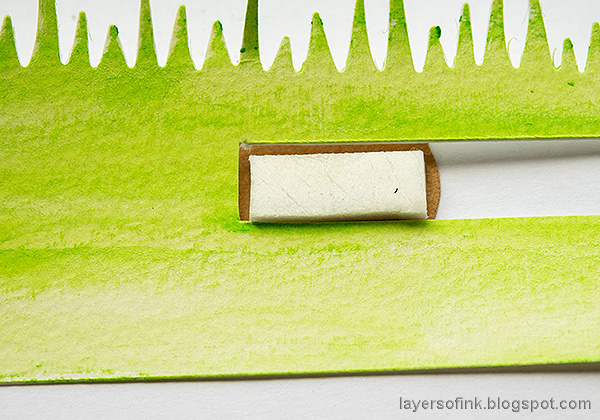
Layers of ink - Dinosaur Slider Card Tutorial by Anna-Karin Evaldsson.

Place the circle at the back of the slot and then adhere the dinosaur to the foam tape.

Layers of ink - Dinosaur Slider Card Tutorial by Anna-Karin Evaldsson.

I made a thin tag and colored it in the same shade, to use as a pull. You can also use acetate.

Layers of ink - Dinosaur Slider Card Tutorial by Anna-Karin Evaldsson.

Glue to the circle, or use the tag as a base instead of the circle, which is quicker.

Layers of ink - Dinosaur Slider Card Tutorial by Anna-Karin Evaldsson.

The Leafy Frame was adhered with foam tape.

Layers of ink - Dinosaur Slider Card Tutorial by Anna-Karin Evaldsson.

I wanted a little bit of texture for the dinosaur. Let the first layer of Scribble Sticks dry and then add more in some areas.

Layers of ink - Dinosaur Slider Card Tutorial by Anna-Karin Evaldsson.

If the dino gets a little entangled into the leaves, you can easily free her.

Layers of ink - Dinosaur Slider Card Tutorial by Anna-Karin Evaldsson.

I added an eyelet and a string to the pull tag.

Layers of ink - Dinosaur Slider Card Tutorial by Anna-Karin Evaldsson.

The splattered texture on the leaves is my favorite part of this project.

Layers of ink - Dinosaur Slider Card Tutorial by Anna-Karin Evaldsson. Perfect Pearls shimmer.

Here you can see the glimmer of the background better.

Layers of ink - Dinosaur Slider Card Tutorial by Anna-Karin Evaldsson.

You can also add a sentiment to the opening in the slot.


If you don't want the background to show through, add another piece of green paper behind it.


I hope you will join us this week in our Create A Scene challenge. As always, you have a chance to win a $50 gift voucher to do some fun shopping at Simon Says Stamp. You have until next Monday 8am Ohio time. 1pm UK time, 2 pm CET to join in.

As you may know, the Simon Says Stamp Store is accepting new orders, but have longer shipping times for the moment due to the coronavirus. With this in mind we have made the difficult decision to suspend the $50 voucher for this challenge.

We know that many people are staying safe at home and we would love it if you would continue to enter the challenges and have fun! We are all in this together!


Don't forget to follow Simon Says Stamp on Instagram, they post great stuff daily. We also have a new hashtag #SSSUnitedWeCraft


Do you use Instagram? If so please add #sssmchallenge so we can see your entries there too.


Thank you so much for taking the time to visit my blog today!  

Happy crafting!

Anna-Karin

Supplies:

* Please note: the links are affiliate links, for which I receive a small percentage of sales generated by the link, at no extra cost to you.


Friday, April 17, 2020

Vellum and Rose Tag

Hello friends! I hope you are well. Today I have a sweet tag tutorial to share, with a mix of easy techniques, which can easily be used on a card, art journal or scrapbooking layout instead.

Layers of ink - Vellum and Rose Tag Tutorial by Anna-Karin Evaldsson.

This is one of those projects that I did without much of a plan, just starting with a tag and adding elements and techniques. I wanted a bright and happy project, to brighten up these hard times. For a fun extra detail, I die cut a vellum overlay. I can still remember the first time I saw vellum, on a printed invite very long ago and I thought it was such an interesting surface.

Layers of ink - Vellum and Rose Tag Tutorial by Anna-Karin Evaldsson. Paint with Distress Paint.

I made the tag a couple of weeks ago when I had left-over paint. It was first coated with gesso and marks were made into the gesso. When dry, blue and yellow Distress Paints were painted on the tag. I misted the tag heavily from the top and angled it to create a flow.

Layers of ink - Vellum and Rose Tag Tutorial by Anna-Karin Evaldsson. Apply Rock Candy crackle paint.

Coat the entire tag with Clear Rock Candy Distress Crackle Paint. Vary the thickness of the paint to get differently sized cracks. 

Layers of ink - Vellum and Rose Tag Tutorial by Anna-Karin Evaldsson.

When dry, I added some white paint to the cracks (I forgot to take a photo of that step).
 Layers of ink - Vellum and Rose Tag Tutorial by Anna-Karin Evaldsson. Die cut vellum.

Die cut the Poppy Stamps Confetti Heart Plate from vellum. Keep the hearts for another project.

Layers of ink - Vellum and Rose Tag Tutorial by Anna-Karin Evaldsson. Scribble Rose Trio.

Die cut the Memory Box Scribble Rose Trio from watercolor paper and the mat from old book paper. Color the roses with watercolor pencils and paint with water to dissolve them.

Layers of ink - Vellum and Rose Tag Tutorial by Anna-Karin Evaldsson.

Die cut Memory Box Kindness Cursive Script from watercolor paper. Smear Blueprint Sketch ink on a craft sheet, mist with water and press the word repeatedly into the ink.

Layers of ink - Vellum and Rose Tag Tutorial by Anna-Karin Evaldsson. Glitter butterflies.

Adhere the vellum with staples and trim off the edges. The Simon Says Stamp Butterfly Drift was die cut from white SSS glittery paper. I also used some Field Notes Snippets ephemera and Clippings Stickers.

Layers of ink - Vellum and Rose Tag Tutorial by Anna-Karin Evaldsson.

Glue the roses to the old book paper. If you want a more distressed look, ink the edges of the book paper. I wanted a light look here, so I skipped that. Add mummy cloth under the roses.

Layers of ink - Vellum and Rose Tag Tutorial by Anna-Karin Evaldsson. Vellum overlay.

The bottom edge of the vellum was torn.

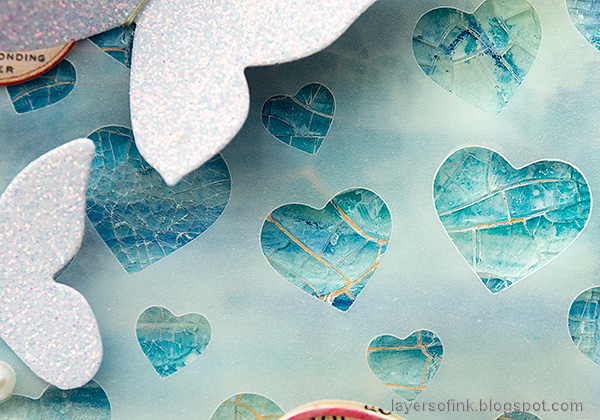
Layers of ink - Vellum and Rose Tag Tutorial by Anna-Karin Evaldsson. Crackle hearts.

I really like the combination of the matte vellum and the shiny crackle hearts. Rock Candy is glossy, which you might not see so well on the photos.

Layers of ink - Vellum and Rose Tag Tutorial by Anna-Karin Evaldsson.

I die cut kindness one more time from SSS White Diamond glimmery cardstock, so that the word would stand out better from the background.

Layers of ink - Vellum and Rose Tag Tutorial by Anna-Karin Evaldsson.

Add some pearls and your tag or card is done. For another project with the Scribble Rose Trio die, check out my Rose Mixed media tag.

I hope you will have a good weekend! Take care of yourself and stay safe. 


Thank you so much for taking the time to visit my blog today!  

Happy crafting!

Anna-Karin

Supplies:

* Please note: the links are affiliate links, for which I receive a small percentage of sales generated by the link, at no extra cost to you.


Tuesday, April 14, 2020

Tiny Books Tutorial

Hello friends! I hope you are well Today I have four little books to share. They could be used as little notebooks or sketchbooks, or you could add photos to them. I like having some notebooks around that I can give away as gifts. Kids would also love to make these.

Layers of ink - DIY Tiny Books Tutorial by Anna-Karin Evaldsson. With Eileen Hull Tiny Book die.

The books were made with Eileen Hull's Tiny Book die and this week the Eileen Hull Inspiration Team are sharing projects made with the Tiny Book and Tiny Book Case dies. I only used the former of the two. Some patterned papers are too gorgeous to cover up and those papers make wonderful notebook covers. I used Cosmos papers by Stamperia. The finished book measures 3x2.4 in.

Layers of ink - DIY Tiny Books Tutorial by Anna-Karin Evaldsson. With Eileen Hull Tiny Book die.

Start by die cutting four Tiny Books from mat board. The die also includes the pieces shown above, as well as an oval. It's a normal Bigz die, so you get a lot of different shapes. I ended up not using the small pieces, but I really like them, especially the key.

Layers of ink - DIY Tiny Books Tutorial by Anna-Karin Evaldsson. Pick patterned papers.

Choose four papers for the front covers.

Layers of ink - DIY Tiny Books Tutorial by Anna-Karin Evaldsson. Add canvas to the spine.

Glue a strip of natural sticky-back canvas to the spine. If you want to you can cut it larger so that it covers the joints completely. It is probably the better method, but I happened to have some strips of canvas with were just wide enough, so I decided to use them.

Layers of ink - DIY Tiny Books Tutorial by Anna-Karin Evaldsson. Glue papers to the covers.

Glue the papers to the cover with matte medium. Leave to dry under a heavy book.

Layers of ink - DIY Tiny Books Tutorial by Anna-Karin Evaldsson. With Eileen Hull Tiny Book die.

Sand and ink the edges.

Layers of ink - DIY Tiny Books Tutorial by Anna-Karin Evaldsson. Bind the book.

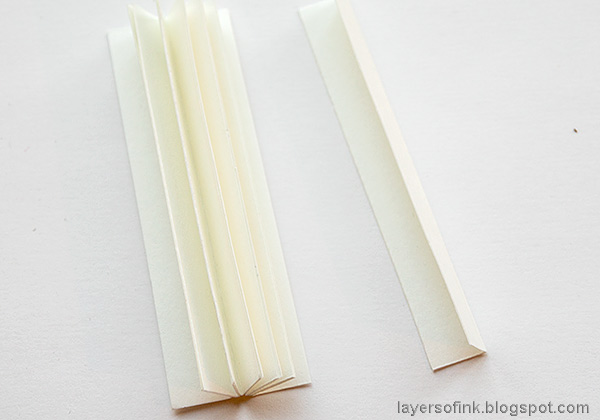
You can do the inside pages in many different ways. I cut strips of 0.8 in (20 mm) and folded in half. Use tape to adhere them together one at a time as shown here. Depending on the thickness of your paper, you can use 7 or 8, maybe more if you use thinner paper.

Layers of ink - DIY Tiny Books Tutorial by Anna-Karin Evaldsson. Add pages to the book.

Cut pages and fold in half, adhere to the right hand flaps.

Layers of ink - DIY Tiny Books Tutorial by Anna-Karin Evaldsson. With Eileen Hull Tiny Book die.

You can attach the pages in two ways. Here, I adhered tape to both flaps at the ends and adhered them to the cover on each side of the spine. This makes for a more traditional looking book, but all the pages might not fold down completely flat.

Layers of ink - DIY Tiny Books Tutorial by Anna-Karin Evaldsson. With Eileen Hull Tiny Book die.

An alternative is to add tape only to the back flap, and possibly also to the back page. This gives you more flexible pages that lie flatter.

Layers of ink - DIY Tiny Books Tutorial by Anna-Karin Evaldsson. With Eileen Hull Tiny Book die. Four tiny books.

Don't use too many pages since that might damage the spine. I made that mistake with my first book, which you can see here (the second book from the left). The book still holds together well, but it doesn't look as nice. I will keep it for myself. I added Clipping Stickers to the spine of the books, picking phrases that fit with the images.

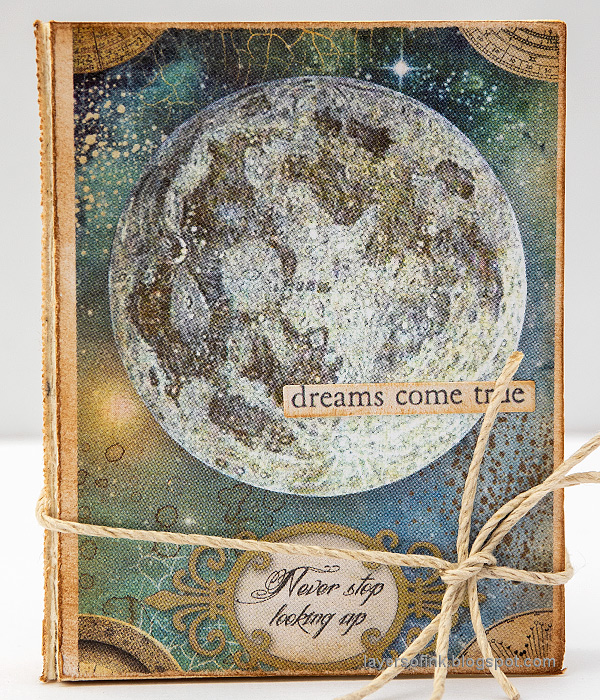
Layers of ink - DIY Tiny Books Tutorial by Anna-Karin Evaldsson. Tiny moon book.

Add another sentiment to the front of the book. The books are tied with strings to keep them closed. You can do the closure mechanism in many different ways. I decided to keep it simple.

Layers of ink - DIY Tiny Books Tutorial by Anna-Karin Evaldsson. Tiny bird book.

Here's the cover of the book that I am keeping for myself. The sentiment on the spine is 'everyday words'.

Layers of ink - DIY Tiny Books Tutorial by Anna-Karin Evaldsson. Tiny owl book.


I love the sentiment combination on this book. On the spine, it says 'dreams of beauty'.

Layers of ink - DIY Tiny Books Tutorial by Anna-Karin Evaldsson. Tiny wolf book.

This wonderful wolf image was the focal point on the Magical Nature Wall-hanging that I made recently. You might also spot both the bird and the owl on that project.

Layers of ink - DIY Tiny Books Tutorial by Anna-Karin Evaldsson. With Eileen Hull Tiny Book die.

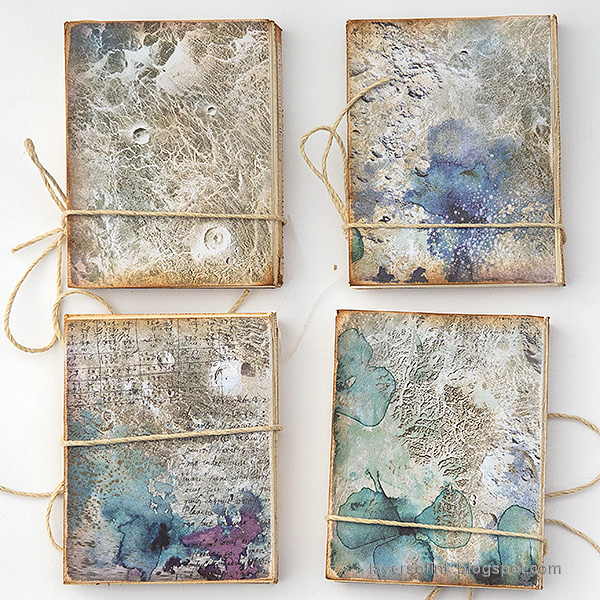
For the back, I used one of the textured papers from the Cosmos paper pad. You can of course make them more elaborate if you want to.

Layers of ink - DIY Tiny Books Tutorial by Anna-Karin Evaldsson. With Eileen Hull Tiny Book die.

Here you can see all four little books together.


Thank you so much for taking the time to visit my blog today!  

Happy crafting!

Anna-Karin

Supplies:

* Please note: the links are affiliate links, for which I receive a small percentage of sales generated by the link, at no extra cost to you.

Die: Eileen Hull Sizzix Tiny Book