
Hello friends! I hope you are well. Today I have a sweet tag tutorial to share, with a mix of easy techniques, which can easily be used on a card, art journal or scrapbooking layout instead.

This is one of those projects that I did without much of a plan, just starting with a tag and adding elements and techniques. I wanted a bright and happy project, to brighten up these hard times. For a fun extra detail, I die cut a vellum overlay. I can still remember the first time I saw vellum, on a printed invite very long ago and I thought it was such an interesting surface.

I made the tag a couple of weeks ago when I had left-over paint. It was first coated with gesso and marks were made into the gesso. When dry, blue and yellow Distress Paints were painted on the tag. I misted the tag heavily from the top and angled it to create a flow.

Coat the entire tag with Clear Rock Candy Distress Crackle Paint. Vary the thickness of the paint to get differently sized cracks.
When dry, I added some white paint to the cracks (I forgot to take a photo of that step).

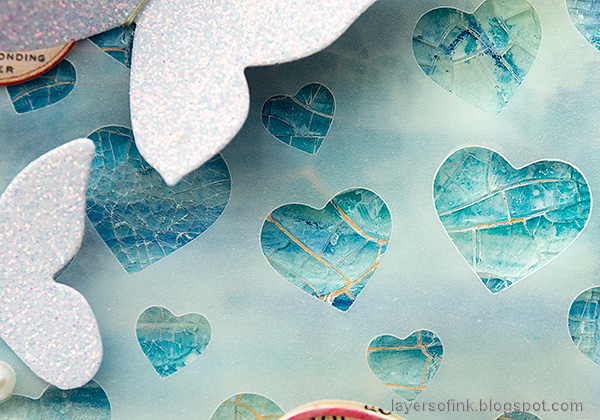
Die cut the Poppy Stamps Confetti Heart Plate from vellum. Keep the hearts for another project.

Die cut the Memory Box Scribble Rose Trio from watercolor paper and the mat from old book paper. Color the roses with watercolor pencils and paint with water to dissolve them.

Die cut Memory Box Kindness Cursive Script from watercolor paper. Smear Blueprint Sketch ink on a craft sheet, mist with water and press the word repeatedly into the ink.

Adhere the vellum with staples and trim off the edges. The Simon Says Stamp Butterfly Drift was die cut from white SSS glittery paper. I also used some Field Notes Snippets ephemera and Clippings Stickers.

Glue the roses to the old book paper. If you want a more distressed look, ink the edges of the book paper. I wanted a light look here, so I skipped that. Add mummy cloth under the roses.

The bottom edge of the vellum was torn.

I really like the combination of the matte vellum and the shiny crackle hearts. Rock Candy is glossy, which you might not see so well on the photos.

I die cut kindness one more time from SSS White Diamond glimmery cardstock, so that the word would stand out better from the background.

Add some pearls and your tag or card is done. For another project with the Scribble Rose Trio die, check out my Rose Mixed media tag.
I hope you will have a good weekend! Take care of yourself and stay safe.

Thank you so much for taking the time to visit my blog today!
Happy crafting!
Anna-Karin
Supplies:
* Please note: the links are affiliate links, for which I receive a small percentage of sales generated by the link, at no extra cost to you.
* Please note: the links are affiliate links, for which I receive a small percentage of sales generated by the link, at no extra cost to you.
Gorgeous tag! I like the lightness of it!
ReplyDelete