Hi everyone! Today I have a step-by-step
Sizzix tutorial to share of a chest of drawers, which is made with
Eileen Hull's Candy Drawer Box Scoreboards die. I also used the
Borders & Hydrangeas Bigz die and several Sizzlits dies which are part of the same
Sweet Treats line. I had so much fun making this and I am using it to store some of the small embellishments that I reach for often. It works great for storing buttons, charms, brads, jewelry and a lot of other little things.
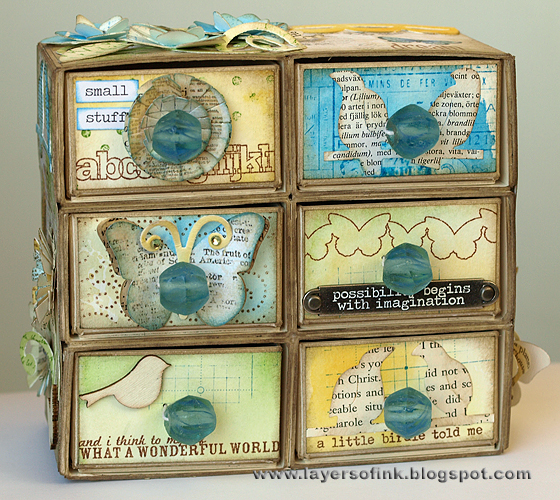
The finished project:
Here's how I did this:
These are the basic pieces to make one drawer box. Die-cut six of each from
cream mat board, you need the extended cutting pads to cut this die. You can use white mat board too, but I thought the undecorated inside of the drawers looked nicer in cream than in white.
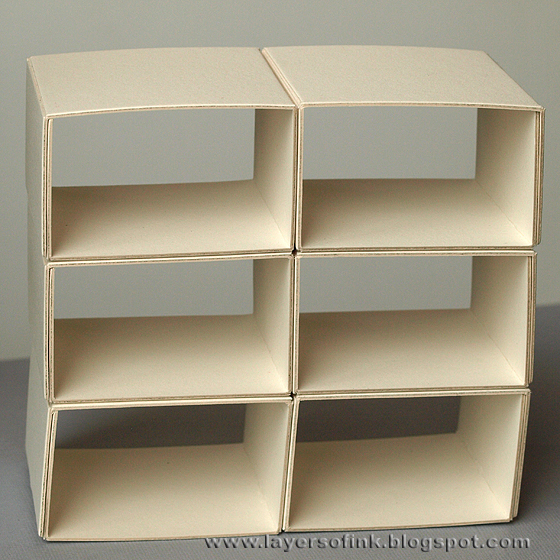
First, we are going to build the structure of the chest. Place strong tape (I used Ranger's Wonder Tape) on the notched flap, fold along the score lines (which is easy since the Scoreboards dies both cuts and scores), press together. Here you see one example showing where to place the tape and one of a finished unit. Assemble all six rectangles.
Use the same strong double-sided tape between all the units. It is easiest to do the two in the bottom layer first and then build the others on top. Place the 'closure side' (where you connected the two sides of each separate unit together) on the outside - then all the joints consist of two layers of mat board and are are equally thick, giving an even appearance to the chest. Make sure you line them up neatly and press them together.
Ink all the edges of the main structure and the front of all the drawer units. Don't assemble the drawers yet, I just folded one up and placed it in the unit to show where to ink.
Measure the sides and the top of the unit and cut patterned paper to fit.
I wanted to inky and did three different watercolour backgrounds with Distress Inks, coordinating with the colours in the patterned paper. Just smear the inks on your craft sheet, mist with water and dip/drag the paper into the ink. Watercolour paper works the best, but other papers, such as manila cardstock can also give a great result.
Cut two rectangles of each colour to fit the front of the drawers. I stamped them with some background and sentiment stamps using Archival Ink Coffee, Salty Oceans and Mowed Lawn Distress Inks. Keep in mind that there will be a handle in the centre of each, so don't stamp anything important there.
Die-cut a bunch of butterflies, flowers, leaves and flourishes from the remaining inky papers and from some old book and dictionary papers with the
Birds & Butterflies,
Sweet Treats For You and
Borders & Hydrangeas dies. Those great birds come from Karen Burniston's new
Birds on a Wire die. Stamp some of the shapes with a text stamp and Archival Coffee ink.
Ink the edges of the papers for the front of the drawers and embellish them. Again, keep in mind where the handle will go. The flower was layered and ruffled a bit.
The other three drawers. The butterfly consists of three layers and is only attached at the centre, to create dimension in the wings.
First, I was planning to use buttons as handles, but I wanted something which would be easier to grab, so I went searching through a bead box and found these fun beads made from glass marbles (we used to call these specific marbles 'spaghetti marbles' as children, because of the spaghetti like strings of colour inside them). Make two holes in the mat board with a needle tool.
Thread some thin twine through a needle. The twine is strong, so will handle all the use this little unit will get.
Make a strong knot on the inside and cut the threads.
Place strong double-sided tape as shown. I don't think the small, thin pieces I added are necessary, but I rather wanted to use too much than too little adhesive since I am planning to use these drawers a lot.
Time to assemble all the drawers. Fold them along the score lines and first adhere the side flap shown on the photo.
Next, adhere the base of the drawers, lining them up neatly.
Originally, I wasn't planning to add a back piece to the chest, but I thought the drawers fell through too easily, so I cut a piece of mat board the right size, rounded the corners, inked it and attached it with Glossy Accents. I placed a book on top and left it for a while so that it would stick down well.
Then I cut a piece of patterned paper to cover the back. I liked the finished look the back piece gave to the project.
Here's a view from the other side.
Decorate the side panels and ink the edges. I added a few stamped words with Coffee ink, before adhering the papers to the chest.
Layer several flower die cuts together and ruffle the fringes a bit.
The other side panel. I love the sweet butterfly die. As on the drawer, I layered three butterflies together and only attached them in the centre, so it looks like it is flying. The sentiment was stamped with Salty Oceans Distress Ink.
Shape the Hydrangea flowers a bit, layer them together and put a rhinestone in the centre, add some leaves and swirls around them.
A view of the finished project with three of the drawers open.
I hope you enjoyed this tutorial!!
Thank you so much for looking!
Anna-Karin
Supplies:
Dies:
Scoreboards Candy Drawer Box,
Borders & Hydrangeas Bigz,
Birds & Butterflies Sizzlits,
Sweet Treats For You Sizzlits,
Birds on a Wire Sizzlits,
Kites Framelits set,
cream mat board
Stamps: Hero Arts: Wonderful World 331068, Calico Borders 331074, Please Note 331072, Grid Pattern ST503,Magical Background CG211, Painted People Background CG402, Cling Dots CG139; Stamper's Anonymous Classics #5, Newspaper Scraps
Ink: Distress Ink: Salty Oceans, Mowed Lawn, Shabby Shutters, Wild Honey, Scattered Straw, Frayed Burlap, Tumbled Glass; Ranger Archival Ink Coffee
Papers: BoBunny patterned paper; watercolour paper, old book paper and dictionary paper
Other: Ranger Wonder Tape, Glossy Accents; Tim Holtz Idea-ology chit chat stickers and word bands; Studio Calico wood veneer shapes; beads; Kaisercraft rhinestones; twine
Tools: BigShot with extended cutting pads; needle tool
;


This is really really cute!! Love how you sewed the bead throw for a drawer pull-genius! Very cool :)
ReplyDeleteThis is incredible, Anna-Karen!! You are amazingly talented. I love the way you embellished this!!
ReplyDeleteOMG Anna- Karin! How do you come up with something so amazing EVERY TIME! This is so pretty- I love everything about it- all the little touches, the soft colors, cool techniques- plus it's a great tutorial and very easy to follow. Thank you my friend!
ReplyDeleteOMG Anna- Karin! How do you come up with something so amazing EVERY TIME! This is so pretty- I love everything about it- all the little touches plus it's a great tutorial!
ReplyDeleteThis is a feast for the eyes! I love it!
ReplyDeleteBaie mooi Anna-Karin! ... ek weet nou ook eindelik hoe ek my knoppies van my nuwe caroussel se laatjies gaan maak krale met garing vassit!
ReplyDeletepsssst... My ma kom môre-oggend aan op Schiphol vir 'n 5 weke vakansie in Nederland! Sy is 85, bly in Pretoria!
These are gorgeous, again such beautiful detailed work.
ReplyDeleteWhat a work of beauty!
ReplyDeleteSuch a wonderful project - all your watercolour papers are utterly lovely, and create such beautiful backgrounds and embellishments alongside the patterned papers... I'm in love with it!
ReplyDeleteAlison x
Wow, this is really STUNNING!
ReplyDeleteVraiment très mignon ! J'adore !
ReplyDeleteReally Awesome.
ReplyDeleteThis is so sweet. I have a different box die (match box) that we used as draws too. Love all your inking and the use of dictionary pages. And your choice of drawer pull using beads is an idea to use up our stash. Fabulous!
ReplyDeleteThis is so lovely, thanks for the tutorial!
ReplyDeleteWOW! This is simply amazing! I a deeply impressed!
ReplyDeleteI love this! Wonderful tutorial! I pinned. https://www.pinterest.com/pin/415386765611743428/
ReplyDelete