Monday, June 9, 2014

Bold Birds Art Journal Tutorial

Hello everyone!! Monday morning and a new Simon Says Stamp Monday Challenge. One of my favourite things with our challenges is the wide variety of themes, every week there is something new. This week we are focusing on paint. I did a tutorial for an art journal page, but you can use the techniques on pretty much anything.

Layers of ink - Bold Birds Art Journal Tutorial by Anna-Karin, with Scribbly Birds stamps by Dina Wakley, Ranger Distress Paints.
I used lovely new Dina Wakley products on this page, and had planned to use her paints too, but they are still in a parcel making their way to me. Instead I used Distress Paint. Ever since I set eyes on the Scribbly Birds stamp set, I knew I was going use it a lot. I am sure you know that I like birds. On this page, I used paint in a number of ways, I turned it into a tutorial.

Layers of ink - Bold Birds Art Journal Tutorial by Anna-Karin, with Scribbly Birds stamps by Dina Wakley, Ranger Distress Paints.
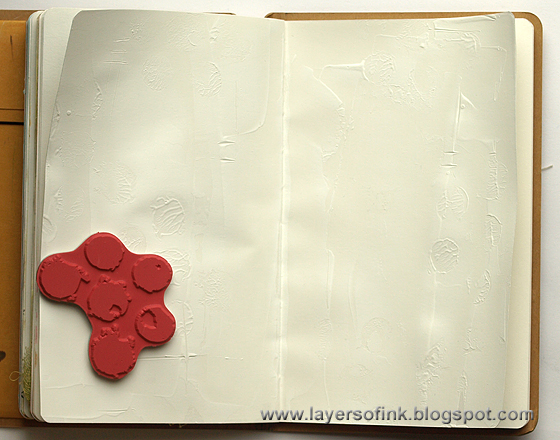
Start by covering the pages with gesso using a palette knife. I pressed a circle stamp into the gesso here and there. Always remember to immediately clean your stamp after using it with acrylic paint or gesso. I also dragged some lines through the gesso with a Ranger scraper tool.

Layers of ink - Bold Birds Art Journal Tutorial by Anna-Karin, with Scribbly Birds stamps by Dina Wakley, Ranger Distress Paints.
When the gesso is dry, paint the page with watered-down Distress Paint, adding just a little bit of water to the paint. I didn't cover the whole page, wanting to leave some of it white. Now you can see the texture of the stamping and scraping clearer.

Layers of ink - Bold Birds Art Journal Tutorial by Anna-Karin, with Scribbly Birds stamps by Dina Wakley, Ranger Distress Paints.
When the paint was dry, I used a stencil and Black Soot paint to add some flying birds to the sky.

Layers of ink - Bold Birds Art Journal Tutorial by Anna-Karin, with Scribbly Birds stamps by Dina Wakley, Ranger Distress Paints.
To be able to play around with the placement of the birds, I first stamped them and some hearts on tissue paper, tore them out and moved them over the page until I was happy. They were adhered with glossy multi medium. The tissue paper practically disappears. I've been using this technique a lot lately, it works great on slightly textured surfaces. My Small Creative Journal is also a little bulky now on the one side, making it harder to get good stamped impressions. Add a layer of gloss multi medium on top of the birds too.

Layers of ink - Bold Birds Art Journal Tutorial by Anna-Karin, with Scribbly Birds stamps by Dina Wakley, Ranger Distress Paints.
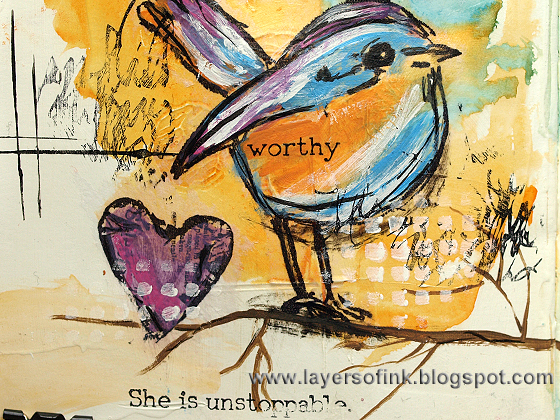
I painted branches for the birds, using Gathered Twigs and Walnut Stain paint. Sentiments were stamped on the page. The purple sentiment was sponged through a stencil using Dusty Concord paint. I painted the birds with Salty Ocean, Spiced Marmalade, Dusty Concord, Picked Raspberry and Picket Fence, letting the paint dry in between layers. White paint was sponged through the Plastic Canvas stencil to add more texture. I also added some lines with my Ranger scraper tool and Black Soot. 

Layers of ink - Bold Birds Art Journal Tutorial by Anna-Karin, with Scribbly Birds stamps by Dina Wakley, Ranger Distress Paints.
Distress Paints are thin and you might need more than one layer. I used a marker to bring some of the black lines back on the birds. Shadows were added under the birds with black paint.
Layers of ink - Bold Birds Art Journal Tutorial by Anna-Karin, with Scribbly Birds stamps by Dina Wakley, Ranger Distress Paints.
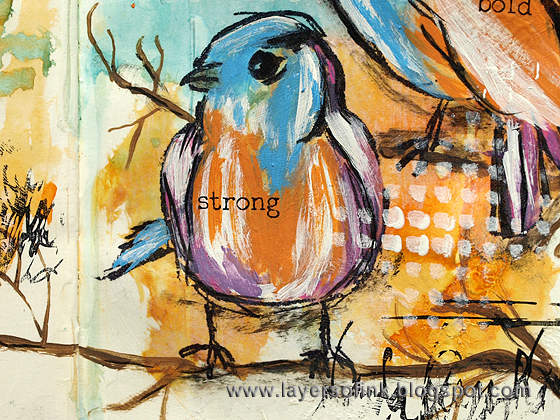
The heart was painted with Dusty Concord and Picked Raspberry. I stamped more words, both on the birds and the background and also stamped some scribbly text here and there.
Layers of ink - Bold Birds Art Journal Tutorial by Anna-Karin, with Scribbly Birds stamps by Dina Wakley, Ranger Distress Paints.
One of the great things with acrylic paint is that you can paint light over darker colours and the white highlights gave the birds more life. I added some marks to the branches with a marker, to make them fit with the Scribbly Birds.

Layers of ink - Bold Birds Art Journal Tutorial by Anna-Karin, with Scribbly Birds stamps by Dina Wakley, Ranger Distress Paints.
Here we have watered-down acrylic paint for the first background layer, stenciled birds and a final layer of white stenciling and stamping.

Layers of ink - Bold Birds Art Journal Tutorial by Anna-Karin, with Scribbly Birds stamps by Dina Wakley, Ranger Distress Paints.
I cut up squares of Ranger Cut 'n Dry Foam to use when sponging paint through the stencils, making the birds lighter in some areas.

I hope you will join us this week in our paint challenge. As every week, one random participant wins a $50 gift voucher from Simon Says Stamp.

Thank you for stopping by today and have a great week!

Anna-Karin

Supplies (affiliate links used):


Supplies:
Surfaces: Ranger Dylusions Small Creative Journal
Stamps: Ranger Dina Wakley: Scribbly Birds, All the Gals, Collaged Hearts, Scribbly Women, Textures
Ink: Ranger Archival Ink: Jet Black
Stencils: Ranger Dina Wakley: Plastic Canvas, Birds in Flight, Affirmations
Paint: Distress Paint: Peacock Feathers, Broken China, Spiced Marmalade, Wild Honey, Black Soot,  Walnut Stain, Picket Fence, Gathered Twigs, Dusty Concord, Picked Raspberry, Salty Ocean
Medium: Ranger Dina Wakley: White Gesso; Ranger Multi Medium Gloss
Tools: Ranger Cut 'n Dry Foam, Craft Scraper Tool

Saturday, June 7, 2014

Resist Background Layout

Hi everyone! After a nice day in a park, it is time to post my layout for this week's CSI:Color, Stories, Inspiration challenge. Here's this week's case file:
 
My layout:
 
I was planning to do a layout on something else, but this topic was calling out my name this week. I used to play badminton, from childhood until my early twenties, lots of training, competitions, and of course many memories. It unfortunately ended with a knee injury, which has recently made itself very much known again in the form of pretty bad knee problems, which is why I felt that I should write both about my badminton memories and about this never ending knee-journey. From the evidence I used: chevrons, numbers, transparent items, rub-ons. From the testimony I added decorative edges to my journaling. I ended up writing four pages of text, and tucked it behind the layout. The photo block also opens and there are several pages inside with more photos and text.
 
I worked on watercolour paper and clear embossed arrows from a new Tim Holtz set over two thirds of the background. The numbers were added with a stencil and embossing paste. When the paste was dry, I watercoloured the background with Distress Inks (Peacock Feathers, Tumbled Glass, Spiced Marmalade).

I liked the resist effect where you see some parts of the arrows better than others depending on how bright the ink is.
 
Here's a better look of the numbers. The title was done with Industrious stickers.
 
The Tim Holtz Prize Ribbon was die cut from mat board and painted orange. I die cut the circle in the middle a second time, painted it silver, added a rub-on and coated with Glossy Accents.
 
The Mini Trophy is perfect for a layout about sports. It was also die cut from mat board, painted silver and coated with Glossy Accents.

I also used a Mini Shield die, treated the same way as the other silver pieces.

Two feathers were stamped with Stazon Cotton White on clear Modeling Film, heated and shaped. They were hard to photograph. The text on the photo panel was stamped with Archival Forget-Me-Not and the orange arrows were done with a Chevron stencil and Spiced Marmalade ink. A photo turn is holding the flap closed, with a Chit Chat sticker on top, showing that there more of the story is told underneath.

You might be able to see the dimension of the feathers better here. The Modeling Film keeps its shape perfectly.

Thank you for looking!

Have a great weekend!

Anna-Karin

Supplies:
Surfaces: Daler & Rowney Watercolour paper; Neenah Smooth Solar White cardstock; Wendy Vecchi Clearly for Art Modeling Film
Dies: Sizzix: Mini Eiffel Tower & Shield, Mini Trophy & Prize Ribbon, Prize Ribbons
Stamps: Stampers Anonymous Tim Holtz: Here & There, Bird Feather, Random Quotes
Ink: Archival Ink: Forget-Me-Not; Distress Ink: Peacock Feathers, Tumbled Glass, Spiced Marmalade; Tsukineko Stazon Cotton White
Embossing powder: Ranger Clear Detail
Paint: Distress Paint: Spiced Marmalade; Adirondack Silver
Medium: Stampers Anonymous Wendy Vecchi: White Texture Paste
Stencils: Stampers Anonymous Tim Holtz: Numbered, Chevron
Embellishments: Tim Holtz Idea-ology: Chit Chat stickers, Words Remnant Rubs, Life Quotes Remnant Rubs, Numbers Remnant Rubs, Chiseled Industrious stickers; 7Gypsies Phototurn

Friday, June 6, 2014

Craft Stamper July 2014

Hello everyone! The July issue of the Craft Stamper is out for sale. I am so happy that I can finally share that I am doing a series on scenic stamping. The first article of the series is in the July issue.
 
You can see one of the two cards to the left in the middle. All the articles will be stepped out tutorials and over the series I am going to cover a lot of fun techniques, different seasons, different colouring methods and media, composition and much more. In this issue there is also a Stamping Contrast article, where different designers, including me, use the same wonderful Stampscapes set, and we are also joined by Kevin Nakagawa from Stampscapes.
 
I hope you will enjoy going on a scenic stamping adventure with me!
 
Happy stamping!
 
Anna-Karin

Thursday, June 5, 2014

Happy Watercolour Flowers Tutorial

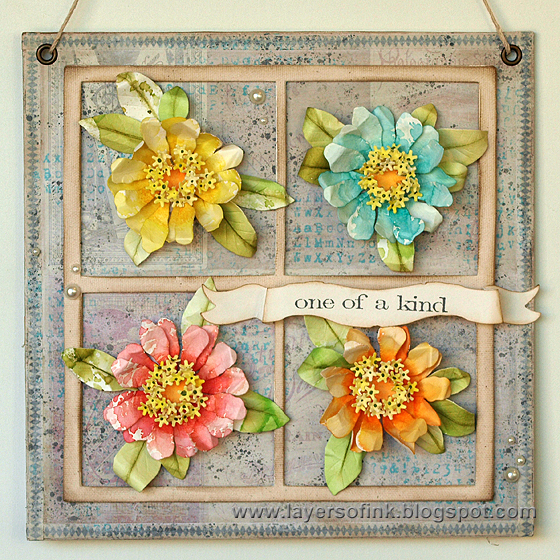
Hi all! I am sharing a tutorial on the Sizzix blog today, for a watercolour flowers made with the Susan's Garden Zinnia set.
 
I made a wall-hanging, but you can place these flowers on many different types of projects, or add a stem to them and place them in a vase. The grid was done with a very versatile Grid Works die. The papers and stamps in the background are by Tim Holtz.
 
To see how I made this, head over to the Sizzix blog.
 
Thank you for the visit!
 
Anna-Karin

Tuesday, June 3, 2014

Blueprints and Stencils Layout

Hello everyone! I hope your week has had a good start. We have another collaborative case file between CSI:Color, Stories, Inspiration and Scrap365. Scrap365 is a wonderful magazine. Here's the case file:
 
 
And my layout:

I loved the colour combo, and was initially planning to use more of the blue, but ended up focusing on the other four colours, and just adding some blue pearls. From the evidence I used: grid design, nautical, texture paste, numbers, twine, frames and book pages. From the testimony I did a six-word memoir with chit chat stickers, and journaled more about the sea under the flaps. I recently got these great Tim Holtz Nautical Blueprint stamps and used them to create a grid on my page. The remaining squares were done with stencils and embossing paste.

All the blueprint squares are folded double into flaps and open to reveal more photos and journaling. I stamped the blueprints with Archival Watering Can ink on watercolour paper. The grey ink gives a softer look than black ink. They were watercoloured with Distress Ink: Tattered Rose, a mix of Barn Door and Dried Marigold, and Pumice Stone.
 
I painted around them and added a shadow with Pumice Stone. When the ink was dry, the papers were splattered with more Pumice Stone, for texture. There is a mirrored star in the centre of this image. The Industrious letter stickers spell out 'sea'.
 
The blueprint images are always fun to colour. If you have the May 2014 issue of the Craft Stamper, I have an article in it using blueprint stamps in three different ways. Two pieces of twine were stapled at the base of each one. I also distressed the edges.
 
Love this sea horse. I added rub-on sentiments here and there.

The remaining five squares were smeared with embossing paste, using a different Tim Holtz stencil for each one. The title of the page ('close to the sea') was stamped on a die cut Tattered Curvy Banner. The background of the layout is a sheet of the new Motif paper (I also used it on this and this journal page). This one has a dot pattern and I watercoloured it with Pumice Stone ink, smearing ink on my craft sheet, misting with water and picking it up with a large brush.

This is the pretty Doily stencil. When the paste was dry, I misted one page at a time with water and watercoloured them with the same Distress Inks, dropping in colours here and there. When the ink was dry, I splattered them with some more Pumice Stone. Here are some chit chat stickers, describing some of my feelings for the sea.

I like these old boathouses, where fishermen keep/used to store their equipment. They are a common site on the Swedish coast. The photos were layered on old book pages. 

The layout is about my feelings for the sea and about all kinds of interesting discoveries you can make close to the sea and in these old fishing villages, but also about the particular day spent at the sea with family.
 
Thank you so much for looking! I hope you will join us in this month-long special case file.
 
Happy crafting!
 
Anna-Karin
 
Supplies:
Surfaces: Tim Holtz Idea-ology: Motif cardstock; Daler & Rowney watercolour paper; old book paper
Stamps: Stampers Anonymous Tim Holtz: Nautical Blueprint
Ink: Ranger Archival Ink: Watering Can; Distress Ink: Tattered Rose, Barn Door, Dried Marigold, Pumice Stone 
Stencils: Tim Holtz Stampers Anonymous: Rays, Arrows, Doily, Stars, Latticework
Medium: Wendy Vecchi White Embossing Paste
Embellishments: Tim Holtz Idea-ology: Observations Word Bands, Frames & Trims Industrious Stickers, Borders Industrious Stickers, Deco Type Industrious Stickers, Number Brads, Long Fasteners, Life Quotes Remnant Rubs, Chit Chat stickers, Index Labels, Mirrored Stars; twine

Monday, June 2, 2014

A Kind of Magic

Hi all and welcome! This week we are having a magical challenge at Simon Says Stamp Monday Challenge Blog. Lots of possibilities with this one, do a project about a magical technique, a magical day or place, and more, whatever you can think of.
  
When I saw the theme for this challenge, I got Queen's A Kind of Magic on my brain and decided that it was a good theme for an art journal page. There are more magical elements on this page: a resist technique is always a bit magical for me, to see the resist areas appear as you apply a colouring medium. Secondly, interactive elements also give a sense of magic and mystery, of something hidden, and here I added a door that opens, made with the new Sizzix Passage Door die by Tim Holtz.
 
For the background, Tim's new Motif cardstock was used. The paper pad comes full of great patterns, on white and kraft cardstock, also with smaller sizes. The patterns will resist a lot of colouring media, creating great effects. I used Distress Ink for my background, smearing orange and yellow inks on my craft sheet, misting with water and pressing the paper into the ink. Wipe the ink off the stars. On an art journal page I posted recently, which also happens to have a magic theme, Distress Stain was used to colour kraft resist paper.  When the background was dry, I stamped it with various stamps using Archival Ink.
 
The bird was stamped on patterned paper, the stamp comes from Stampers Anonymous Classics #16 set. The blue splatters on the background were done with watered-down Peacock Feathers Distress Paint, and a splatter brush. 

I die cut the door from a woodgrain piece of resist paper and inked it with Tumbled Glass and Peacock Feathers. The die also embosses the paper, you can see the lines here, they will be more visible on, for example, cardstock. The watch was stamped on a dotted piece of resist paper. As a door knob I used a number brad.

I printed some lines from the lyrics on a ticket, and used the ticket to attach the door to the page. There is also another clock, since the quote refers to the doors of time. When it was done, I attached the page to my Small Creative Journal.

I hope you will join us in the challenge this week, and show us some magic. As always, one random participant wins a $50 gift voucher from Simon Says Stamp.
 
http://www.simonsaysstamp.com/

Thank you for stopping by! Enjoy your week!

Anna-Karin

Supplies:
Surfaces: Tim Holtz Idea-ology Motif Cardstock, Menagerie Paper Stash; Ranger Dylusions Small Creative Journal
Dies: Sizzix: Passage Door
Stamps: Stampers Anonymous: Classics #16, Classics #3; Stampers Anonymous Tim Holtz: Typography, Psychedelic Grunge, Mini Muse, Curiosities, Nature Walk, Purveyor, Mercantile,
Ink: Ranger Archival Ink: Jet Black, Forget-Me-Not, Monarch Orange; Distress Ink: Spiced Marmalade, Wild Honey, Squeezed Lemonade, Tumbled Glass, Peacock Feathers
Paint: Distress Paint: Peacock Feathers
Embellishments: Tim Holtz Idea-ology: Life Quotes Remnant Rubs, Label Letters, Chiseled Industrious Stickers, Number Brads, Game Spinners, Long Fasteners, Elements Tissue Tape,  Journaling Tickets,
Tools: Sizzix Big Shot; Liquitex Free Style Large Scale Splatter Brush

Sunday, June 1, 2014

By the Sea Scenic Stamping

Hello stampers! It is a new month and a new challenge at Craft a Scene, By the Sea. I wish I was at the sea today, instead let's go there in a scene. 
 
I made a square (10 x 10 cm) scene today using Stampscapes stamps. The Seaside Dwelling is a really nice stamp with great details. The sea was done by repeatedly stamping the Waves Small and added some cliffs in the foreground. All the stamping, except for the birds, was done with Archival Jet Black ink. At first I planned to do a monochrome blue card, but later decided to add some purple, for a little drama. As usual, highlights were added with a white gel pen and some foam to the water by dry-brushing white pigment ink here and there.
 
Thank you for stopping by! We are looking forward to seeing scenes by the sea this month and don't forget to check out the cards by my fellow DT members.
 
Happy stamping!
 
Anna-Karin
 
Supplies:
Stamps: Stamspcapes: Ducks in Formation 027A, Sailboat 153A, Rocks and Waves 235E, Seaside Dwelling 249E, Waves Sm. 297C
Ink: Ranger Archival Ink: Jet Black; Adirondack: Aqua, Stonewashed, Denim; Distress Ink: Chipped Sapphire, Dusty Concord, Black Soot
Embellishments: Tim Holtz Idea-ology: Label Letters
Surface: Kromekote glossy cardstock; Tim Holtz Core'dinations Distress Colour-Core cardstock