Monday, January 27, 2020

Kaleidoscope Heart Card

Hello friends! We had a busy weekend with lots of fun stuff, Anton ran an obstacle course, we saw Frozen 2 at the movies, played (and watched) a soccer game, picked up a parcel that a friend sent along from South Africa with some of my favorite magazines and some snacks, and went for a walk.



This week at the Simon Says Stamp Monday Challenge Blog, our theme is 'All loved up', since Valentine's Day is coming up soon. Don't miss the fantastic project by our January guest designer Claudia, with her blog Von Pappe II, it is really special.

Layers of ink - Kaleidoscope Heart Card by Anna-Karin Evaldsson.

I made a fairly quick card this week, with a big kaleidoscope heart as the focal point. I wanted the heart to have a tone-on-tone effect, but it would also look great with contrasting colors, or just in white. For the background, I did one of my all time favorite techniques, white embossing on vellum.
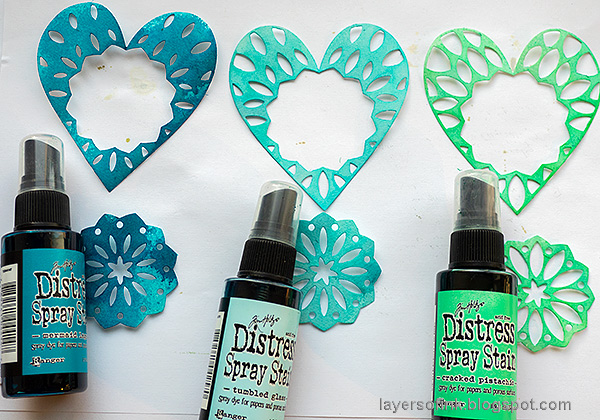
Layers of ink - Kaleidscope Heart Card by Anna-Karin Evaldsson. Die cut and mist the Birch Press Kaleidscope Hearts.

I used the Birch Press Kaleidoscope Heart Layer set, which consists of three die sets: A, B and C. After die cutting them from watercolor paper, I misted them with Distress Spray Stains, to get nice vibrant colors.

Layers of ink - Kaleidscope Heart Card by Anna-Karin Evaldsson.

When dry, glue them together to get the kaleidoscope effect. For variation, you could have misted the center pieces the other way around, with the darker piece at the top.

Layers of ink - Kaleidscope Heart Card by Anna-Karin Evaldsson. White emboss You Matter on vellum.

I love the Simon Says Stamp You Matter stamp. The sentiments are wonderful and work on so many projects, I have used it on scrapbooking layouts for the kids, cards and in my art journal. You can also cut out just one of the sentiments on the stamp. Here I white embossed it on vellum. Always take care when using a heat gun so that you don't burn yourself.

Layers of ink - Kaleidscope Heart Card by Anna-Karin Evaldsson.

I layered the vellum on kraft paper, cream paper and then on folded slate grey SSS cardstock. Distress the edges, or leave them as is.

Layers of ink - Kaleidscope Heart Card by Anna-Karin Evaldsson. Splatter white paint.

After gluing the heart to the background, I splattered some white paint on the card. As you can see, the white paint will pick up some of the ink as it dries, especially from the darkest Mermaid Lagoon ink.

Layers of ink - Kaleidscope Heart Card by Anna-Karin Evaldsson.

The sentiment was die cut with the Memory Box Big Hugs from SSS glimmer cardstock, and the smaller sentiment was stamped with dark grey ink, which gives a softer look than black ink. Finally, I added three Tim Holtz Bouquet Flowers.

For another example using the Kaleidoscope Heart Layers set, check out this wedding card tutorial of mine.

I hope you will join us this week in our Fall/Autumn challenge. As always, you have a chance to win a $50 gift voucher to do some fun shopping at Simon Says Stamp. You have until next Monday 8am Ohio time. 1pm UK time, 2 pm CET to join in.


Don't forget to follow Simon Says Stamp on Instagram, they post great stuff daily. 


Do you use Instagram? If so please add #sssmchallenge so we can see your entries there too.


Thank you so much for taking the time to visit my blog today!  

Happy crafting!

Anna-Karin

Supplies:

* Please note: the links are affiliate links, for which I receive a small percentage of sales generated by the link, at no extra cost to you.


Friday, January 24, 2020

Roots Scrapbooking Layout

Hello friends! I have a vintage scrapbooking layout to share with you today. It's a continuation of a Vintage Frame project I posted earlier this week featuring my grandfather as a baby. My Mom and I have been learning a lot about the family history on her side and I have found and scanned a bunch of old photos.

Layers of ink - Vintage Scrapbooking Layout by Anna-Karin Evaldsson.

My great grandparents hand only one child and started out from very humble beginnings on the countryside. They worked hard and my grandfather was probably the first one in both extended families to have a higher education. This is the oldest photo of the three of them together that I could find. All dressed up and my grandfather's outfit is so cute. The photo frame opens up and there is journaling on the inside. The background paper comes from Tim Holtz Wallflower paper stash and fit the topic well, with the tree with roots, postal elements bird and numbers. 

Layers of ink - Vintage Scrapbooking Layout by Anna-Karin Evaldsson. Tim Holtz Planks.

In their first home, which I recently visited, there were these rough wooden walls and I wanted to try to replicate that on the layout. Die cut Tim's Planks from watercolor paper. I die cut more of one of the sizes on the die.

Layers of ink - Vintage Scrapbooking Layout by Anna-Karin Evaldsson.

Smear Pumice Stone and Frayed Burlap on a non-stick craft sheet. Mist with water and press the planks into the ink. Emboss in the 3-D Lumber folder, before the paper dries. The embossing becomes deeper and more pronounced when the paper is wet.

Layers of ink - Vintage Scrapbooking Layout by Anna-Karin Evaldsson.

When dry, ink the edges.

Layers of ink - Vintage Scrapbooking Layout by Anna-Karin Evaldsson. Wooden wall.

I glued them to the background cardstock to make it look like a wall.

Layers of ink - Vintage Scrapbooking Layout by Anna-Karin Evaldsson. Stamped farm animals.

My great grandfather started out by working as a farmhand, and later became foreman for various farms. I stamped farm animals from Tim's On The Farm set and colored them with Prismacolor pencils. I also stamped some sentiments and clocks.

Layers of ink - Vintage Scrapbooking Layout by Anna-Karin Evaldsson. Stamp film strip.

To continue with the photo theme, I stamped a negative film strip twice on Clearly For Art Modeling Film and colored it at the back with alcohol inks. It is important to color at the back, otherwise the alcohol ink will make the black ink bleed.

Layers of ink - Vintage Scrapbooking Layout by Anna-Karin Evaldsson.

It was glued to the page on top of an old calendar page. The frame comes from the Halloween Layers and Baseboard set and was sanded and inked.

Layers of ink - Vintage Scrapbooking Layout by Anna-Karin Evaldsson.

The title is 'roots' and was stamped with Tall Text alphabet stamps.

Layers of ink - Vintage Scrapbooking Layout by Anna-Karin Evaldsson. Outline Clustered Leaves.

I used the SSS Outline Clustered Leaves die to die cut one green and one patterned paper leafy branch. The lace piece was die cut with Tim's Crochet set.

Layers of ink - Vintage Scrapbooking Layout by Anna-Karin Evaldsson.

I could only find one single horse stamp in my stash, and the lady looks too wealthy and isn't from the right era, but it had to do anyway.

Layers of ink - Vintage Scrapbooking Layout by Anna-Karin Evaldsson. Tim Holtz On The Farm.

The farm animals walking along the bottom of the layout.

Layers of ink - Vintage Scrapbooking Layout by Anna-Karin Evaldsson.

I thought this Quote Token fit well on the page. 


Thank you so much for taking the time to visit my blog today! Have a wonderful weekend!

Happy crafting!

Anna-Karin

Supplies:

* Please note: the links are affiliate links, for which I receive a small percentage of sales generated by the link, at no extra cost to you.


Wednesday, January 22, 2020

Photo Block Tutorial

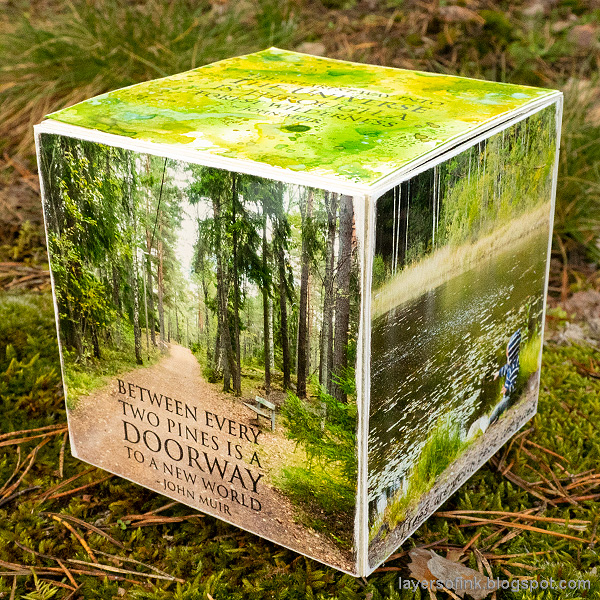
Hello friends! I have a quick photo block tutorial to share with you today. It was fun doing a project focusing on photos, and since it is forest photos with many shades of green, it is a real feel-good project.

Layers of ink - Photo Block Tutorial by Anna-Karin Evaldsson.

I love forests, the trees, the colors, the sounds, the smells, the peace and quiet and the way in which they are so full of life. Forests and especially forests with lakes are probably my favorite setting in nature and luckily there are many forests close by (which is the case for a large part of Sweden). During January the Eileen Hull Inspiration Team has shared projects made with Eileen's newly released dies. I used Eileen's new Gift Box with Scallop Edges XL die to create this. It is meant to be a gift box, which can open, but I turned it into a closed block instead. It's pretty large, with each square being 3.8 x 3.8 in. You can do a photo block with any types of photos and it would also make a great gift.

Layers of ink - Photo Block Tutorial by Anna-Karin Evaldsson.

Start by die cutting two box parts from mat board. This is an XL die, so you need the Extended Cutting Pads. As you can see, the die both cuts and scores the mat board. I ended up not using the label.

Layers of ink - Photo Block Tutorial by Anna-Karin Evaldsson.

Cut four photos into 3.8 x 3.8.

Layers of ink - Photo Block Tutorial by Anna-Karin Evaldsson.

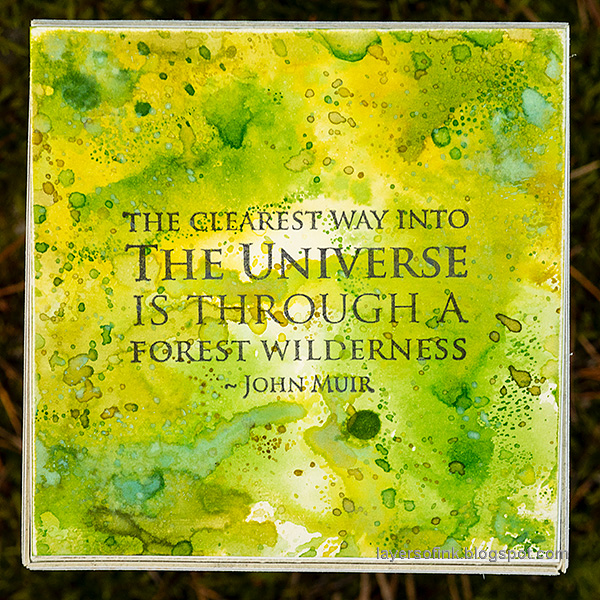
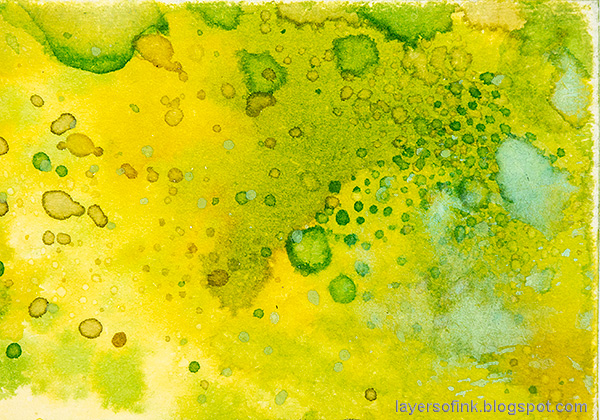
I wanted the top piece with the stamped sentiment to have a forest feeling, trying to capture the beautiful shades of green. This was done by smearing Distress Ink on a craft sheet, misting with water and repeatedly pressing the paper into the ink. Dry the paper in between each application. Finally, I splattered some ink on it with a paint brush to create even more texture. I only used the Distress Oxide towards the end of the inking process.

Layers of ink - Photo Block Tutorial by Anna-Karin Evaldsson.

Stamp sentiments on some of the photos too, using Stazon ink. The sentiment stamps are by Stampscapes. I used a stamp positioner, to make sure I didn't mess up the stamping.

Layers of ink - Photo Block Tutorial by Anna-Karin Evaldsson.

Sand the edges of the photos to reveal the white core and adhere wonder tape along the flaps. 

 Layers of ink - Photo Block Tutorial by Anna-Karin Evaldsson.

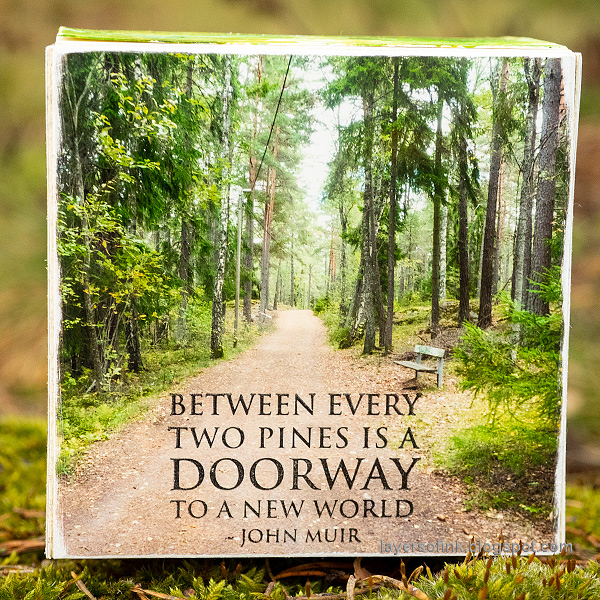
This is one of my favorite quotes, and such a great description of forests.

Layers of ink - Photo Block Tutorial by Anna-Karin Evaldsson.

And another quote by John Muir, who shared my love of forests. This is also a Stampscapes Scenic Sentiment stamp.

Layers of ink - Photo Block Tutorial by Anna-Karin Evaldsson.

The inky goodness at the top of the block.

Layers of ink - Photo Block Tutorial by Anna-Karin Evaldsson.

Beautiful moss-covered ground and roots.

Layers of ink - Photo Block Tutorial by Anna-Karin Evaldsson.

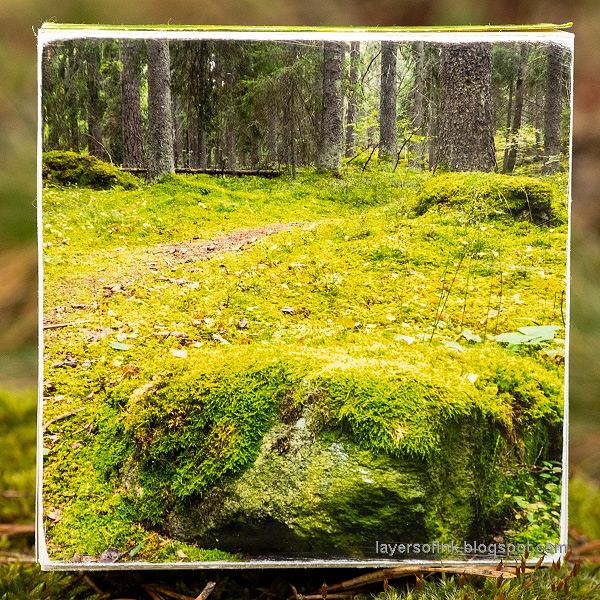
I take a lot of photos of mossy stones, so one had to feature on the block.

Layers of ink - Photo Block Tutorial by Anna-Karin Evaldsson.

And here is a very small Leo pointing at something across the water.

Layers of ink - Photo Block Tutorial by Anna-Karin Evaldsson.

If you want to display some of your favorite photos, or need a quick gift, this is a great project. You can also leave the top without adhesive so that it can be opened and use it as a combined photo block and gift box. This was a fun project to make and it reminded me of all the Artist Trading Blocks that I used to make around five years ago.

Thank you so much for taking the time to visit my blog today!  

Happy crafting!

Anna-Karin

Supplies:

* Please note: the links are affiliate links, for which I receive a small percentage of sales generated by the link, at no extra cost to you.


Sizzix Eileen Hull: Gift Box with Scallop Edges XL die
Stampscapes: Scenic Sentiments 1, Scenic Sentiments 3


Monday, January 20, 2020

Vintage Photo Frame

Hello friends! I hope you had a nice weekend! We had some much needed sunny skies yesterday and spent time outdoors.


At the Simon Says Stamp Monday Challenge Blog we have a Home Decor theme this week. I hope you will join us! And don't miss the pretty project by January guest designer Claudia, with her blog Von Pappe II.

Layers of ink - Vintage Photo Frame Tutorial by Anna-Karin Evaldsson.

Lately, my Mom and I have discovered many unknown facts about the family history on her side. That part of the family moved around a lot, all over the country, even back in the 1800s, and much information about where they lived have been forgotten or never retold. Funnily enough, my grandfather was born not far from where I live now, and they lived in quite a number of locations close by, while originating far away from here and ending up far away from here (where my Mom was born and I grew up). It is such a coincidence that my grandfather and his parents lived in places close by and visited places close by, while I thought that no ancestors had almost ever been to this area. When this photo was taken, my great grandfather was a foreman on a farm and they lived in a humble little house that I recently visited. My grandfather later had this photo in a frame that he made in school, and I scanned and printed it for this project.

Layers of ink - Vintage Photo Frame Tutorial by Anna-Karin Evaldsson. Tim Holtz cabinet frame.

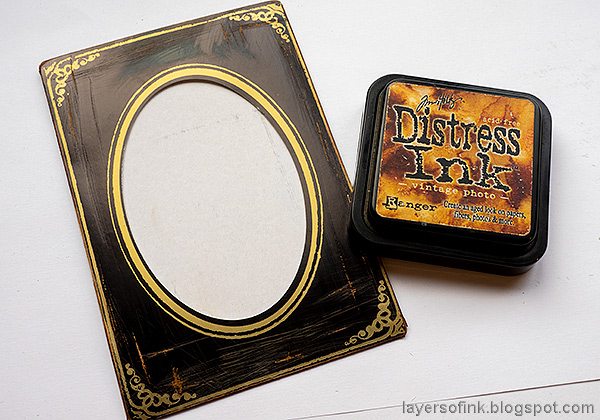
Distress the Sophisticate Cabinet Card Frame with sand paper and a Craft Scratcher tool.

Layers of ink - Vintage Photo Frame Tutorial by Anna-Karin Evaldsson.

Ink with brown ink. The ink sticks to the distressed areas, and can be wiped off from the glossy areas.

Layers of ink - Vintage Photo Frame Tutorial by Anna-Karin Evaldsson. Tim Holtz Stacked Baroque.

I wanted a lighter frame around the photo and die cut one with Tim's Stacked Baroque set.

Layers of ink - Vintage Photo Frame Tutorial by Anna-Karin Evaldsson. Metal flowers.

I also colored some metallic idea-ology embellishments with alcohol ink, as well as a Gumdrop Heart.

Layers of ink - Vintage Photo Frame Tutorial by Anna-Karin Evaldsson.

For the base, I glued a Worn Wallpaper to mat board and inked the wallpaper a little. I imagined the photo hanging on a wall, or standing on the little shelf beneath it. The title was stamped with Tim's Simple Sayings set.

Layers of ink - Vintage Photo Frame Tutorial by Anna-Karin Evaldsson.

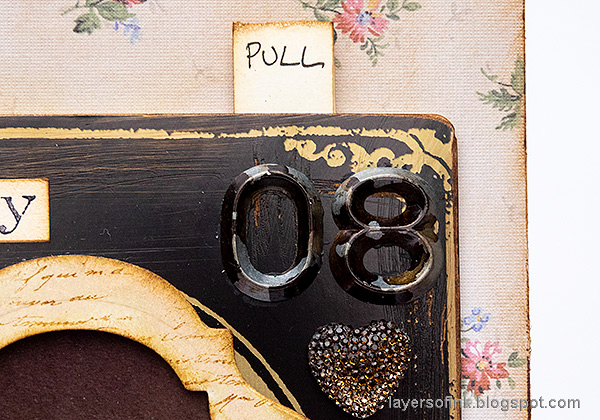
There is a pull tab, and journaling is written behind the photo. I used Numeric Numbers for the year.

Layers of ink - Vintage Photo Frame Tutorial by Anna-Karin Evaldsson.

The frame was inked with Pumice Stone and Frayed Burlap and stamped with a script stamp. The flower comes from the Floral Adornments set.

Layers of ink - Vintage Photo Frame Tutorial by Anna-Karin Evaldsson. DIY miniature book.

The shelf was made by cutting two strips from a piece of Salvaged Baseboard and glueing them together. I also added a postcard and a pen nib, with black ink at the top.

Layers of ink - Vintage Photo Frame Tutorial by Anna-Karin Evaldsson. Letterpress letter.

The little book was made from kraft core cardstock and leftover old book paper. The green label comes from the Curiosities Sticker Book.

Layers of ink - Vintage Photo Frame Tutorial by Anna-Karin Evaldsson.

I painted the letterpress M and sanded it slightly when dry. Ink the edges of the shelf with brown ink.

Layers of ink - Vintage Photo Frame Tutorial by Anna-Karin Evaldsson. Pocket watch.

I also found an idea-ology watch cameo frame in my stash and added a stamped clock face to it and a game spinner.

I hope you will join us this week in our Home Decor challenge. As always, you have a chance to win a $50 gift voucher to do some fun shopping at Simon Says Stamp. You have until next Monday 8am Ohio time. 1pm UK time, 2 pm CET to join in.


Don't forget to follow Simon Says Stamp on Instagram, they post great stuff daily. 


Do you use Instagram? If so please add #sssmchallenge so we can see your entries there too.


Thank you so much for taking the time to visit my blog today!  

Happy crafting!

Anna-Karin

Supplies:

* Please note: the links are affiliate links, for which I receive a small percentage of sales generated by the link, at no extra cost to you.