Monday, December 23, 2013

Merry Christmas Blueprints

Hello everyone! We are not having a challenge at Simon Says Stamp Monday Challenge this week, instead we are going to post some inspiration. Today six members of the team will share inspiration using Tim Holtz stamps.

If you are like me, you might discover that you made too few Christmas cards once again and need some quick cards. Tim Holtz blueprint stamps are perfect for this.

In the past, I used to make different Christmas cards for each recipient. Nowadays, there isn't time for that since I do lots of other types of projects too. In those days, I would only make Christmas cards the last months of the year. Last year, I made quick inky cards, you can see them here. This year there is more variety since I've made quite a few cards at a time, for various tutorials and posts. But I was still lacking.

The blueprint stamps are fun to colour and since they are pretty large, you don't need much more on the card. Here I used a fabulous bauble.

I added some extra sentiments with rub-ons, but you could skip this step, the blueprint stamps don't really need sentiments.

I started out by die cutting eight backgrounds from watercolour paper, using Tim Holtz Cameo Frame and Postage Stamp Frame dies. The blueprint images were stamped with Archival Jet Black ink. It is important to use a waterproof ink since we are going to use water. The images were watercoloured with Distress Ink. Smear Distress Ink on your craft sheet, mist once with water and pick up with a paint brush.

If you work relatively quickly you can drop in a darker colour while the first colour is still wet, which creates nice wet-on-wet effects as you can see here on the ice skate. Don't add in more colour when the previous layer is almost dry, since then you'll get cauliflower effects.

I wanted some more shine and painted around all the images with Biscotti Perfect Pearls. You don't really see the effect on the photos, but it adds a great shimmer.

 I painted a shadow under some of the images with Iced Spruce.

When the Biscotti mist was dry, I splattered the panels with Walnut Stain ink. Press the ink on your craft sheet, mist with water and pick up with a paint brush. Tap the brush with your finger. Remember to protect your clothes and work surface since the splatters fly far.

The edges of the panels were inked with Gathered Twigs. 

I picked out some kraft-core cardstock, which works great for quick cards, since it adds extra detail and texture. The card fronts were embossed in different embossing folders, sanded and inked slightly.

The panels were stapled to the background and finally I also added a piece of Silver Tinsel Twine for that extra festive feeling.

If you use the small blueprint stamps instead, you can easily turn these ideas into quick gift tags.

There won't be a challenge to link up to this week, but of course you can still head over to Simon Say Stamp for some shopping.

http://www.simonsaysstamp.com/servlet/StoreFront

I hope you will all have a very Merry Christmas!! I still have a few Christmas projects to share, so I'll be back tomorrow again.

Anna-Karin

Supplies:
Surfaces: Ranger Watercolor Paper; Tim Holtz Core'dinations Kraft-Core cardstock
Dies: Sizzix: Cameo Frame, Postage Stamp Frame
Embossing folder: Sizzix: Dot-Matrix & Gridlock, Harlequin & Stripes, Holly Pattern & Wreath, Snowflake Pattern & Plaid
Stamps: Stampers Anonymous: Christmas Blueprint, Christmas Blueprint 2,
Ink: Distress Ink: Antique Linen, Frayed Burlap, Gathered Twigs, Iced Spruce, Peeled Paint, Walnut Stain; Ranger Archival Ink: Jet Black
Mist: Ranger Perfect Pearls Biscotti
Embellishments: Tim Holtz Idea-ology: Silver Tinsel Twine, Christmas Time Remnant Rubs
Tools: Sizzix Big Shot; Tim Holtz Tiny Attacher, sandpaper

Saturday, December 21, 2013

CSI case file #103 - Santa-ol-ogy

Hi all! Time for the last CSI:Color, Stories, Inspiration challenge of the year. We are continuing with our Christmas theme and this week the colour combo is a traditional Christmas one.
 
 
I had a lot of little Santa photos and made a double-pager: 
 
From the evidence I used: birds, stars, metal, something transparent and rub-ons. From the testimony I was inspired by the fun "...olo-ogy" category and made my layout about 'Santa-ol-ogy', how to make and photograph a little Santa. This layout is almost completely covered in photos of different sizes, with the embellishments being on top of the photos.
 

Little Santa - Layers of ink
I used kraft cardstock for the background and stamped it at the top with a Hero Arts tiny stars stamp and at the bottom with a Merry Christmas border stamp. I also added a strip of tinsel twine as a border, I keep reaching for Tim Holtz tinsel this Christmas, it adds such a festive feel. The photos were arranged on top of white cardstock.

Little Santa - Layers of ink
Some of the journaling was typed and cut into strips, but most of the journaling is on the tag behind this photo block. It is about this photo session, which contained a lot of running around and making funny faces (and many blurry photos as a result). The Santa prop, which happens to be one of my favourite Christmas ornaments, was flying through the air quite a few times. When I developed these photos, a free A4 print was included and it was fun to use this large photo on the layout. I don't often scrap such large photos.

For embellishments, I used a mix of die cuts, white rub-ons and Tim Holtz Idea-ology metal pieces. The tree is a Simon Says Stamp die. The journaling on these strips translate: "A small Santa = red clothes, happy, lots of running around, funny, full speed". I like the look of the white rub-ons on the photos.

Shapes were also die cut from mat board, inked with Pumice Stone and coated with Pumice Stone Distress Glitter.

I had a piece of leftover acetate that was stamped with a Wendy Vecchi Christmas text stamp (used on this window card), and used two small pieces on the layout. The 'happy' word is also a Simon Says Stamp die.
 
 I also used some mirror stars and a few cut out stamped images.
 
Favourite Christmas song: Jingle Bells.

Another piece of stamped acetate, attached with the brads used for the Word Band.

Thank you for looking! I hope you will join us in our last challenge of the year!

Happy crafting!!

Anna-Karin

Supplies:
Surfaces:
Dies: Sizzix: Mini Jingle Bell & Christmas Bell, Mini Cardinal & Poinsettia, Vintage Market Sizzlits; Simon Says Stamp: Mod Tree, Happy
Stamps: Hero Arts: Tiny Star Background CG616; Wendy Vecchi Stampers Anonymous: Art of Making it Merry; Stampers Anonymous Tim Holtz: Mini Holidays; Panduro stamps
Ink: Ranger Archival Ink: Jet Black; Distress Ink: Pumice Stone; Stazon Cotton White
Glitter: Distress Glitter: Pumice Stone
Embellishments: Tim Holtz Idea-ology: Christmas Time Remnant Rubs, Christmas Word Bands,  Mirrored Stars, Silver Tinsel Twine, Christmas Muse Tokens

Wednesday, December 18, 2013

Cream Poinsettia Window Card

Hello and welcome! Today I am sharing a Christmas card on the Sizzix blog, with a removable magnet ornament.
 
Flowers are so easy to make with Susan Tierney-Cockburn's Susan's Garden dies, and here I used the new Poinsettia die. The flower is mounted on a magnet so the recipient can remove it and use as an ornament. The window is also die cut with another new die by Susan, a fun grid die.
 
For more info on how I made this and more photos, head over to the Sizzix blog.
 
Happy Crafting!
 
Anna-Karin


Monday, December 16, 2013

Joy to the World

Hi! This week we are all about stamping at Simon Says Stamp Monday Challenge Blog, in our Stamp Out 2013 challenge, the last challenge of the year. It is simple, just use a stamp, or many stamps.

I made a Christmas card with some new Hero Arts stamps. I really like this World Ornament stamp and it worked perfectly together with one of my favourite sentiments. Stars were repeated four times on the card, stamped on the background, embossed on the white cardstock, two star embellishments, and die cut from a mirror sheet.

The globe was stamped on Wendy Vecchi's Clearly for Art Modeling Film and coloured at the back with alcohol inks and a alcohol fillable pen marker. I cut the globe out, heated it with my heat gun and shaped it around a ball. Be careful not to burn yourself. The Modeling Film keeps its shape perfectly. It is a favourite product of mine, for example, I used it the other day for a totally different looks on Tim Holtz pre-released Jumbo Tattered Florals die. I punched a hole at the top of the globe and tied with tinsel.

For the background, I used a folded piece of Ranger's Specialty Stamping Paper and inked it softly with Tumbled Glass and Salty Ocean. This tiny star background stamp is a new favourite of mine, I love the mix of tiny and small stars and even the tiniest of the stars stamp with perfect detail. It was stamped with Cornflower Blue Archival Ink. The white cardstock is also Specialty Stamping paper and was embossed in the Starry Night folder.

The star border was die cut from a mirror sheet, which looks like a real mirror. The sentiment was stamped with Cornflower Blue ink and cut into a banner. I also added a tinsel border for an even more festive feel. The tree is die cut with the great Simon Says Stamp Exclusive Mod Tree die.

I hope you will join us in our stamping challenge. As always, one participant wins a $50 gift voucher from Simon Says Stamp.

http://www.simonsaysstamp.com/servlet/StoreFront

Thank you for looking!

Happy crafting!

Anna-Karin

Supplies:
Dies: Sizzix: Star Cluster On the Edge; Simon Says Stamp: Mod Tree
Embossing folder: Sizzix: Iron Gate & Starry Night
Ink: Distress Ink: Tumbled Glass, Salty Ocean; Ranger Archival Ink: Cornflower Blue; Tsukineko Stazon Jet Black
Alcohol Ink: Adirondack: Lettuce, Meadow, Latte, Stonewashed, Sail Boat Blue
Embellishments: Tim Holtz Idea-ology: Mirrored Sheets, Mirrored Stars, Silver Tinsel Twine

Sunday, December 15, 2013

Winter Covered Bridge

Hello stampers! We are continuing with our winter December challenge at Craft a Scene. I wanted to have done a tri-shutter card this week, but time ran out.

I hadn't inked up this Stampscapes Snowy Covered Bridge yet and wanted to use it. All the stamping was done with Archival Watering Can ink, which is a great grey, perfect for a winter scene and softer than the black ink that I often stamp my scenes with. I coloured the scene lightly with lilac and grey dye inks, as usual starting with the lightest shades and building up somewhat darker colours.

Highlights were added with a white gel pen and just a tiny bit if mist by dry-brushing white pigment ink on the scene.

Another Christmas card done! There is till plenty of time to join us in the challenge this month.

Happy Stamping!

Anna-Karin

Supplies:
Stamps: Stampscapes: Flock 112A, Pines and Rocks 195G, Old Fence 293G, Pebbles 256A, Snowy Covered Bridge 357F, Snow Texture 362C, Snowy Rocks Sm. 365A, Winter Twigs 367B, Sentiment Sheet 6
Ink: Ranger Archival Ink: Watering Can, Jet Black; Distress Ink: Milled Lavender, Black Soot; Jenni Bowlin: Weather Vane, Shaded Lilac
Paper: Kromecote glossy cardstock; Tim Holtz Core'dinations Color-Core cardstock

Friday, December 13, 2013

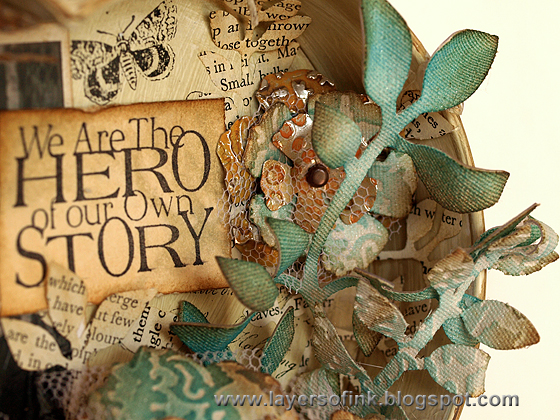
Jumbo Tattered Florals Shadow Box

Hi everyone! Have you seen the fun news? Tim Holtz has pre-released three dies, which will be shipping later this month: Jumbo Tattered Florals, Garden Greens and Spring Greenery. They are fantastic.
 
Jumbo Tattered Florals Shadow Box - Layers of ink
The Jumbo Tattered Florals are so large that they work perfectly for a home decor project. The Tattered Floral die was one of my first Tim Holtz dies and I am happy to have a larger version now - the two also work great together. My favourite dies of the three are the two leaf dies. The leaves and leaf branches are fabulous and so useful together for many different types of projects.

For my project, I made a large heart shadow box heart out of a tray I picked up at a shop for almost nothing. The flowers were inspired by the flower canvas I made for Tim's Tattered Floral challenge early this year and are made of a mix of some of my favourite materials: Wendy Vecchi's Modeling Film, sticky-back canvas and foil tape. The heart is 8 inches wide and features one of my favourite photos of my grandmother. I took step photos.

Cover modeling film with natural sticky-back canvas and foil tape. Die cut flowers and leaves using the Jumbo Tattered Florals, Garden Greens and Tattered Florals Bigz die.

Emboss most of the flowers in different embossing folders. I used: Dot-Matrix, Honeycomb, Damask, and Bubbles.

Ink the canvas-covered flowers with Distress Inks. The embossed parts will pick up more of the ink and become darker.

Heat the modeling film flowers with a heat gun, one flower at a time. On the larger flowers you have to work one section at a time because the film cools down quickly. Shape the flowers. Be careful not to burn yourself. Try not to reheat the flower because then the embossing might disappear. The Modeling Film keeps its shape perfectly.

Paint the metallic flowers with Distress Paints (Spiced Marmalade, Mustard Seed, Broken China).
 
When the paint is almost, but not completely, dry, wipe with a cloth to remove paint from the embossed parts.

Paint the flowers with watered-down brown paint and wipe most of it off. Heat them one at a time with a heat gun. Be extra careful not to burn yourself, because the metal makes the flowers hotter.

Die cut Spring Greenery from old book paper. I used a book about gardening. I also die cut tattered flowers from tulle.

The heart was painted with two coats of gesso and then with Antique Linen, Frayed Burlap and just a little bit of Walnut Stain. I stamped it with a script and a butterfly stamp, using Stazon ink.

The edges were stamped with this great text stamp by Tim Holtz.
 
Layer canvas and foil flowers, adding tulle flowers here and there. When you are happy with the arrangement, glue them together. I used hot glue. The smallest flowers at the front were attached together with a brad, but the full flower is too thick for a brad.

Layer two smaller flowers and attach with a brad.

 Adhere the flowers and text leaves to the background.

Tuck the leaves in here and there.

The Modeling Film gives great dimension to the leaves and flowers.

The mix of canvas and foil together with the various dry embossed patterns makes for a very interesting and tactile flower.

Remember to ask you local craft shop to pre-order the dies. You can also pre-order them at Simon Says Stamp: Jumbo Tattered Florals, Garden Greens, Spring Greenery, to make sure you get them quickly and before everyone else.

Thank you for looking!! Be sure to check out the Sizzix blog to see all the gorgeous projects created by the DT members using these dies.

Happy Crafting!

Anna-Karin

Supplies:
Surfaces: Wendy Vecchi Clearly For Art Modeling Film, White-out Modeling Film; Claudine Hellmuth Natural Sticky-Back Canvas; Ranger Metal Foil Tape Sheets; old book paper; tulle
Dies: Sizzix: Jumbo Tattered Florals, Garden Greens, Spring Greenery, Tattered Florals
Embossing folders: Sizzix: Damask & Regal Flourishes, Bubble & Honeycomb, Dot-Matrix & Gridlock
Stamp: Stampers Anonymous Tim Holtz: Classics #5, Classics #9, Tiny Things, Stuff to Say
Ink: Distress Ink: Tumbled Glass, Peacock Feathers, Gathered Twigs; Ranger Archival Ink Jet Black; Stazon Jet Black
Paint: Distress Paint: Antique Linen, Frayed Burlap, Walnut Stain, Spiced Marmalade, Mustard Seed, Broken China
Medium: Claudine Hellmuth Gesso

Thursday, December 12, 2013

CSI Scrap365 - Joy

Hello everyone! I forgot to post this layout I made for the third CSI and Scrap365 collaborative case file. If you have never seen the magazine Scrap365, I hope you will check it out, it is really fabulous. Here's the case file:
 
 
And my layout:
 
I decided to scrap this photo from my first Christmas, with my grandparents. From the evidence items I used: ribbons, birds, glitter, snowflake and brads. And from the testimony, I journaled about a Christmas/winter memory and tied a ribbon to my journaling spot (the tag behind the photo).
 
For the background, I used a favourite technique of mine, blocks of dry-embossed paper. The paper are Ranger's Specialty Stamping paper, but you can use other white cardstock too. I used various Tim Holtz Sizzix folders.   
 
The edges of the embossed papers were distressed and I also splattered Distress Ink on them, using Pumice Stone, Squeezed Lemonade and Worn Lipstick. The title was stamped with Pumice Stone and die cut with the coordinating die. The same Holiday Joy stamp and die set was used for the snowflake, holly leaves, pine trees and deer.
 

The coordinating dies make it very quick to cut out the trees and deer. The new magnetic platform also makes it so easy to use stamp/die combos. The photo was layered on a gelli printed paper and some cheese cloth.
 
I love these birds by Brenda Walton. It is a long Sizzlits die, so they are perfect as a border, but here I used only two. They were die cut from watercolour paper and watercoloured with Distress Inks (Scattered Straw, Pumice Stone and Worn Lipstick). I also added a border with die cuts, tinsel and linen ribbon.
 
More Pumice Stone stamping and splatters.

The gelli print that I used (made during this session) had a scalloped border from a Dylusions stencil, which I liked. The little angel come from the Christmas Thinlits set.

The journaling was written on a tag tucked behind the photos. It is about my first Christmas, Christmas memories of my grandparents and about different details I can spot on the photo.

Thank you for looking! I hope you will join us in this case file (deadline is 31 December).

Anna-Karin

Supplies:
Surfaces: Ranger Specialty Stamping Paper; Neenah Smooth Solar White cardstock; Daler & Rowney watercolour paper
Embossing folders: Sizzix: Iron Gate & Starry Night, Snow Flurries & Snowman, Snowflake Pattern & Plaid, Textured Poinsettia Pattern, Brush Poinsettia & Winter Berries, Holly Pattern & Wreath,
Dies: Sizzix: Bower Birds, Tag & Bookplates, Christmas, Holly, Beaded & Snowflake Garland
Stamps: Sizzix/Stampers Anonymous: Holiday Joy Framelits die set with Stamps
Ink: Distress Ink: Pumice Stone, Scattered Straw, Worn Lipstick
Embellishments: Tim Holtz Idea-ology: Tinsel Twine, Linen Ribbon; brads