Hi everyone! Have you seen the fun news?
Tim Holtz has
pre-released three dies, which will be shipping later this month:
Jumbo Tattered Florals,
Garden Greens and
Spring Greenery. They are fantastic.
The
Jumbo Tattered Florals are so large that they work perfectly for a home decor project. The
Tattered Floral die was one of my first Tim Holtz dies and I am happy to have a larger version now - the two also work great together. My favourite dies of the three are the two leaf dies. The leaves and leaf branches are fabulous and so useful together for many different types of projects.
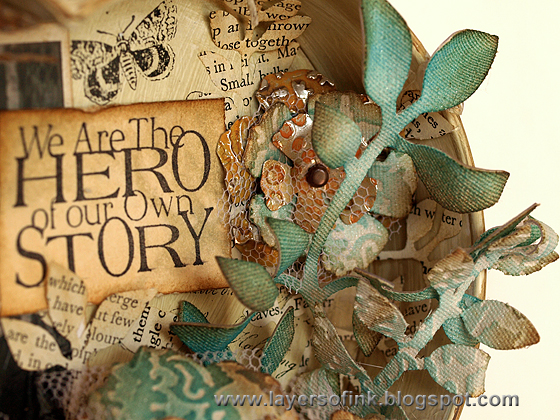
For my project, I made a large heart shadow box heart out of a tray I picked up at a shop for almost nothing. The flowers were inspired by the
flower canvas I made for
Tim's Tattered Floral challenge early this year and are made of a mix of some of my favourite materials:
Wendy Vecchi's Modeling Film, sticky-back canvas and foil tape. The heart is 8 inches wide and features one of my favourite photos of my grandmother. I took step photos.
Cover modeling film with natural sticky-back canvas and foil tape. Die cut flowers and leaves using the
Jumbo Tattered Florals,
Garden Greens and
Tattered Florals Bigz die.
Emboss most of the flowers in different embossing folders. I used:
Dot-Matrix,
Honeycomb,
Damask, and
Bubbles.
Ink the canvas-covered flowers with Distress Inks. The embossed parts will pick up more of the ink and become darker.
Heat the modeling film flowers with a heat gun, one flower at a time. On the larger flowers you have to work one section at a time because the film cools down quickly. Shape the flowers. Be careful not to burn yourself. Try not to reheat the flower because then the embossing might disappear. The Modeling Film keeps its shape perfectly.
Paint the metallic flowers with Distress Paints (Spiced Marmalade, Mustard Seed, Broken China).
When the paint is almost, but not completely, dry, wipe with a cloth to remove paint from the embossed parts.
Paint the flowers with watered-down brown paint and wipe most of it off. Heat them one at a time with a heat gun. Be extra careful not to burn yourself, because the metal makes the flowers hotter.
Die cut
Spring Greenery from old book paper. I used a book about gardening. I also die cut tattered flowers from tulle.
The heart was painted with two coats of gesso and then with Antique Linen, Frayed Burlap and just a little bit of Walnut Stain. I stamped it with a script and a butterfly stamp, using Stazon ink.
The edges were stamped with this great text stamp by Tim Holtz.
Layer canvas and foil flowers, adding tulle flowers here and there. When you are happy with the arrangement, glue them together. I used hot glue. The smallest flowers at the front were attached together with a brad, but the full flower is too thick for a brad.
Layer two smaller flowers and attach with a brad.
Adhere the flowers and text leaves to the background.
Tuck the leaves in here and there.
The Modeling Film gives great dimension to the leaves and flowers.
The mix of canvas and foil together with the various dry embossed patterns makes for a very interesting and tactile flower.
Remember to ask you local craft shop to pre-order the dies. You can also pre-order them at
Simon Says Stamp:
Jumbo Tattered Florals,
Garden Greens,
Spring Greenery, to make sure you get them quickly and before everyone else.
Thank you for looking!! Be sure to check out the
Sizzix blog to see all the gorgeous projects created by the DT members using these dies.
Happy Crafting!
Anna-Karin
Supplies:
Surfaces: Wendy Vecchi Clearly For Art Modeling Film, White-out Modeling Film; Claudine Hellmuth Natural Sticky-Back Canvas; Ranger Metal Foil Tape Sheets; old book paper; tulle
Dies: Sizzix:
Jumbo Tattered Florals,
Garden Greens,
Spring Greenery,
Tattered Florals
Embossing folders: Sizzix:
Damask & Regal Flourishes,
Bubble & Honeycomb,
Dot-Matrix & Gridlock
Stamp: Stampers Anonymous Tim Holtz: Classics #5, Classics #9, Tiny Things, Stuff to Say
Ink: Distress Ink: Tumbled Glass, Peacock Feathers, Gathered Twigs; Ranger Archival Ink Jet Black; Stazon Jet Black
Paint: Distress Paint: Antique Linen, Frayed Burlap, Walnut Stain, Spiced Marmalade, Mustard Seed, Broken China
Medium: Claudine Hellmuth Gesso


wonderful anna karin - love the colour combo and those super large dies look amazing xx
ReplyDeleteWonderful creation, must get those dies.
ReplyDeletewat weer besonders mooi, ek geniet!
ReplyDeleteWonderful! Love the colors and textures. Can't wait to get my hands on these!
ReplyDeleteGorgeous!!
ReplyDeleteOK, I love everything about this, don't even know where to start praising you. Just know that I think you made a stunner. Ooooh, the colors!!!! Thank you very much for the tutorial with such wonderful closeups showing all that delicious texture and color.
ReplyDeleteWow! Stunning to say the least, love the colors.
ReplyDeleteThis is absolutely stunning, Anna-Karin! LOVE the texture on your blossoms, and you have showed me some new mediums that now I really want to get my hands on. Love this!
ReplyDeleteBeautiful project. love the colours you've used.
ReplyDeleteThat is a beautiful piece of ART to have on display. Looking forward to getting the dies when they become available in the UK. Thank you for the inspiration :)
ReplyDelete