Sunday, May 19, 2013

Neverland Scenic Stamping

Today I am sharing my second scene for the May challenge at Craft a Scene, 'Ships in the Night'. There is still plenty of time to join us in the challenge.

On my last scene, 'The Black Pearl', Alison left a comment that it reminded her of Peter Pan, which I totally agreed with, and one reason might have been that we have often read Peter Pan at bedtime lately. I thought it was a great idea for another scene. Thank you Alison!

This is another half-sheet scene (8.5 x 5.5 in), done on glossy cardstock and coloured with dye inks. I used the sweet Neverland set from Artistic Outpost for the children and the sentiment. I wanted an island of course and used two new Stampscapes stamps, Rocky Waterside Left and Right for that. They are mirror images of each other. Here's a scene where I used them in another way. I stamped the one fully, and used a stamp positioner to line up the second one to create the island. To reduce the mirrored effect a bit, I added some more pine trees and bushes to the island, and the Stampscapes Spooky Branch sm. stamp was perfect for Peter Pan's hideout, the Hangman's Tree. I used the same ship as on The Black Pearl scene and wished I had a crocodile stamp too. I wanted a rough sea and stamped the Waves Sm. repeatedly. The sky is simple, with just a few clouds and birds.

I was in the mood for a black and white scene. If you have never tried this, I encourage you to try it out, it is a great way to learn about values, shadows and highlights and it is fun doing a scene with very few inks. You could use only black ink, but I like to start out with a lighter grey and used two shades of grey in addition to black. The stars and highlights were added with a white gel pen and quite a bit of mist with white pigment ink, dry-brushed on the scene.

Thank you for stopping by!!

Happy stamping!

Anna-Karin

Supplies:
Stamps: Artistic Outpost Neverland; Beeswax Ship; Stampscapes: Tree Duo 085A, Cloud Bits 292C, Waves Sm. 297C, Spooky Branch Sm., Rocky Waterside Left 324G, Rocky Waterside Right 325G, Winter Twigs 367B
Ink: Ranger Archival Jet Black ink; Distress Ink: Black Soot; Jenni Bowlin: Weather Vane; Memento: Grey Flannel; Colorbox Frost White
Surface: Kromecote glossy cardstock

Saturday, May 18, 2013

CSI case file 72: Snow Racer

Hello weekend! And of course a new CSI: Color, Stories, Inspiration case file. Here it is:

I love the kraft background and whimsical images. My layout:

Layers of ink: Snow racer, CSI case file
I felt like a winter layout and these photos fit very well with the case file. From the evidence I used: something clear, bird, book page, kraft background and metal. From the testimony: I placed my journaling in a glassine pocket and the layout is also partly about balance.

I used a stencil and light molding paste for the snowflake and part of the title and also added some glittery foam snowflakes, my supply of which has dwindled lately because my son got hold of them and pasted them in neat rows all over his toy drawer unit. I layered dictionary and patterned papers under the photos.

The two birds were stamped on the background and coloured with coloured pencils. Love the texture of the molding paste and the light paste is great because it doesn't add much weight to the layout and it is an opaque white.

I had just die cut a row of pine trees from clear packaging for another project, but hadn't used it, it was perfect for this layout. I coloured it at the back with Juniper and Bottle alcohol ink and added some snow with Picket Fence Distress Paint. The snowflakes were die cut from dictionary and patterned papers and layered together with a mini gear in the center.

Here's a close-up of the texture of the snowflakes.

Journaling summary: 'This is our old snowracer, which was first our cousin's, so it is pretty old. That is good quality. Imagine all the fun this snowracer has had through the years. Anton was so very happy when he could sit behind his cousin (who had been skiing) on the snowracer and be pulled. It wasn't half as fun to sit on your own. Very very cold weather.'

Thank you for the visit! I hope you will have a great weekend!

Anna-Karin

Supplies:
Dies: Sizzix: Tree Line On the Edge, Snowflakes Framelits, Snowflake Frame, Tag & Tie
Stamps: Stampendous Snow Bird; Prima: Lyric bird; Graphic 45 Typewriter Letters
Ink: Ranger Archival Ink Jet Black
Alcohol Ink: Ranger Adirondack: Juniper, Bottle
Paint: Distress Paint: Picket Fence
Stencil: Dylusions: Let it Snow
Medium: Golden Light Molding Paste
Surfaces: Prima Sunset/Sunrise 6 x 6 pad; MME Collectable
Embellishments: Tim Holtz Idea-ology Word Sticks, Mini Gears, Seasonal Chit Chat stickers; Pom Pom trim; Making Memories glassine envelope; Baker's Twine

Thursday, May 16, 2013

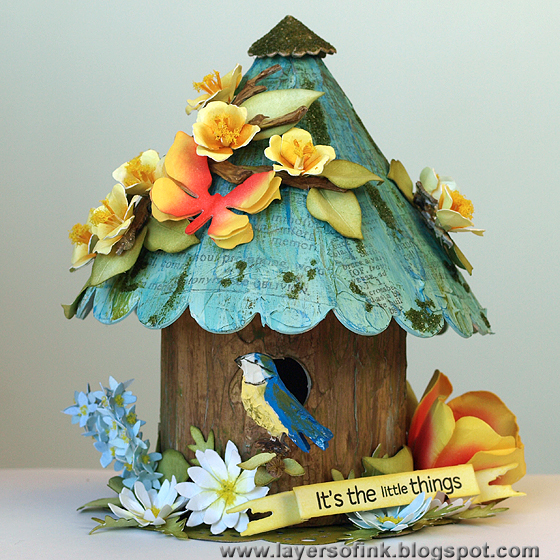
Susan's Garden Birdhouse and Flowers tutorial

Hi everyone! Today I am sharing a fun tutorial on the Sizzix blog, using the brand new Susan's Garden dies by Susan Tierney-Cockburn. When I first saw them, I knew I would love these dies, since I like to make my own flowers. You can see the whole collection here.

Here's the finished project, a happy birdhouse surrounded by flowers. I was pretty happy with how it turned out. Susan's flower dies work great together with 3-D projects, which are one of my favourite things to make. I love to make houses, so picking the Rounded 3-D Birdhouse as a base for my project was easy. All the flowers were made from white paper and coloured with Distress Inks. The flowers look very intricate, but they are easy to make. The finished project is about 5.5 x 5.5 in. This is another long tutorial, because there are many details and techniques. You don't have to do the entire project, pick just one of the flowers for instance, or just make the birdhouse.

Susan has made great videos where she shows how to make each flower. If you are making a project for someone who loves a particular flower, you can make a flower that looks just like that, but on the other hand, the flowers don't have to look like the example flowers, you can make a large variety of both real and imagined flowers with these dies.

To see the tutorial, head over to the Sizzix blog.

Happy Crafting!!

Anna-Karin

Tuesday, May 14, 2013

Postage Stamp Suitcase

Hi everyone! I was happy to get to play with the new Darkroom Door Postage Stamps background stamp. Don't miss the post on the Darkroom Door blog where some of my design team mates show different projects using this same stamp.


This is a really useful background stamp which can be used on a large variety of projects: cards, layouts, 3-D projects etc. My first thought when I saw it was of old suitcases covered with stamps or travel destinations stickers. 
 Layers of ink: Postage Stamp Suitcase
I made a suitcase using Eileen Hull's Sizzix Suitcase Bag die, which is a favourite of mine. There is a mini-book inside. The suitcase was die cut from cream mat board and stamped with the Postage Stamps background stamp, using Archival Jet Black ink. I inked it with Old Paper and Gathered Twigs. If you want to see a tutorial for another version of the suitcase, I made one here. More suitcases: here, here and here. My suitcases look pretty nice standing together on a shelf.
 
A suitcase needs a ticket and some luggage tags. The ticket was stamped with one of the sentiments from the Nomad set, and the two small tags were inked and stamped with sentiments from New York Vol. 1
 
Background stamps don't only need to be used for backgrounds, I stamped the Postage Stamps again, on Ranger's Specialty Stamping paper and coloured three of the stamps lightly with Distress Inks. They were cut out and placed underneath a die cut postage stamp frame, just cut the inner frame away to form a frame. The postage stamp frames were inked first with Brushed Pewter Distress Stain, but I wanted more colour and went over them again with Barn Door Distress Stain, giving them a nice red metallic look. 
 
I kept the back of the suitcase simple because I didn't want to cover up the background, and used only one framed postage stamp.  
 
Here you can see the suitcase from the side.  
 
The two small tags were tied to the handle. I love these types of small sentiment stamps, they are very useful. 
 
On the inside, I stamped the gorgeous Central Park photo stamp with Archival Jet Black and inked with Old Paper, Bundled Sage and Gathered Twigs. I love how it looks like you are looking really far into the suitcase because of the perspective in this stamp. A little left-over bird on my desk flew into the suitcase too. 
 
On the front flap, I stamped a stamp from the Love Letters Vol. 2 set and some more sentiment stamps from New York Vol. 1. As you can see 'N.Y.C' is stamped twice, I forgot that the lower part of the suitcase would be covered up by the flap. 
 
Inside the suitcase there is a small mini-book, which can be filled with travel memories and photos, or perhaps with quotes.  
 
The pages are made from manila cardstock which was coloured with Bundled Sage, Antique Linen, Frayed Burlap and Brushed Pewter Distress Stain. When dry, I cut them into pages (7x8 cm) and stamped them with different background and photo stamps using Frayed Burlap ink. I also added some sentiments and more stamping with black ink. The back of each page was left blank, to give more space for writing or photos. All the edges were inked with Gathered Twigs. 
 
I bound it with my Bind-it-All. This first stamp comes from Venetian Vol. 1
 
Here's one of the inside pages, with a stamp from New York Vol. 1.

Thank you for looking!!

Happy Stamping!

Anna-Karin

Supplies:

Darkroom Door products:
Photo stamps: Central Park, Bicycle, Laneway

Other products:
Surfaces: Sizzix Little Sizzles cream mat board 6 x 13; Ranger Manila Cardstock, Specialty Stamping Paper
Ink: Ranger Archival Jet Black Ink; Ranger Distress Ink: Old Paper, Gathered Twigs, Bundled Sage, Mustard Seed
Stain: Ranger Distress Stain: Bundled Sage, Antique Linen, Frayed Burlap, Barn Door, Brushed Pewter
Embellishments: twine; ribbon 

Monday, May 13, 2013

Learning to Count Board Book

Hello! This week at Simon Says Stamp & Show our challenge is to use 6 x 6 paper pads, which have become very popular lately. I am happy that so many brands now sell their patterned paper in these smaller shapes. You can also use other small versions of larger papers, such as the 6 x 6 paper in the Tim Holtz paper pads.

I love 6 x 6 papers and most of the patterned paper I use nowadays come from these pads. The smaller prints fit perfectly for my favourite ways of using patterned paper: die-cutting, stamping and for smaller sized projects. This week I made a children's board book teaching numbers and counting, using a lot of different 6 x 6 papers and the fun Sizzix Karen Burniston Door die. The book is made from mat board, covered with patterned papers (size). This is the front, with Word Play letters spelling 'Fun numbers'. Some of the letters were coated with Glossy Accents, and so was the arrow.

All the pages are covered with a different patterned paper and this was a great time to use papers I might not otherwise use, such as very busy papers with lots of patterns. I embellished the pages with little things found in my scrap box, even the photo of my son running away was there. The stamped text on the label translates, 'how many'. Each page has a door which was first die cut from mat board. I cut away the door part, to get just a door frame. Then it was die cut again from different patterned papers. Behind this first door, there is, as you might guess, nothing.

Tim Holtz new Numeric stamps were perfect for the numbers on the door, since they are large and also show the numbers very clearly. I stamped each number out with letter stamps too, for another element of learning. The book can help a child recognise numbers, letters and to count, plus that it hides little fun details here and there.

For the inside of the doors, I picked stamps that my son would find interesting. They were stamped with Archival Jet Black ink and coloured with coloured pencils. A Paris to London balloon here.

The Mater character from Cars is very popular, so he had to be in the book.

Some of the papers I used have numbers, map print, text, and other interesting things. All the door frames were painted with a different colour Adirondack paint dabber.

Three Tim Holtz air planes.


These are, I think, my favourite pages in the book, because the papers worked so well together, with the map, the children, the houses and all the numbers.

Five globes. This is a good time to use some small stamps.

And six houses.

More pages, I hope I am not boring you! More people, numbers and balloons. The star circle stamp is from Simon Says Stamp exclusive Shoot for the Stars set.

Seven hearts from the Simon Says Stamps exclusive Lots of Hearts set, stamped with Vermillion ink.

Eight balloons. It was starting to get hard to find small enough stamps, which were still interesting.

And finally, more house paper, some glasses and bicycles. I was happy to have used so many different patterned papers. This book has become very popular and we have read it many times already, counting all the different images. Anton is proud to have his very own handmade book.

Nine mothers (according to my son), stamped with olive ink.

And finally ten red cars.

The back of the book, with this sweet Basic Grey paper. The holes were punched with my Crop-a-Dile. Since I bound it with rings, the pages can be moved around to make it more of a challenge to the child.

I hope you will join us this week and show your projects with 6 x 6 papers. As every week, our sponsor Simon Says Stamp gives a $50 gift voucher to one random participant.


Thank you for stopping by!

Happy crafting!!

Anna-Karin

Supplies:
Stamps: Simon Says Stamp: Lots of Hearts, Shoot for the Stars; Stamper's Anonymous Tim Holtz Numeric, Paris to London, Attic Treasures, Warehouse District; Ranger Dyan Reavelely Right up your Street; Hero Arts: Monster Fun CL391, Going CL478, Hey y'all, Playful Flower Letters, Robot Trio, Past Times; TJ Designs Vintage School Days; EK Success Cars Tow Mater
Surfaces: 6 x 6 paper pads: Hero Arts/Studio Calico: Take Note, Heyday, Abroad, Yearbook, Memoir, Classics 3; BasicGrey: What's Up, Oxford, Life of the Party, Wander, Paper Cottage; My Mind's Eye: Be Happy; Tim Holtz Idea-ology grungeboard, Sizzix Little Sizzles mat board; felt
Ink: Ranger Archival Ink: Jet Black, Vernillion, Olive
Pencils: Derwent Studio Pencils
Embellishments: Tim Holtz Idea-Ology Symphony tissue tape; Studio Calico wood veneer shapes: Birds, Tiny Stars, Transportation; Creative Impressions ABC printed twill, Antique Ruler; rhinestones

Saturday, May 11, 2013

CSI case file #71: Water balloons

Hello everyone! Time for another CSI: Color, Stories, Inspiration challenge, and a fun one it is:

My layout:

I adapted the sketch, because I had four photos I wanted to use and they didn't work well as circles. Instead I die cut them into rectangles. From the evidence I used:  bicycle, window, twine, clouds, circles, paint and ink splatters, From the testimony, I journaled on cloud 'speech bubbles'. This layout is about how much my son loves to play with water balloons, if we have a bag at home, it is the very first thing he wants to do in the morning. Some days we have tossed about 50 of these balloons, and they all need to be filled up first.

I smeared molding paste through a stencil on watercolour paper to make the dots. After the paste dried I painted blue watercolour paint on top - the paste resists the paint. I also splattered yellow Dylusions spray and made a few squiggles with it too. There is a die cut washer border behind the photos and a Darkroom Door window stamp in the middle.

The clouds were die cut from white smooth paper and I used three of them to write my journaling on. I also stamped Tim Holtz new Tiny Things stamps here and there on the background. The fun bicycle paper comes from a Studio Calico pack and the dotted paper is BasicCrey, die cut with the Scallops on the Edge die.

The fragment circles were coloured with alcohol ink, to sort of look like transparent balloons. I stamped them with images from the Tiny Things set.

Some more stamping and texture.

Thank you for the visit! Enjoy your weekend!

Anna-Karin

Supplies:
Dies: Sizzix: Washer Border, Wanted, On the Edge Scallops, Arrows, Banners, Chevrons & Clouds, Hearts Set, Rectangles Framelits
Stamps: Stamper's Anonymous Tim Holtz: Tiny Things, Tiny Textures; Darkroom Door Window Frame
Surfaces: Daler & Rowney watercolour paper; BasicGrey and Studio Calico 6 x 6 in paper pads; BoBunny dotted paper
Ink: Ranger Archival Ink French Ultramarine; Stazon Jet Black
Alcohol ink: Sunshine Yellow, Stonewashed, Red Peppber
Mist: Dylusions ink: Lemon Zest
Paint: Daler & Rowney watercolours
Medium: Golden Molding Paste
Embellishments: Tim Holtz Idea-ology circle fragments; baker's twine

Tuesday, May 7, 2013

Heart Gift Bag

Hi everyone! Today I have a Mother's Day project to share with you, using different Darkroom Door stamp sets, Eileen Hull's Sizzix Heart Bag die and lots of ink.

I made a heart gift bag, if you change the sentiments it could work for lots of other topics too. Both sides of the bag are stamped and decorated, this is the front. The bag was die cut from cream mat board using the Sizzix Heart Bag die. It was decorated with flowers, a dragonfly, a butterfly and of course some sweet sentiments. I used sentiments from All Occasions and stamped them on inked tattered banners. The tiny heart stamp comes from that same set.

I white embossed flowers from Bold Blossoms, which is such a gorgeous and useful stamp set. On some of the flowers, I bent the stem on my acrylic block, so that it doesn't stamp straight, but rather follow the line of the heart. Love that you can do that with cling stamps. The heart and the sides of the bag were inked with Antique Linen, Victorian Velvet and Barn Door distress inks. Then I used the same flower stamps again and overstamped the embossed images with Fired Brick ink, placing the stamp a little bit to the side, to create a shadow effect. I love script stamps and used the French Script stamp with brown ink. I held the stamp in my hand instead of mounting it on an acrylic block, for a more random effect.

You can see the shadow effect better here. The embossing resists the ink, that's why it looks as if the red impression is behind the white one. I felt that the heart needed a border, and smeared embossing ink along the edges and embossed with white powder.

The dragonfly from Wildflowers Vol. 1 was white embossed three times on vellum, cut out and layered. I attached it with a mini staple.

The flowers were die cut from patterned papers, rolled up, inked smeared with a bit of Platinum Stickles. See this tutorial on how to assemble these.

The second little flower on the front.

This is the other side of the bag, stamped with different flower stamps and I also used another sentiment on the banner.

I stamped the red impression of the largest flower a bit too much to the side of the white embossed flowers, but decided to leave it as it was. If you want more precision, use a stamp positioner (mine was hiding somewhere when I did this project).

The butterfly from Wildflowers Vol. 1 was white embossed three times on vellum and layered. It looks pretty where it flutters among the flowers.

 Another two little flower die cut from patterned paper.

After assemblying the bag, I glued lace trim around the edges and made a handle, tying it into a knot on the one side of the bag.

Thank you for looking!

Happy Stamping!

Anna-Karin

Supplies:

Darkroom Door products:
Stamps: Bold BlossomsWildflowers Vol. 1, All Occasions, French Script

Other:
Surfaces: Sizzix Little Sizzles cream mat board 6x13; Ranger Manila cardstock; vellum; BasicGrey 6x6 paper pads
Dies: Sizzix: Heart Bag, 3-D Flower Bloom w/Leaves, Tattered Banners
Ink: Distress Ink: Antique Linen, Victorian Velvet, Barn Door, Fired Brick, Gathered Twigs; Ranger Emboss-It dabber; Versamark
Embossing Powder: Ranger Seamfoam White
Embellishments: lace trim, pearls