Hello stampers! Welcome to my blog on this last day of January! For today's project, I revisited an old favorite, namely shrink plastic. I never stopped using shrink plastic, but definitely used it more in my early papercrafting days.
Please note: this post has affiliate links, for which I receive a small percentage of sales generated by the link, at no extra cost to you.
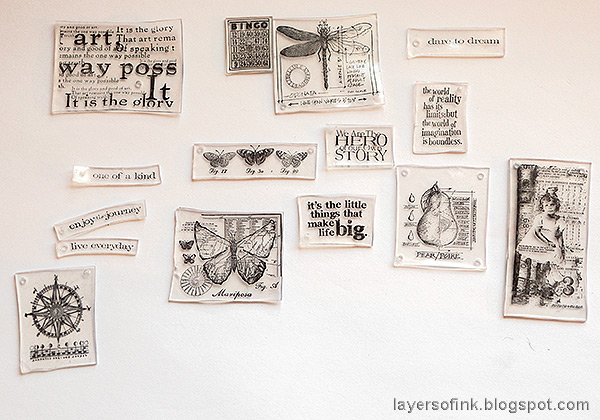
Shrink plastic is like magic and makes it possible to shrink a large stamp or die cut into something smaller and dimensional. I used a whole bunch of sentiment and collage type stamps for this card and decided to fill the entire card front with shrink plastic panels.
I find that it is often easiest to use brads, string or stitches to attach shrink plastic pieces. You need to punch holes before shrinking the plastic. Punch holes with a Crop-A-Dile.
I used a
Simon Says Stamp Pawsitively Everything Tool on top of a box when shrinking my pieces. Flatten them out with an acrylic block or a wood-mounted stamp. The pieces don't always shrink to the exact shape that they originally were, which means that many of them won't be completely square or rectangular. I like that imperfect look. Move the pieces around on your cardstock until you are happy with the placement. I made two additional pieces to fill in two gaps.
Here you can see the amount of shrinking that will happen. Cool isn't it?
You can color the shrink plastic before shrinking, but I decided to do it afterwards since I wanted to be able to plan where the pieces would go first. It also gives you more control of the color since the shrinking process darkens colors. Color the pieces at the back with
alcohol ink and a
felt applicator on your ink-blending tool. Don't color on the front since that will ruin your stamping.
The background is neutral. I inked the heavystock paper with Distress Ink and misted lightly with water.
Place the pieces on the cardstock again to see if you want to change anything. You can remove the alcohol ink with
blending solution. I lightened the pieces in a few places.
Attach the pieces with Tim Holtz brads. As you can see, they are a little wonky and skewed, which I really like.
The small sentiment banners were stamped with Tim Holtz Simple Sayings. The beautiful dragonfly, as well as the compass and pear, come from Stamper's Anonymous Classics #1. I used several of the Classics sets since they have beautiful collage images.
I added a Label Sticker sentiment too. The art words panel behind it comes from the Classics #4 set.
Since the pieces aren't all completely flat, the card has quite a bit of dimension and it also adds movement.
I hope you enjoyed this tutorial and that it inspired you to use some
shrink plastic.
Thank you so much for visiting my blog today!
Happy stamping!
Anna-Karin
Supplies:
* Please note: the links are affiliate links, for which I receive a small percentage of sales generated by the link, at no extra cost to you.


No comments:
Post a Comment
Thank you so much for leaving a comment! Happy Crafting!