Friday, November 6, 2020

Shimmery Dry Embossed Flowers

Hello friends! Simon Says Stamp has a new release called Holly Jolly and today I have two projects to share made with a product from the release.


The Holly Jolly release contains a surprise, a new type of product in the Simon Says Stamp Exclusive range, namely embossing folders! I was so happy when I saw that since I love embossing folders. I can clearly remember the first time I used one, making dry embossing so much easier and quicker than what it used to be and opening up for a range of techniques. The release also contains wonderful stamps, dies and stencils. You can see the full Holly Jolly release here.

Layers of ink - Shimmery Dry Embossed Flowers Card Tutorial by Anna-Karin Evaldsson.

I used the Floral Field embossing folder. The folders are detailed and thick and create fantastic dimensional embossing. Here I used two different methods for adding color to the background, but with a similar result. I was in the mood for neutral colors this week, and they shimmer!

Layers of ink - Shimmery Dry Embossed Flowers Card Tutorial by Anna-Karin Evaldsson. Simon Says Stamp Floral Field.

The first technique was done with Distress Ink. Press the ink directly onto the embossing folder.

Layers of ink - Shimmery Dry Embossed Flowers Card Tutorial by Anna-Karin Evaldsson.

Mist a piece of watercolor paper with water on both sides and add a few mists of homemade shimmer mist on the top side. Mix a tiny bit of Perfect Pearls powder into a Mini Mister and fill with water. This is the sandwich you will use if you have a Sizzix BigShot: Multipurpose platform Tab 1, folder with paper inside, 1 cutting pad. 

Layers of ink - Shimmery Dry Embossed Flowers Card Tutorial by Anna-Karin Evaldsson.

The embossing has fantastic details and so many layers. Isn't it gorgeous? I inked it with a little Antique Linen and Vintage Photo. I also misted the background with a little more glimmer mist.

Layers of ink - Shimmery Dry Embossed Flowers Card Tutorial by Anna-Karin Evaldsson.

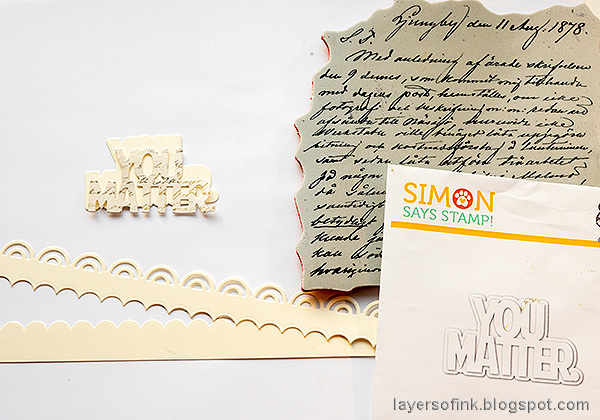
Die cut the You Matter background and the Slimline Borders and Edges from cream paper. The You Matter words were die cut from leftover inky paper and stamped with the Old Letter Background stamp, using brown ink.

Layers of ink - Shimmery Dry Embossed Flowers Card Tutorial by Anna-Karin Evaldsson.

Ink the borders with Distress Ink.

Layers of ink - Shimmery Dry Embossed Flowers Card Tutorial by Anna-Karin Evaldsson.

The panel was mounted on two shades of brown cardstock, with the two slimline borders and a small piece of lace. The sentiment was adhered with foam tape.

Layers of ink - Shimmery Dry Embossed Flowers Card Tutorial by Anna-Karin Evaldsson.

The text stamping adds a nice touch and makes the sentiment stand out from the background.

Layers of ink - Shimmery Dry Embossed Flowers Card Tutorial by Anna-Karin Evaldsson.

Here you can better see the amazing detail and dimension and the effect of the glimmer mist. I added a pearl to each flower center.

Layers of ink - Shimmery Dry Embossed Flowers Tag Tutorial by Anna-Karin Evaldsson.

The tag has more of a textured mixed media look to it, but is just as easy to make. Here I used Distress Paint instead of Distress Ink.

Layers of ink - Shimmery Dry Embossed Flowers Tag Tutorial by Anna-Karin Evaldsson.

Start with a tag that has been coated with gesso.

Layers of ink - Shimmery Dry Embossed Flowers Tag Tutorial by Anna-Karin Evaldsson.

Apply Antique Linen Distress Paint directly to the embossing folder. When you are done with the embossing, immediately clean the folder since you don't want the paint to dry on the folder.

Layers of ink - Shimmery Dry Embossed Flowers Tag Tutorial by Anna-Karin Evaldsson.

Mist the tag with water before embossing. Here is the embossed tag, with color already added by the embossing folder.

Layers of ink - Shimmery Dry Embossed Flowers Tag Tutorial by Anna-Karin Evaldsson.

I wanted more color and texture and painted the tag with Antique Linen, Pumice Stone and a little Ground Espresso. Mist heavily with water and then let dry. It takes a little while, but is well worth the wait since the paint will settle in the grooves. When dry, I misted with the glimmer mist.

Layers of ink - Shimmery Dry Embossed Flowers Tag Tutorial by Anna-Karin Evaldsson. Simon Says Stamp Mix and Match Circles.

The sentiment circle was done with the Mix and Match Circles set, from the STAMPtember release. The set has many coordinating circles. You can overlap them or layer them. They fit perfectly into one another as you can see here. Stamp one of the sentiments in the center. I used SSS Khaki and Dark Chocolate ink.

Layers of ink - Shimmery Dry Embossed Flowers Tag Tutorial by Anna-Karin Evaldsson.

Here you can see some of the cool texture of the embossing, paint and glimmer mist. The mummy cloth was dyed with Antique Linen Distress Spray Stain.

Layers of ink - Shimmery Dry Embossed Flowers Tag Tutorial by Anna-Karin Evaldsson.

Use different colored brown ink for the circles. The dotted circle fits into the lighter double circle. Mount with foam tape.

Layers of ink - Shimmery Dry Embossed Flowers Tag Tutorial by Anna-Karin Evaldsson.


I also added some SSS Aztec Gold sequins. The little bag of sequins had opened or broken in my last order and when I opened the box it looked like a treasure, with gold everywhere. I managed to collect most of the sequins, but there are still some here and there. My youngest loves to find them.

Layers of ink - Shimmery Dry Embossed Flowers Tag Tutorial by Anna-Karin Evaldsson.

Glue two borders to the bottom of the tag to cover up the unembossed area. Add sequins and a piece of lace trim.

Layers of ink - Shimmery Dry Embossed Flowers Card Tutorial by Anna-Karin Evaldsson.


I hope you enjoyed this Holly Jolly inspiration! Have a wonderful weekend and stay safe.


Happy crafting!

Anna-Karin

Supplies:

* Please note: the links are affiliate links, for which I receive a small percentage of sales generated by the link, at no extra cost to you.

No comments:

Post a Comment

Thank you so much for leaving a comment! Happy Crafting!