
Hi friends! Today I have two beach cards made with the same stamp set, but with different papers and inks.
Please note: this post has affiliate links, for which I receive a small percentage of sales generated by the link, at no extra cost to you.

Using different papers and inks can change the look of your project a lot. Sometimes you might also struggle to get a good result if you use a paper and ink combination that don't work well together. On the card to the left, I used Distress Ink combined with watercolor paper. On the card to the right, I used Ranger's Specialty Stamping Paper with Archival Ink. Solid clear stamps can be hard to get a good result with on some papers. I used the Beachcombing stamp set from Simon Says Stamp new Sunny Vibes release.

I had inky Specialty Stamping papers leftover from another tutorial. You can see how they were made here.

Start by white embossing one of the shells on a pink paper.

Stamp the three coordinating solid stamps with Archival Inks. You can also try other types of ink. Test how it will work on a scrap piece first. Since the inks are transparent, not all colors will look great on every background, since the background will show through slightly.

Stamp the shell one more time on Simon Says Stamp Masking Paper and mask the image. White emboss other stamps from the set. The stamps are very nicely organised on the backing sheet and it is easy to see which solid stamp belongs to which outline.

Continue stamping the solid stamps on the rest of the images.

I repeated the colors from the first shell on the large one to the right.

Ink Distress Ink through the Simon Says Stamp Happy Rainbows stencil to add bubbles to the top part of the card. Stamp sentiments from Beachcombing with brown ink.

Now on to the second card. Start with a piece of watercolor paper which has been tinted with Antique Linen Distress Ink. White emboss the images as before.

Stamp the solid images with Distress Ink. Mist the stamp with water about three times after inking it.

Don't worry if the stamping isn't completely in the lines, with this watercolor technique it just adds to the look. I stamped the smaller stamps before the larger impressions had dried completely, making the inks blend on the paper.

I restamped some of the images with darker ink, not applying ink to the whole stamp, to create shading. Ink through one of the Happy Rainbows stencil as before and stamp a sentiment. This stencil set is very versatile.


Add some sequins here and there to shine and as bubbles.

The Specialty Stamping paper has a nice, but subtle, texture. It is matte.

The Archival Ink might cover up some of the white embossing slightly.

You can also add more masking to the card. It makes the stamped images appear more connected.

I splattered some ink on the watercolor card before matting it on orange and cream papers. The cardbase is Simon Says Stamp Peacock cardstock. Avoid splattering on the sentiment since that might make it hard to read.

Distress the edges of the watercolor paper and add some sequins.
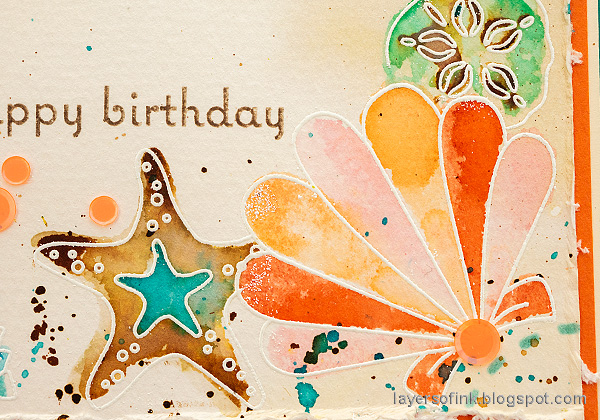
The Distress Ink blend in a nice way on the images.

The large shell benefitted from darker brown stamping in the shadow areas.


Don't miss the new Sunny Vibes release.

Thank you so much for stopping by here today!
Anna-Karin
Supplies:
* Please note: the links are affiliate links, for which I receive a small percentage of sales generated by the link, at no extra cost to you.
* Please note: the links are affiliate links, for which I receive a small percentage of sales generated by the link, at no extra cost to you.
No comments:
Post a Comment
Thank you so much for leaving a comment! Happy Crafting!