
Hello friends! Today I have a Christmas ornament to share which you can make for yourself or as a gift to someone. Mine is now a part of my Christmas village, which I have been building with projects for many years: houses, nature scenery and more.
Please note: this post has affiliate links, for which I receive a small percentage of sales generated by the link, at no extra cost to you.

I love to make snowy scenes and to create snow in different ways. This project was inspired by a Swedish poem called 'Santa' ('Tomten'), by Viktor Rydberg from 1881. It is about a gnome who helps out secretly at a little farm. He is standing about one cold mid-winter's night thinking about the meaning of life. The Swedish gnome/Santa is more of a humble gnome than the jolly Santa, which is why I gave him mainly neutral colors, with just the hat and the gloves being red. The poem is a favorite of mine.
I used a wooden disc as a base, but you could also use a tin, gift box or a small canvas.

I placed some Distress Paint in a plastic bag, misted the idea-ology Tree Lot trees with water and then placed them in the bag, rubbing the paint into the needles. This is a mess-free way of coloring the trees. I used mainly Rustic Wilderness, but also some Pine Needles. You can use Lucky Clover instead of Pine Needles.

When the trees were dry, I added snow with white paint, using Dina Wakley's white paint, which is thicker than the white Distress Paint.

Add some Distress Texture Paste to the trees as thicker snow. Sprinkle a few Mica Flakes on top and then sprinkle again with Rock Candy Glitter.

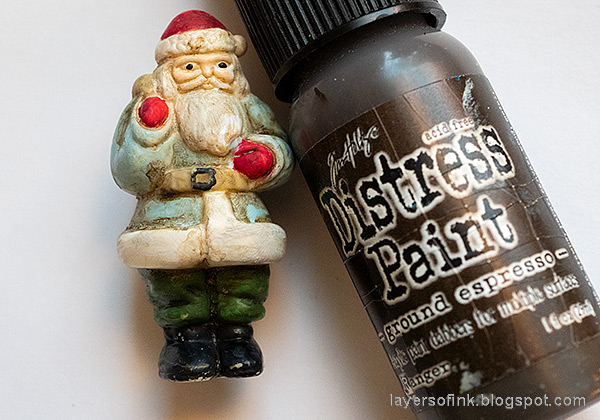
I painted the Tim Holtz idea-ology Salvaged Santa with Matte Medium first, to make the paint stick better. You can skip this step.

Paint Santa with Distress Paint. Let dry. You can leave him like this, or distress him, like I did.

Apply a thick layer of texture paste to the base. I later added more than what you see here.

Press the Santa and the trees into the paste. Sprinkle Mica Flakes all over and then add Rock Candy glitter. The Rock Candy makes wonderful snow.

I added white details to the Santa with a white gel pen. I also added a little matte medium and a little texture paste to the Santa and sprinkled with Rock Candy.

I made a snow lantern from Tim Holtz Baubles.

I just love the look of the Rock Candy glitter crystals.

This gnome/Santa isn't carrying gifts on his back, but instead food for the animals on the farm. The tradition is to place a bowl of rice porridge out for the gnome on Christmas Eve, so that he is happy to continue helping out at the farm.

To make the trees coordinate better with the Santa, I added a little bit of brown, both to the pines and to some of the texture paste.

The sparkly snow is my favorite part of this project.

If you want more of a winter-project and less of a Christmas-project, use the Salvaged Snowman instead. I actually did a similar project three years ago, but with the snowman and using different colors. You can find that Winter Wonderland tutorial here.

Thank you so much for stopping by here today!
Happy stamping!
Anna-Karin
Supplies:
* Please note: the links are affiliate links, for which I receive a small percentage of sales generated by the link, at no extra cost to you.
No comments:
Post a Comment
Thank you so much for leaving a comment! Happy Crafting!