
Hi friends! Today, I have another Christmas décor project to share, a winter scene in a clock.
Please note: this post has affiliate links, for which I receive a small percentage of sales generated by the link, at no extra cost to you.

I built a little winter/Christmas scene in a Tim Holtz Christmas Curio Clock using mainly shades of pink, turquoise and white. One of my favorite things is to create the look of snow in different ways and here I used texture paste, Rock Candy Glitter and Grit Paste Snowfall.

Ink the Tim Holtz Tree Rings folder with Saltwater Taffy and Abandoned Coral. Cut a circle from watercolor paper, mist the paper and emboss.

Glue the embossed paper to the back of the clock. I also wanted to lift the floor a little and cut a piece of mat board. Add two blocks of foam underneath, or something similar.

Color Tim Holtz Baubles and Bubbles with alcohol ink. Place a few drops of alcohol ink in a plastic bag and place the baubles in the bag. I colored some Heirloom Roses too, but ended up not using them.

Fill a Tim Holtz Snowglobe with baubles and bubbles, using some without color too. Sprinkle mica flakes into the globe.
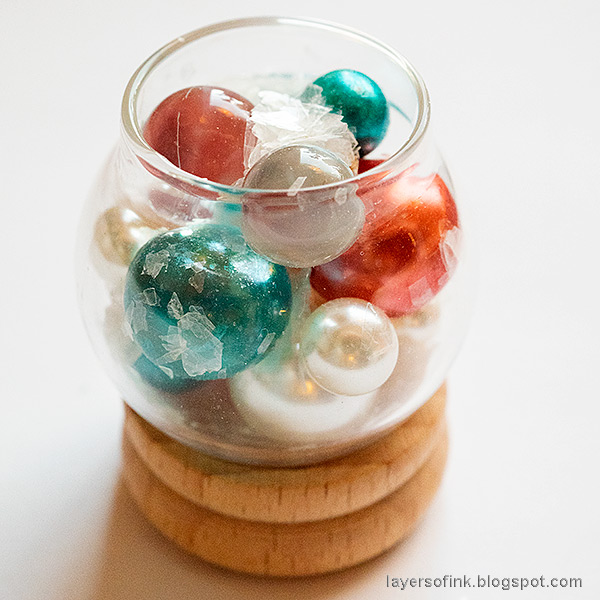
I kept the globe upside down in the wooden base when filling it up.

Color Tim Holtz trees with Distress Paint. I used two shades of pink on the larger tree and Salvaged Patina on the smaller one.

When dry, add some Dina Wakley white paint to the pine needles, as snow.

I painted the horns of a deer with Salvaged Patina. The candy canes and Salvaged Deer were painted with matte medium and covered with Rock Candy Glitter. I added some glitter to the trees too.

The silver rim of the clock was painted white. Apply a thick layer of texture paste to the clock and press the embellishments into the paste, which will act as a glue.

The nose of the deer was painted with Dried Marigold before adding the glitter.
Add mica flakes to the paste and then sprinkle with Rock Candy glitter.


The Rock Candy adds a really nice glittery and frosty effect.

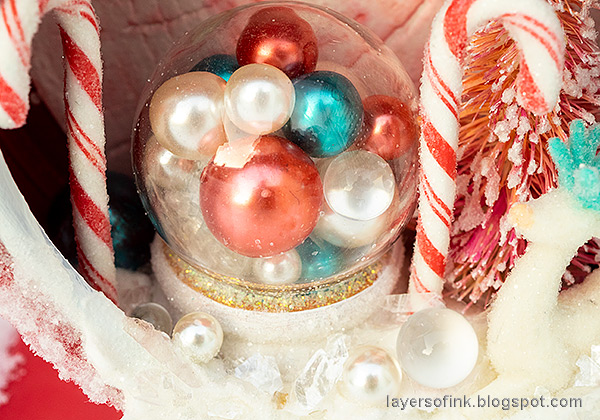
I painted the base of the snowglobe white and then coated that too with Rock Candy.

I applied Snowfall Grit Paste around the rim of the and sprinkle with Rock Candy, giving the look of frosty ice.

The snowglobe filled with mica, bubbles and baubles adds to the playful feel of the scene.

I added three Mirrored Stars to the background, splattering them with white paint.


I hope you enjoyed this tutorial. The project doesn't have to be a Christmas one since the Curio clock is great also for general winter scenes.

Thank you so much for stopping by here today!
Happy stamping!
Anna-Karin
Supplies:
* Please note: the links are affiliate links, for which I receive a small percentage of sales generated by the link, at no extra cost to you.
so pretty ! lovely work
ReplyDeletegreetings, martina