Monday, July 4, 2022

Dimensional Pansy Flower

Hi friends! July is already here and the sun is shining. 

Please note: this post has affiliate links, for which I receive a small percentage of sales generated by the link, at no extra cost to you.


This week we have a Red, White, and/or Blue theme at the Simon Says Stamp Monday Challenge Blog. I hope you will join us. Since it is the first Monday of a new month, the team is showcasing products from a specific designer/company and this week it is Paper Rose. You can see their wonderful range of products here. You don't have to use Paper Rose products to join, but it is always fun if you do. 

We also have a new guest designer and during July Rox aka Red Dirt Crafter will be our Designer Spotlight. Don't miss visiting her Instagram page to see what she has created.


Layers of ink - Dimensional Pansy Flower Tutorial by Anna-Karin Evaldsson.

I made a red, white and blue background directly on kraft cardstock and embellished the card with a dimensional pansy flower die cut with Paper Rose Etched Pansy 1 set

Layers of ink - Dimensional Pansy Flower Tutorial by Anna-Karin Evaldsson. Apply white paint through Simon Says Stamp Mix and Match Circles Stencil.

Start by applying white Distress Paint through the Simon Says Stamp Mix and Match Circles Stencil with a mini round ink-blending tool. Let dry and apply a second layer.

Layers of ink - Dimensional Pansy Flower Tutorial by Anna-Karin Evaldsson.

Continue with Distress Oxide Ink, off-setting the stencil slightly. I applied the ink with blending brushes.

Layers of ink - Dimensional Pansy Flower Tutorial by Anna-Karin Evaldsson. Die cut Paper Rose Etched Pansy 1.

Die cut the Etched Pansy 1 from watercolor paper

Layers of ink - Dimensional Pansy Flower Tutorial by Anna-Karin Evaldsson.

Smear Distress Inks on a non-stick craft sheet, mist with water and press the paper into the ink. This is a very quick way of coloring. Let dry, and repeat for darker colors.

Layers of ink - Dimensional Pansy Flower Tutorial by Anna-Karin Evaldsson.

When dry, add a darker shade with a blue colored pencil. I used Prismacolors.

Layers of ink - Dimensional Pansy Flower Tutorial by Anna-Karin Evaldsson.

Shape the flower, petals and leaves with Tim Holtz Shaping Kit.

Layers of ink - Dimensional Pansy Flower Tutorial by Anna-Karin Evaldsson.

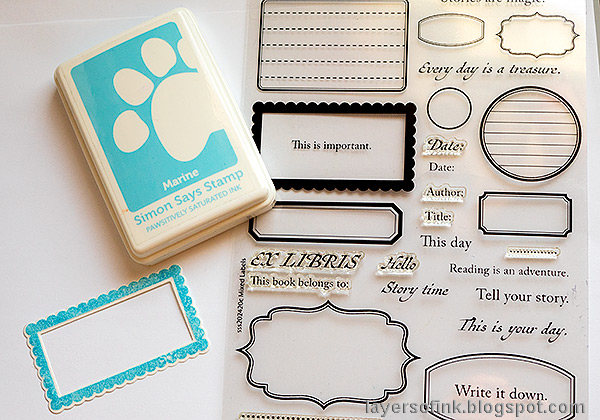
Stamp a label on white paper with Simon Says Stamp Mixed Labels and Marine ink. Die cut with the coordinating Mixed Labels set

Layers of ink - Dimensional Pansy Flower Tutorial by Anna-Karin Evaldsson.

The circles get a textured look from applying Distress Oxide Ink on top of the white paint. I also drew a border around the card with a white gel pen.

Layers of ink - Dimensional Pansy Flower Tutorial by Anna-Karin Evaldsson.

Stamp a sentiment from Mixed Labels with Royal ink. Assemble the flower and add Starshine Glitter  Stickles to the center.

Layers of ink - Dimensional Pansy Flower Tutorial by Anna-Karin Evaldsson.

The card was embellished with Design Tape from the Butterfly and Trims sets.

Layers of ink - Dimensional Pansy Flower Tutorial by Anna-Karin Evaldsson.


I hope you will join us this week in our Red, White and/or Blue challenge. You have a chance to win a $25 gift voucher to do some fun shopping at Simon Says Stamp. You have until Monday 8am Ohio time. 1pm UK time, 2 pm CET to join in.


Do you use Instagram? If so please add #sssmchallenge so we can see your entries there too.


Thank you so much for visiting my blog today! 

Happy crafting!

Anna-Karin

Supplies:

* Please note: the links are affiliate links, for which I receive a small percentage of sales generated by the link, at no extra cost to you.

1 comment:

  1. I love the texture from how you created your circles! So many lovely elements all around! I always forget that kraft makes such a great card - thank you for the wonderful inspiration!

    ReplyDelete

Thank you so much for leaving a comment! Happy Crafting!