Hi and welcome! Today I have another
Sizzix tutorial for you, for a pastel gingerbread house. I had such fun making this and it almost looks good enough to eat. Follow along to see how I got a shimmery glittery house without using any dry glitter.
When I posted my
Halloween Manor House tutorial some days ago, I wrote that I would soon be back with another house, and this is the one. It has the same base as the Manor House, Sizzix
Tim Holtz Village Dwelling die, with the addition of the
Village Gingerbread die, which contains a lot of fun details. I also used:
Mini Holiday Greens,
Tree Line,
Holiday Words Thin and
Mixed Media Christmas.
I had such fun creating this pastel house and it makes me happy just to look at.
I wanted a texture of the house reminiscent of cookies, and die cut one of the three dies from the
Mixed Media Christmas set. The pieces were cut and torn to fit onto the house. The
Village Dwelling house parts were die cut from T
im Holtz patterned paper packaging. It has just the right weight and I like to re-purpose packaging. Glue the pieces down with
Matte Collage Medium, and add a layer of medium on top too.
When dry, paint the house with Distress Paint.
Apply
Crazing Collage Medium to the house, using a palette knife. Make sure that you really get the medium into the recessed parts.
When the Crazing Medium is dry, fine cracks will appear. The cracks will be thicker where the medium was applied thicker - which in this case will be the recessed areas. Rub
Vintage Photo Distress Crayon into the cracks and onto the houses. Wipe some of it off with a slightly moist paper towel. On the top piece here, I wiped some of the colour off, on the bottom piece you can see the original application.
Die cut details for the house using the
Village Gingerbread die. I later changed my mind and used pink for the window shutters. Most of my shapes were die cut from color-core and kraft-core Distress cardstock, with the exception of the white parts. The candy cones were die cut from mat board and the rest of the white details from white Paper Leather.
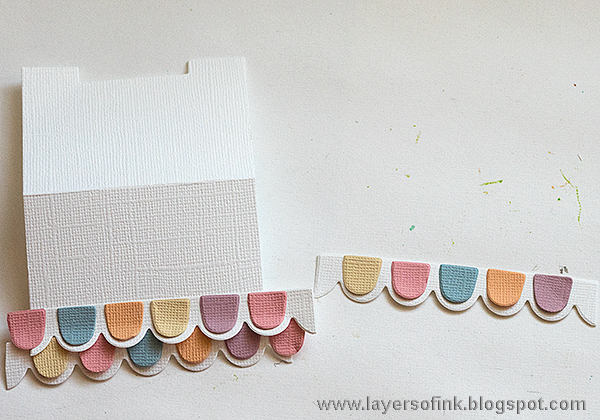
Die cut roof tiles from white cardstock and smalles ones from pastel color-core cardstock. The smaller roof, chimney and door comes from the Village Dwelling die, and were die cut from the same papers.
The roof itself also comes from the Village Dwelling die, but the tiles are from the Village Gingerbread. Glue smaller tiles onto the larger ones and try to vary the colours. I worked one line at a time, gluing them down as I went along.
Continue gluing down tiles until you have covered the entire roof. Glue the top part in place.
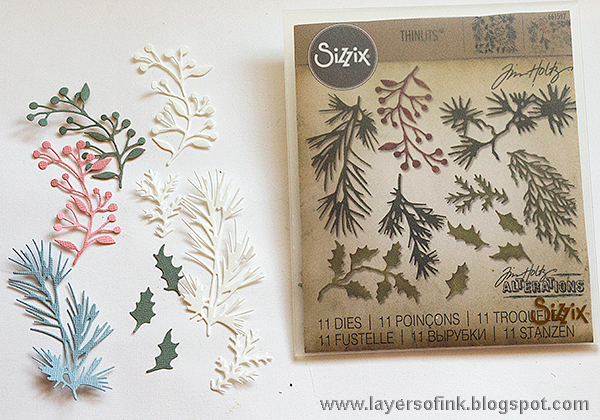
Die cut branches and leaves with the
Mini Holiday Greens set from the same papers as used before. The white ones are from Paper Leather. You can use ordinary white cardstock too.
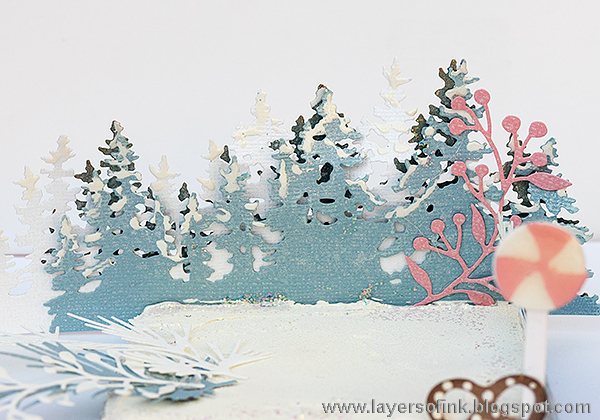
Die cut the
Tree Line from white, blue and greenish papers.
Die cut a sentiment using the
Holiday Words Thin set and cut into a strip. Layer on silver Deco Sheet.
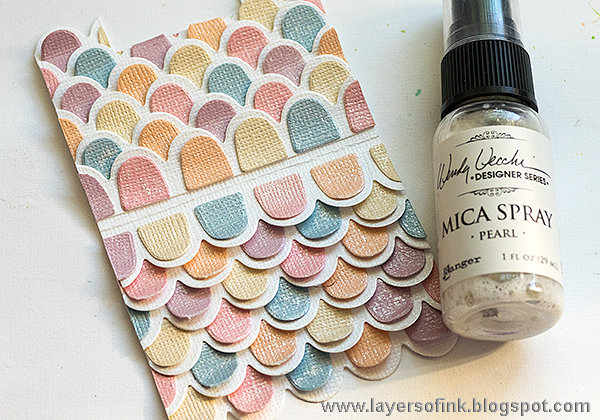
I wanted my house to shine, but without using glitter, since I wanted to do something different than on my
previous gingerbread house, which had a lot of glitter. On a whim, I misted the roof with
Pearl Mica Spray, and it turned out wonderfully. It looks just like pearlarized papers, instead of ordinary cardstock.
I decided to mist everything else too. The shine is wonderful. Remember to shake the bottle first.
The lollipops were coated with a thick layer of Glossy Accents. Set aside to dry.
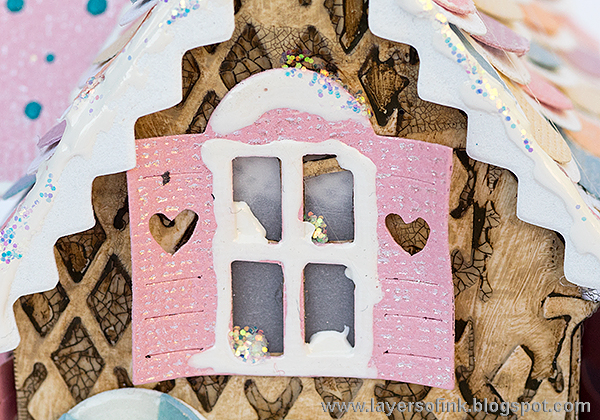
I always add windows to my houses, and normally use mica for that (check out the
Halloween Manor House, and almost every other house that I made). For this house, I decided to use
vellum instead, since I thought it would look nice with the candy theme. I also added lace windows.
Glue the shutters in place and then add lots of
Glacier White Enamel Accents, as frosting. Add dots of
Caribbean Enamel Accents to the small roof, and as a door handle. When the enamel accent was dry, I added some
Icicle Stickles, mainly along the edges of the white Enamel Accent areas. Icicle Stickles has shine pastel coloured pieces inside, which fit well with my house.
The base, as well as the step piece (which I forgot to include here), were covered with
Distress Grit-Paste. I used the same paste for the ground of my
Halloween Manor House, but painted it gray. If you leave it white, it looks like snow or frosting. I love this stuff. When it was completely dry, I misted the Grit-Paste with the
Mica Spray. This gave a wonderful subtle shine to it, which was impossible to capture on photo. Later, I also added some Icicle Stickles.
Assemble the house according to the directions on the die and glue the details in place.
I added
Glacier White Enamel Accents and some
Icicle Stickles along basically all the joints. It covers up any gaps or visible glue.
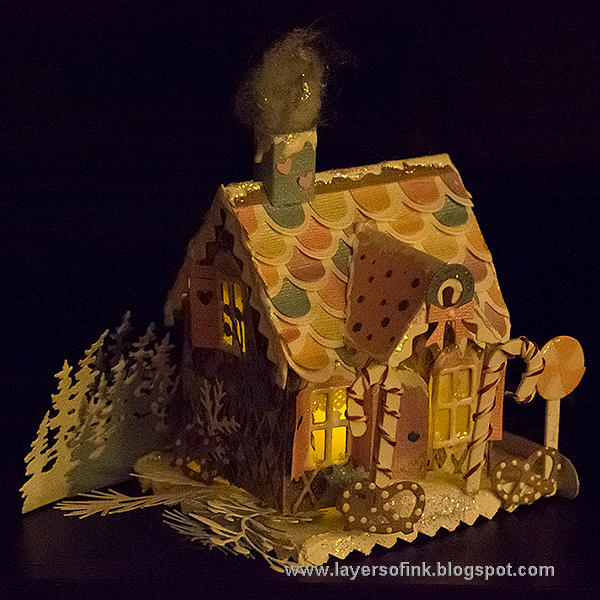
The house is not glued to the base, since I wanted to be able to add a battery-driven tea light inside.
I made a gingerbread house with the Village Dwelling die last year too, you can find that
Gingerbread House tutorial here, if you want more inspiration. I wanted this house to look different which is why I went for a pastel look instead.
Here's a view of the house from the top. You could extend the roof tiles to the small roof too, but I liked them different.
The candy cones were wrapped with red baker's twine, to look like polka.
I glued the wreath to the top of the roof, instead of to the door. The white dot was made with Enamel Accents.
For the lollipops, I die cut candy cones from mat board and cut the top part off.
The blue dots added another fun touch.
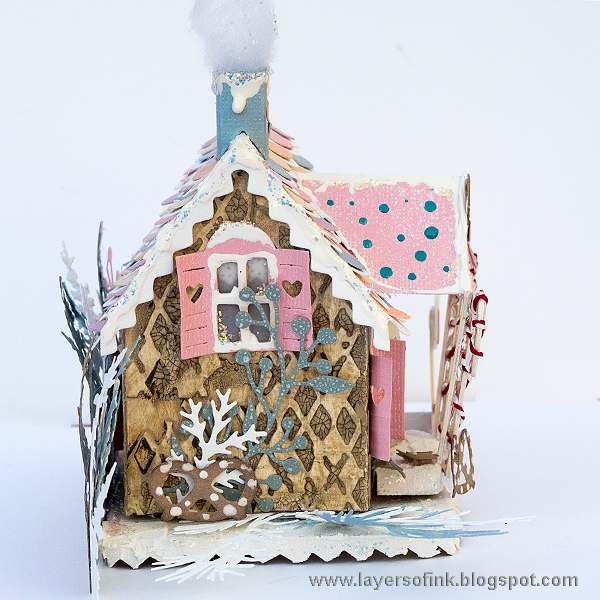
The sides of the house were decorated too, with branches and other embellishments.
Since Crazing Medium produces larger cracks where the medium is thicker, the cracks are much larger in the recessed areas, which you can clearly see here. Since I used a palette knife to apply the medium, most of it was scraped off from the higher areas, and thus there are tiny cracks there, sometimes not even visible. This is probably my favourite part of the house.
You can see the lace curtains through the vellum windows.
I used toy stuffing as smoke and added Stickles to it. The cute tiny hearts come from the window shutters.
The back of the house is the least decorated, since it will not be visible most of the time as it faces the woods.
This is the second side of the house.
Two lollipops were glued to the side of the house, with sticks die cut from mat board (the candy cone).
Apply some of the Enamel Accents and Stickles directly to the vellum windows, to give it even more the look of snow/frosting.
I rounded the corners of the sentiment with my Crop-a-dile Corner Chomper. The silver Deco Sheet looks nice though the letters. Glue the circle in the 'o' in place.
I wish you could see the shimmery shine of the mica spray in real life. It might show a little on this photo.
I layered the three die cut tree lines and glued them to the back of the stand, to form a sugary forest behind the house. A friendlier forest than in the Hansel and Gretel story.
The trees also got some Enamel Accents and Stickles. I love this
Tree Line die.
Some branches were glued to the base too.
Here you can see the base without the house, to give you a clear idea of what it looks like.
Here you can see what the house looks like with a battery-driven tea light inside. It shines beautifully through the vellum windows.
These houses are also great projects for kiddies crafting and children will love to embellish their own gingerbread house. Last year Anton and his friend made their own gingerbread houses and loved it. I did all the die cutting first and assembled the house. They got a bunch of embellishments and had fun customizing their houses. You can read more about it and see their houses in my original
Gingerbread House Tutorial.
I hope you enjoyed this tutorial! Thank you so much for stopping by today!
Happy crafting!
Anna-Karin
Supplies:


Beautiful! The colors look just like those Neco Wafer candies! Really cool!
ReplyDeleteWhat a delightful gingerbread house! You are right about the pearl mica spray, it looks so pretty on the roof, especially. I like the treeline behind the house, also. Such attention to detail!
ReplyDeleteAnna-Karin you did it again! This Gingerbread House is a masterpiece! love love love every single detail! Barbara
ReplyDeleteWOW! super beautiful! adorable!!
ReplyDeleteSo stunning. You did a fab job with this little house! So perfect for some Christmas decorations! ;-)
ReplyDeleteI've just discovered this and it's gorgeous
ReplyDelete