Saturday, October 29, 2016

Halloween Party Banner Tutorial

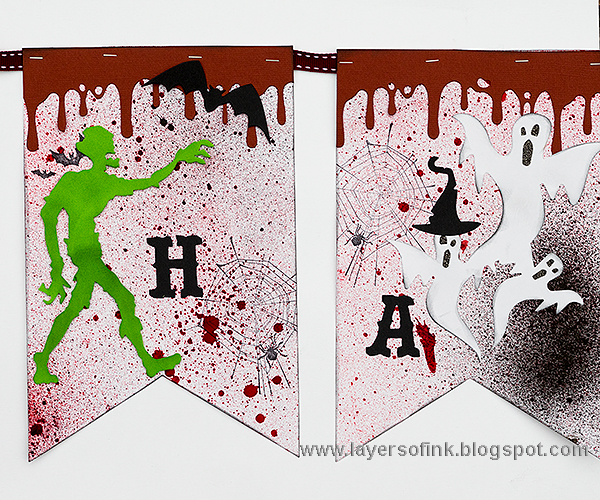
Hi friends! I have a last minute Sizzix Halloween tutorial for you, in the form of a fun pennant banner. This would be a great project to make together with kids for or on Halloween, since the techniques are real easy. 

Layers of ink - Halloween Party Pennant Banner Tutorial by Anna-Karin with Sizzix dies
Long pennant banners are hard to photograph in a nice way. Here I placed it on the ground so that you can see the whole thing. I made this banner for the Halloween party at Anton's school. I also die cut some of the same shapes for the kids to use when they were crafting decor for the part. They met on the weekend before the party to make some decor pieces. 

Layers of ink - Halloween Party Pennant Banner Tutorial by Anna-Karin with Sizzix dies
I die cut flags from white paper using the Big Banner die (it is 1/4" x 8"). They were splattered and misted with Candied Apple and Black Soot. In the past, whenever I got the idea of using red mist, I often ended up not liking the result since it has a tendency to look like splattered blood - but for this project, that was perfect. Anton was very impressed with all the bloody splatters.

Layers of ink - Halloween Party Pennant Banner Tutorial by Anna-Karin with Sizzix dies
 I die cut the Drip Edge from red paper and adhered at the top of each banner.

Layers of ink - Halloween Party Pennant Banner Tutorial by Anna-Karin with Sizzix dies
The banners were stamped with a variety of Tim Holtz Halloween images.

Layers of ink - Halloween Party Pennant Banner Tutorial by Anna-Karin with Sizzix dies
I die cut skulls, ghosts, pumpkins, cat/bat/witch hat and Lost Zombies, from white, orange and black paper, as well as green foam.

Layers of ink - Halloween Party Pennant Banner Tutorial by Anna-Karin with Sizzix dies
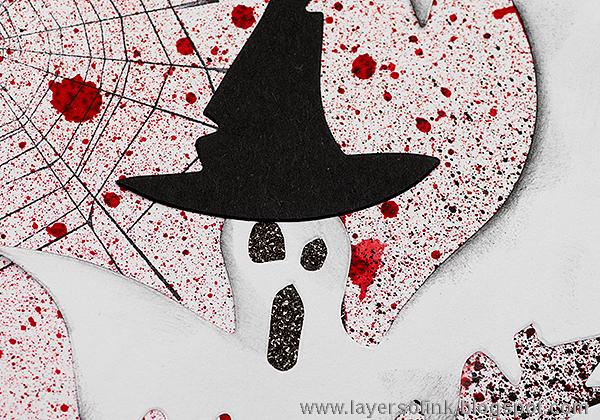
The ghosts and skulls were inked and I placed black Deco Sheet behind their eyes and mouths. I also had some small die cut bats - from the Halloween Mixed Media set - on my desk and used them as eyebrows for the skull. I used the same ghost die for a banner for Anton's room last year, you can find that Translucent Ghost Banner Tutorial here.

Layers of ink - Halloween Party Pennant Banner Tutorial by Anna-Karin with Sizzix dies
The happy pumpkins got black cardstock behind them. 

Layers of ink - Halloween Party Pennant Banner Tutorial by Anna-Karin with Sizzix dies
 Stamp the pumpkins with some word stamps.

Layers of ink - Halloween Party Pennant Banner Tutorial by Anna-Karin with Sizzix dies
I die cut HALLOWEEN using the Vintage Market XL die, and placed one letter on each of the nine banners.

Layers of ink - Halloween Party Pennant Banner Tutorial by Anna-Karin with Sizzix dies
The banners were stapled to a ribbon that I found in my stash.

Layers of ink - Halloween Party Pennant Banner Tutorial by Anna-Karin with Sizzix dies
 One of the ghosts got a witch hat and is looking pretty funny.

Layers of ink - Halloween Party Pennant Banner Tutorial by Anna-Karin with Sizzix dies
 You can really mix any Halloween dies or stamp for this project.

Layers of ink - Halloween Party Pennant Banner Tutorial by Anna-Karin with Sizzix dies
 The Deco Sheet adds a fun detail, and glimmers real nicely in the light.

Layers of ink - Halloween Party Pennant Banner Tutorial by Anna-Karin with Sizzix dies
 This Drip Edge die is such fun, and I already have some non-Halloween ideas for it too.

Layers of ink - Halloween Party Pennant Banner Tutorial by Anna-Karin with Sizzix dies
I used simple die cut shapes on this project, but you could of course make them more elaborate, for instance, by die cutting them from chipboard and painting them, or adding glitter, or maybe die cutting them from different patterned papers. 

Layers of ink - Halloween Party Pennant Banner Tutorial by Anna-Karin with Sizzix dies
The Distress Spray Stain splatters are a real easy way to create the look of blood, and get a lot of texture at the same time.

Layers of ink - Halloween Party Pennant Banner Tutorial by Anna-Karin with Sizzix dies
 The stamp of the little trick and treaters is one of my favourite Halloween stamps.

Layers of ink - Halloween Party Pennant Banner Tutorial by Anna-Karin with Sizzix dies
 Small die cuts can be placed here and there to add interest.

Layers of ink - Halloween Party Pennant Banner Tutorial by Anna-Karin with Sizzix dies
 I started and ended the banner with another Lost Zombie, walking in the opposite direction.

Layers of ink - Halloween Party Pennant Banner Tutorial by Anna-Karin with Sizzix dies
Here you can see it hanging in a window at home. It looked better at the school, but I didn't get any good photos of it there (not that this one is perfect, pennant banners are hard to photograph since they are so long and horizontal).

I hope you will have a great Halloween weekend! I'll be back again tomorrow with an autumn tutorial, also featuring pumpkins.

Happy crafting and thank you for stopping by!

Anna-Karin

Supplies:


3 comments:

  1. Wow! Brilliantly spooky and a great idea! Hugs, Chrisx

    ReplyDelete
  2. How cool Anna-Karin. Love all the die cut decor on the banner flags. The bat "eye brows" on the skulls is ingenious! And the drip die cuts are the perfect flag toppers. Happy Halloween! -- Mary Elizabeth

    ReplyDelete

Thank you so much for leaving a comment! Happy Crafting!