Hi and welcome! I was so happy to have been asked to make some samples with
Tim Holtz new holiday products and today I have a really fun Halloween tutorial to share. I used a lot of idea-ology papers and embellishments here, as well as Sizzix dies.
The idea of making a book cabinet full of odds and ends has been on my mind for a while and I had such fun with this project. In the book cabinet, a witch or a wizard has collected all sorts of curiosities. There are books, of course, and I wrote some of the stories I make up for my son in them. The owner's cat has is exploring the cabinet and so is a bat. The owner of the cabinet also forgot her or his hat on one of the shelves.
I used a
Configurations box as my base, and removed some of the boxes to create space for the cat and the other items in the middle section. This is a long post, so let's start.
Die cut multiple cats, bats and hats from grungeboard using the new
Hocus Pocus die. This is such a fun die and you get three great shapes on the one Bigz die.
Glue the shapes together to form dimensional embellishments.
Paint with Black Soot.
When the paint is dry, sand the cat slightly.
Ink with Ground Espresso. You don't see it well on this photo, but the ink shows in the areas that were sanded.
Mix a little bit of silver paint into Texture Paste and smear through the
Batground stencil, for a fun pattern for the cat. I made sure to place the stencil so that one bat was in the center of the face.
I wanted to use the
Jack O' Lanterns and
Skull dies, but they are too large for this project. The solution was to die cut them from
shrink plastic. This is a favorite technique of mine.
Shrink according to the instructions on the packaging. Here you can see how much smaller they get.
Colour with alcohol inks, using a ink blending tool with a felt applicator.
Coat the shapes with Glossy Accents for a great finish. Leave to dry.
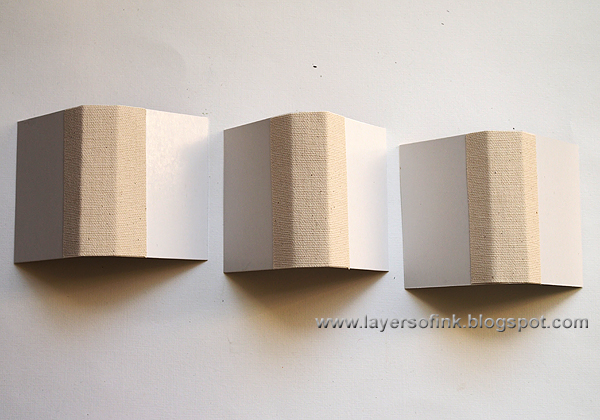
The books were made with the
Matchbox die. I die cut them from the cover of one of Tim's paper stashes. I like repurposing packaging in this way. Cut off the two flaps.
Adhere a piece of sticky-back canvas as the spine of the book.
Colour Mixed Media cardstock by smearing Pumice Stone and Frayed Burlap Distress Ink on a craft sheet. Mist with water and press the paper into the ink. Repeat on the other side.
Cut the papers and fold. I used three signatures of three papers each in every book. Ink.
The book covers were painted black. This also covered up the print from the packaging on the inside.
I used some of the portraits in the
Regions Beyond paper stash to cover the front of the books and other papers for the back. Pierce holes and tie the signatures with twine. Isn't that
skeleton fun?
I wanted the inside of the boxes to look as if they had been wallpapered with all kinds of odds and ends, with no particular order. To achieve that, I measured and cut squares and rectangles using the new
Regions Beyond 8 x 8 papers. The boxes were painted along all the joints, so that if any edges showed, they would be black. Sand the papers and ink with Ground Espresso.
Stamp the papers with various Halloween stamps using Jet Black ink. I later added some rub-ons too, from the
Curiosities set.
This is how I arranged the
boxes. Later, I also painted the edges black. Glue the patterned papers into the boxes with matte multi-medium.
The
Trophy Cup and
Tiny Vials were aged with alcohol ink.
I folded up a piece of paper and placed inside the new
Apothecary Vials. The Tiny Vial in the middle has white embossing powder inside (bone dust) and the one to the right has Spiced Marmalade Distress Glitter.
I crumbled up a piece of paper and placed in the trophy. The Texture Paste was smeared on top.
When the paste was dry, I painted it.
After gluing all the boxes into place, I placed a
Regions Beyond Design Tape around the edges, using matte multi-medium to make sure it was stuck well.
If you want to hang anything from the ceilings of the boxes, do that before gluing them in place. I used
Ring Fasteners to hang items, in this case a very cool
Oddities Adornments spider.
Here's the hat of the owner of the cabinet, forgotten on a shelf. An owl peaks through from the back. The spider sticker comes from the
Gothic Industrious Stickers set.
In the last small box, a
Crypt Cameo hangs from the ceiling. A
Boneyard resin skull was glued to the edge. I used another two skulls in other places.
The
Wicked Alpha Part words were distressed with brown paint.
I placed thick foam pieces behind the cat, for the sake of more dimension. I was happy with how well she fitted into the box.
I painted a little more silver paint on the bats, after the paste was dry.
The cat has climbed up among some ephemera pieces and the two shrink plastic pumpkins.
The word band was glued to the edge, next to another skull.
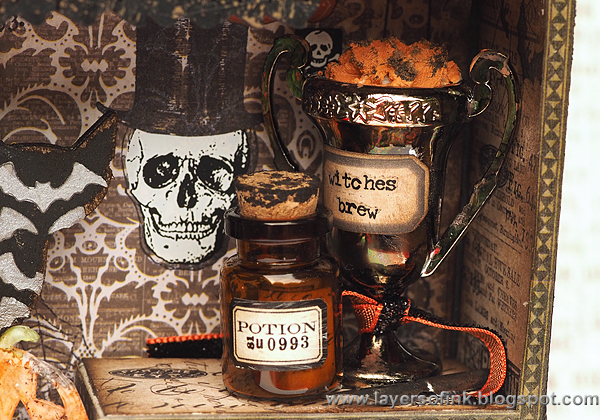
The cat is looking at some spooky potions and mixtures, placed on a shelf. The skull at the back was first stamped, but is disappeared a little on the patterned paper, so I used one of the white backed rub-ons, and simply cut off the top so that it looked like the hat is sitting on top of the head.
There is a pen nib with old ink, which might have been used to write the books.
I love the look of these. Paint the back with Picket Fence paint to make them a little less transparent.
On this shelf, you find some more mysterious bottles, and a shrink plastic skull.
I was real happy with how this
skull turned out. The combination of Snow Cap Mixative and Pitch Black alcohol ink was very effective.
The label to the left comes from the Vial Labels with a rub-on on top, the label to the right comes with the Apothecary Vials.
The mini books look nice on their shelf, and fit perfectly into this Configurations box.
When the books are removed, their box looks like this. This
undertaker stamp is very spooky.
I added some rub-on words to the books.
These are the backs of the books. I really had fun making these tiny books.
In the books, I will write some of the stories I make up for Anton in the evenings. Yesterday, I finished the first one. He wanted a story about Vampires, Monsters and Witches - 'but nice ones, they mustn't be too spooky so that they frighten me'. In our stories, the bad characters often turn out to be nice in the end. I illustrated the book with stamps.
I adhered papers to the top and sides of the box too, the top looks like this.
One of the sides of the box, with a funny skeleton ephemera piece.
The other side of the box.
I hope you enjoyed this tutorial and that it inspired you to make some Halloween projects. You could also adapt the ideas and techniques to fit for Christmas projects.
Thank you so much for watching!
Happy crafting!
Anna-Karin
Supplies:


Wow! You are one super-talented mom! Your son is sooo lucky to have you and your creativity! This is gorgeous!!!
ReplyDeleteSooooo many good ideas! And quite spooky too. Thanks for your hard work.
ReplyDeleteWhat a fun project, I love the books you made and how you personalized them.
ReplyDeleteHow creative. Love it.
ReplyDeleteI commented on this project on the Tim Holtz page. It is wonderful. Everywhere you look there are fun halloween details. Great job. Thank you for sharing it.
ReplyDeleteholy wow Anna-Karin..like seriously!!!
ReplyDeleteAwesome piece Anna-Karin! Love the little books!
ReplyDeleteWickedly Wonderful! Perfect for Halloween!
ReplyDeleteAstonishing in the way you paid attention to the smallest of detail. An absolute triumph.
ReplyDeleteWishes
Lynne
Brilliant absolutely love all the details and techniques used.
ReplyDeleteJulie x
Amazing configurations box! Loved all the techniques and details along the way.
ReplyDeleteSpeechless! I ador your Halloween configuration box! Books are stunning and i love he little pumpkinsand skull! Wonderful as always! barbarayaya
ReplyDeleteGreat project! Love the idea with the shrink plastic, but what really catch my eye are the beautiful books.
ReplyDeleteWonderful techniques..enjoyed this even though I'm not one to celebrate Halloween!
ReplyDeleteWhen I woke up this morning, I couldn't wait to have my cup of fabulous coffee to start my day off right. I had NO idea I'd be drinking that coffee and looking at this too! My morning couldn't be any more perfect. I got lost in all the pictures and details and I didn't want it to stop. Your enjoyment shines through in your work and it was sincerely shared with us all. I truly loved reading this post. Very inspiring!
ReplyDeleteHappy weekend,
Lisa ....
I'm off to make miniature books now...LOL
Amazingly creative!
ReplyDeleteWhat a fun piece! So many clever ideas. Especially love the shrunken jack o lanterns and skull. Brilliant idea to use the matchbook die to make little books. Thanks for sharing all the steps and details.
ReplyDeleteSo many creative ideas but the use of shrink plastic and the matchbox die are my favorites.
ReplyDeletethis is amazing! thanks for the great tutorial - can't wait to make one of these for myself!
ReplyDeletewonderful project, love it
ReplyDeletePure genius. Love it. Thanks for such a detailed tutorial....
ReplyDeleteBeautiful work, thank you for the inspiration. Love the books
ReplyDeleteWow this is fabulous it must have taken you a long time to make !!
ReplyDeleteThis is AMAZING! I love every inch of it!
ReplyDeleteStunning! I LOVE all the little details. Those tiny spell books are fantastic and I adore the shrink plastic pumpkins and skull. :)
ReplyDeletesoooo creative and interesting! Thank you for all the instructions! Great! TFS too! :)
ReplyDeleteWhat a wonderful configurations box Anna-Karin! I especially LOVE your little books!!! Julia xx
ReplyDeleteI am meant to be on a blog break but this is so fabulous I just had to come and say so - absolutely incredible, the little books are superb! xx
ReplyDeleteYou certainly paid attention to every little detail. This is Fantastic!!!!
ReplyDeletedefinitely spooky Anna-Karin!
ReplyDeleteSuch an imagination you have............thanks for all the details. I adore those little books! Happy Halloween.
ReplyDeleteI saw this over at Tim's and it's so great to get a look in close-up ... what an outstanding piece of Halloween inspiration. The little books are wonderful, and I love how you've used all the papers. So tempted by the skull die too, and he looks marvellous here.
ReplyDeleteAlison xx
An absolute masterpiece!!!! I love each and every corner, nook and dimension.
ReplyDeleteWow wow wow Anna-Karin, finally found the time to visit your blog starting with this Halloween project, and I don't regret it... It's simply amazing!!!!!
ReplyDeleteHope Anton is too much frightened of your book cabinet, poor of him! At the same time, if you write particular stories only for him, he will be very proud and probably delighted with it..
That's really a fabulous project, well done Anna-Karin. :)
Hugs, hope you are well! Coco X
Also a great tutorial, thank you !!! :D xxx
ReplyDeletegreat box !
ReplyDeleteLove it all, but especially the bone dust :)
And the fact that you USE the books to write real stories in for your son, is what I like the best.
it makes this box not just a decoration item, but a real "homedecor".
Thanks for the detailed "how-to"
greetings from belgium
Inge
OMG what an amazing Piece!!
ReplyDelete