Friday, March 22, 2024

Grunge Mixed Media Tutorial

Hello and welcome to my blog! Today I have an art journal page tutorial to share, with a textured and inky background. You can also use the techniques for cardmaking or scrapbooking.

 Please note: this post has affiliate links, for which I receive a small percentage of sales generated by the link, at no extra cost to you.

Layers of ink - Grunge Mixed Media Tutorial by Anna-Karin Evaldsson.

I wanted a very inky and splotchy background and combined it with an older stamp by Tim Holtz called Grunge Alphabet. The birds were die cut from papers I colored recently for another project, with Paper Artsy Infusions Colored Stains. The page is in my Small Creative Journal.

Layers of ink - Grunge Mixed Media Tutorial by Anna-Karin Evaldsson.

Start by white embossing the Grunge Alphabet on watercolor paper.

Layers of ink - Grunge Mixed Media Tutorial by Anna-Karin Evaldsson. Color with Distress Ink.

Smear Distress Inks on a non-stick craft sheet and mist with water. Press the paper into the ink. Let dry and repeat until you are happy with the look. 

Layers of ink - Grunge Mixed Media Tutorial by Anna-Karin Evaldsson.

I did a final inky layer using Mermaid Lagoon Distress and Twisted Citron Oxide Inks as well as Scorched Timber Distress Ink, but forgot to take a photo of that step. Distress the edges, mat on kraft paper and stitch with a sewing machine. I used both zig-zag and a straight stitch, aiming for a messy look.

Layers of ink - Grunge Mixed Media Tutorial by Anna-Karin Evaldsson. Stamp with Tim Holtz grunge stamp.

Stamp here and there with a texture stamp from Tim Holtz Ultimate Grunge.

Layers of ink - Grunge Mixed Media Tutorial by Anna-Karin Evaldsson. Paper Artsy Infusions colored papers.

I had fun coloring a lot of watercolor papers with Paper Artsy Infusions Colored Stains recently and you see some of them here. The papers were used on an art journal/scrapbooking page, which you can find here.

Layers of ink - Grunge Mixed Media Tutorial by Anna-Karin Evaldsson. Die cut Simon Says Stamp Whirl Bird.

I used an orange, yellow and pink paper to die cut Simon Says Stamp Soaring Whirl Bird and Standing Whirl Bird. The birds were also die cut from old book paper and a sheet of Tim Holtz Backdrops paper.

Layers of ink - Grunge Mixed Media Tutorial by Anna-Karin Evaldsson.

Assemble the birds. Glue black paper behind the eye and add a highlight with a white gel pen.

Layers of ink - Grunge Mixed Media Tutorial by Anna-Karin Evaldsson.

The inky layers give an interesting look to the background. I added a few Clippings Stickers as sentiment.

Layers of ink - Grunge Mixed Media Tutorial by Anna-Karin Evaldsson. Flying Whirl Bird.

The yellow soaring bird. If you make a card or a tag, you can add dimension to the wings. In my art journal, I prefer to keep things fairly flat.

Layers of ink - Grunge Mixed Media Tutorial by Anna-Karin Evaldsson.

Try to die cut the birds from a section of the paper that adds extra interest. Here I placed the die so that the bird's chest would have the darkest color.

Layers of ink - Grunge Mixed Media Tutorial by Anna-Karin Evaldsson. Standing Whirl Bird.

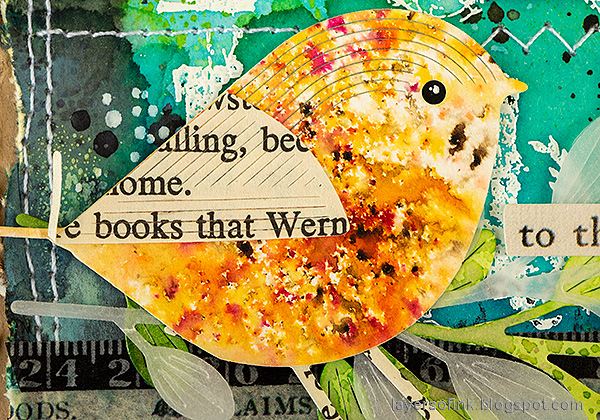
The orange Standing Whirl Bird. I like that the bird 'books' show on the wing, which was a coincidence. I used vellum and inky leaves from another project as a standing place for the bird. They were die cut with Simon Says Stamp Budding Branches.

Layers of ink - Grunge Mixed Media Tutorial by Anna-Karin Evaldsson.

I added some strips of Design Tape Trims to the page too.

Layers of ink - Grunge Mixed Media Tutorial by Anna-Karin Evaldsson. Grunge texture.

The inky background has a layered look, where you can see the ink in the background showing through. I particularly like the blue area mixing with the green at the bottom of this photo. The title was stamped on vellum and comes from Tim's Ponderings set.


Thank you so much for stopping by here today! 


Anna-Karin

Supplies:

* Please note: the links are affiliate links, for which I receive a small percentage of sales generated by the link, at no extra cost to you.


No comments:

Post a Comment

Thank you so much for leaving a comment! Happy Crafting!