
Hi and welcome to my blog! I am so happy to take part in the Simon Says Stamp Blog Hop to celebrate the new DieCember® release. If you are following along in the hop, you should have come here from the creative Miriam Prantner.
Please note: this post has affiliate links, for which I receive a small percentage of sales generated by the link, at no extra cost to you.

This is the 10th annual DieCember® celebration at Simon Says Stamp. The DieCember® release is full of wonderful new dies, and some stamps, stencils and special papers. Perfect for winter and Christmas crafting, but also for many other themes. You can find the whole release here. If you use the code MERRY you will get the Merry on a Line FREE with any purchase of $25 or more (while supplies last)!! This promotion will expire at 12/4 at 11:59 pm EDT.

I love die cutting and all the fantastic techniques you can do with dies. I can still clearly remember when I did die cutting for the first time, a long time ago. For today's hop I made a Winter Wonderland Mixed Media project, which may become a Christmas gift.

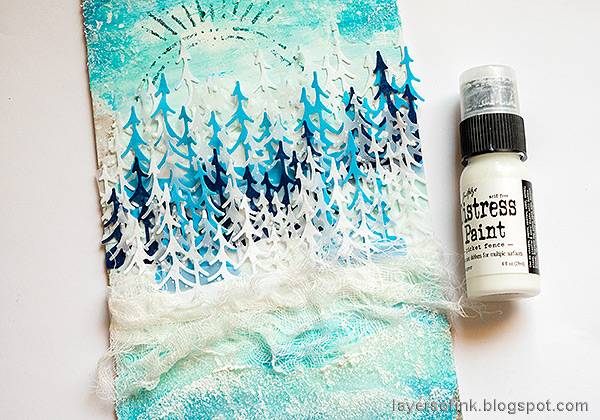
One of my favorite things is to create the look of snow in different ways and since I love forests, I decided to make the Little Evergreen Trees into the focal point of my project. The colors were inspired by the Pawsitively Velvet Shades of Blue papers that I used for some of the trees. This board is 5.5 x 8.5 in.

For my base I used Simon Says Stamp Chipboard sheets, which are very sturdy. To make it even more sturdy, I cut a sheet in half and then glued the second one at the back. Leave to dry under a heavy book. Coat with gesso, leaving some of the board showing through. Let dry and then add a second coat, if needed.

Paint the board with Distress Paint and mist with water. When almost dry, dab with a paper towel to create a little texture.

I made my own stencil using the Simon Says Stamp Radiant die. Die cut it from Simon Says Stamp Masking Paper.

Apply Stickles Galaxy Glitter Gel through the masking tape stencil and carefully remove it. Since there are some larger pieces in the glitter gel, my result wasn't perfect, but I wasn't aiming for that.

Die cut the beautiful Simon Says Stamp Little Evergreen Trees from Pawsitively Velvet Shades of Blue, Pawsitively Velvet Snow White and Vellum.

Glue them on the board starting from the top. Cut some of them in two pieces and tuck extra trees in here and there.

Add some cheesecloth for a flowing snow dune feel.

Next, I added Snowfall Grit Paste, both in thicker layers at the bottom and in a thin layer at the top. Let dry (it will take a while).
When the Grit Paste is dry, dry-brush some white paint on it to increase the texture and splatter white paint all over the project, so that it looks like it is snowing.

Die cut snowflakes with the Snowflake Hexagon from Pawsitively Velvet Snow White and from Tim Holtz Winter Deco Sheets. The latter were adhered to paper first, for stability. Later I also die cut the Simon Says Stamp Stitched Flakes, for some smaller flakes.

Layer the snowflakes together here and there.

The white splatters sinks into the velvet paper and is therefore mainly visible on the vellum trees. There are Frosty Morning sequin snowflakes tucked in between the trees.

The mix of velvet, vellum and glitter paper adds a tactile element to the project. This sentiment comes from Simon Says Stamp Forest Scenery.

I was in a hurry and accidentally wiped off some of the glitter gel since it wasn't completely dry. I only noticed it when taking the photos and will fix it later with a new stencil.

The sentiment label was stamped and die cut with Simon Says Stamp Mixed Labels and the sentiment and snowflakes come from Let it Snow.

I added a little Stickles to the snow too.

The Snowfall Grit Paste has a really cool texture.
Don't miss all the inspiration along the hop. There are of course prizes to be won too, and at each stop on the hop SSS is giving away a $25 coupon, randomly drawn from those who leave a comment. The winners will be posted post on the Simon Says Stamp store blog on Wednesday the 7th of December.
Your next stop on the hop is Amanda Korotkova. Don't miss to see the wonderful project she has created. If you get lost along the way, here are all the stops:
Anna-Karin Evaldsson (you are here)
For more DieCember® inspiration remember to check out the DieCember® gallery at Simon Says Stamp, and if you make something with products from the range, it is fun if you post it in the gallery too. There are galleries for all releases, and for the card kits, full of inspiration.
This is the second blog hop for DieCember®, don't miss blog hop day number 1 which took place yesterday.

Absolutely adore this, I’ve been wanting to make a shadow Box and this is givin me great ideas.
ReplyDeleteWonderful dimension and snowy scene.
ReplyDeleteMelissa
"Sunshine HoneyBee"
Your project is so pretty.
ReplyDeleteI really like how you used the white to blue trees. These skinny trees are so cute. And the background is sooooo cool
ReplyDeleteOh! Love seeing it in stages... awesome! TFS!
ReplyDeleteThis is so beautiful! I am intimidated by mixed media projects such as this. But you've inspired me to try again!
ReplyDeleteWhat a stunning project! I love all the texture and the gorgeous blues!
ReplyDeleteOh my goodness! This is stunning!! Thanks for sharing the steps you took to create this.
ReplyDeleteI love those trees. Great project.
ReplyDeleteWOW! What an amazing gift this will be. Love all the layers and texture. Truly beautiful. Nicely done and Happy Holidays.
ReplyDeleteThis is Fabulous!!!! Gorgeous work of art!!!
ReplyDeleteLove the colors and texture.
ReplyDeleteLove this project! It is magical!
ReplyDeleteSuch a beautiful piece of art! Love the colors you have used. So pretty.
ReplyDeleteWow, your project is gorgeous! love all the layers and colours!
ReplyDeleteWhat an incredible forest!
ReplyDeleteI LOVE the mixed media, colors and texture!
ReplyDeleteWow! Lovely texture and color!
ReplyDeleteOMG - love how you made the background - love the texture !!!
ReplyDeleteLove the colors and texture, you have an eye!
ReplyDeleteGreat idea to use the Radient die as a stencil! I love using that technique too.
ReplyDeleteVery creative picture. The textures are fascinating and great color choices. Love it ❤
ReplyDeleteReally like the color palette. So much texture and dimension. Gorgeous. Thank you for sharing.
ReplyDeleteI love what you did with these dies! Your texture is amazing!
ReplyDeleteAwesome colors and textures! Loving the trees!
ReplyDeleteThis is an amazing piece of art!!!
ReplyDeleteLovely layering, sweet scene!
ReplyDeleteLove all of the dimension, looks like a peaceful scene.
ReplyDeleteI just ordered the snowfall Grit paste from SSS and can't wait to get it so I can play.
Wow, Just Wow. I love love love love the radiant die stencil and the galaxy gel combo. Brilliant idea and soo beautiful!
ReplyDeleteNow that is STUNNING!!
ReplyDeleteBeautiful background & composition with Little Evergreens & sunrise die! TFS
ReplyDeleteLovely. Thanks for including the step by step instructions.
ReplyDeleteThis is just amazing!
ReplyDeleteBeautiful!!
ReplyDeleteLove your fabulous winter wonderland project! Can only imagine how cool it looks in person.
ReplyDeleteWow, this is fantastic!
ReplyDeleteWowsers! This is absolutely stunning!
ReplyDeleteAbsolutely awesome, and - as always - thanks for such a detailed tutorial!
ReplyDeleteAmazing layering and such a pretty winter palette on your card, thanks for sharing your process for this lovely mixed media design!
ReplyDeleteBeautiful project! Love the artistically arranged details and fun textures.
ReplyDeleteSo very beautiful! I love all the texture!
ReplyDeleteGorgeous!
ReplyDeleteMixed-Media creations are so much fun! You have freedom to do whatever you want. This is spectacular!
ReplyDeleteLooks like a fairy forest.
ReplyDeleteFantastic. thanks for sharing
Tons of texture and color - SO pretty!
ReplyDeleteLori S in PA
Such a gorgeous mixed media project. Awesome colors…
ReplyDeleteThis card carries your eyes all over. So many different dimensions. Absolutely beautiful!
ReplyDelete