Monday, November 28, 2022

Winter Robin Tag

Hi friends! I hope you are well! Christmas time is here now and I spent yesterday working at a traditional Christmas market. 

Please note: this post has affiliate links, for which I receive a small percentage of sales generated by the link, at no extra cost to you.


This week we have a Freezing Cold Mood Board challenge at the Simon Says Stamp Monday Challenge Blog and you can see the lovely mood board that team member Zoey created below:


Don't miss the last project by our guest designer Joanne Travis, who has created such beautiful projects for us during November.


Layers of ink - Winter Robin Tag with Clear Background tutorial by Anna-Karin Evaldsson.

I was inspired by the robin on the mood board, as well as by the snow, ice, color combo, and berry branch. It has been a while since I made a project with a transparent background and the mood board inspired me to do a transparent tag with a glittery, frosty snowflake background. I love the look of dry embossed acetate/modeling film.

Layers of ink - Winter Robin Tag with Clear Background tutorial by Anna-Karin Evaldsson.

I just had to photograph the tag on actual snow too, since we still have quite a bit of snow here since last weekend's heavy snowfall.

Layers of ink - Winter Robin Tag with Clear Background tutorial by Anna-Karin Evaldsson. Emboss in Simon Says Stamp Filigree Snowflakes.

Start by cutting a tag from a sheet of acetate of from Clearly For Art Modeling Film. You can also try Simon Says Stamp Clear Acetate Sheets. Different acetate surfaces will give different effects, so experiment on a small piece first. Emboss in the beautiful Simon Says Stamp Filigree Snowflakes folder.

Layers of ink - Winter Robin Tag with Clear Background tutorial by Anna-Karin Evaldsson. Apply Ranger Stickles.

Turn the tag around and apply Moon Dust Stickles Glitter Gel to the back.

Layers of ink - Winter Robin Tag with Clear Background tutorial by Anna-Karin Evaldsson.

Stamp the robin with AALL & Create Robin & Nuthatch on watercolor paper. The stamp set was designed by Tracy Evans.

Layers of ink - Winter Robin Tag with Clear Background tutorial by Anna-Karin Evaldsson. Color with Distress Watercolor Pencils.

Watercolor with Distress Watercolor Pencils, pick the paint up from the pencil with a paint brush.

Layers of ink - Winter Robin Tag with Clear Background tutorial by Anna-Karin Evaldsson.

Splatter some orange and brown on the bird to create a fuzzy look.

Layers of ink - Winter Robin Tag with Clear Background tutorial by Anna-Karin Evaldsson.

Die cut Simon Says Stamp Berry Stems from heavystock paper and ink two of the branches with Distress Ink. I really like this die set and have used it a lot lately.

Layers of ink - Winter Robin Tag with Clear Background tutorial by Anna-Karin Evaldsson.

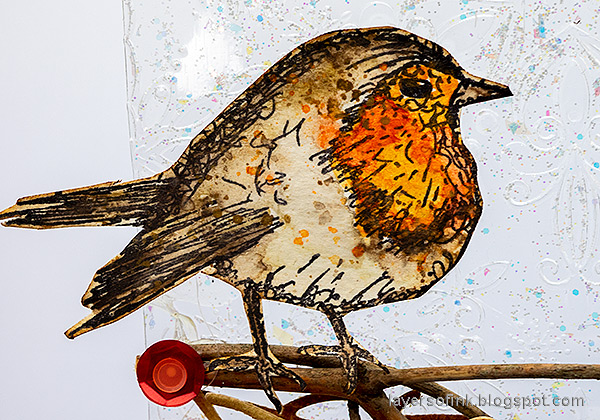
I cut out the bird and inked the edges, adhere with foam tape.

Layers of ink - Winter Robin Tag with Clear Background tutorial by Anna-Karin Evaldsson.

This sentiment comes from Simon Says Stamp Printmaking Birds and was stamped on a Tim Holtz Journal Card.

Layers of ink - Winter Robin Tag with Clear Background tutorial by Anna-Karin Evaldsson.

The dry embossed, glittery background is a little hard to photograph, but you might get a better idea of how it looks here.

Layers of ink - Winter Robin Tag with Clear Background tutorial by Anna-Karin Evaldsson.

I picked two small branches from the garden and also added Berry Branches. The berries were die cut from Simon Says Stamp Schoolhouse Red cardstock. I also added some sequins. 

Layers of ink - Winter Robin Tag with Clear Background tutorial by Anna-Karin Evaldsson.

I hope you enjoyed this tutorial and that it inspired you to dry emboss some clear surfaces.

I hope you will join us this week in our Freezing Cold mood board challenge. You have a chance to win a $25 gift voucher to do some fun shopping at Simon Says Stamp. You have until Monday 8am Ohio time. 1pm UK time, 2 pm CET to join in.


Do you use Instagram? If so please add #sssmchallenge so we can see your entries there too.


Thank you so much for stopping by here today! 

Happy crafting!

Anna-Karin

Supplies:

* Please note: the links are affiliate links, for which I receive a small percentage of sales generated by the link, at no extra cost to you.


2 comments:

  1. This is SO beautiful for winter, it looks like a sheet of ice. You have really inspired me to try this, I love the way this looks. Your work is always so lovely, Anna-Karin.

    ReplyDelete
  2. What lovely art! Thank you for sharing.

    ReplyDelete

Thank you so much for leaving a comment! Happy Crafting!