Hi and welcome to my blog! I am so happy to take part in the Simon Says Stamp Blog Hop to celebrate the new Holiday Sparkle release. If you are following along in the hop, you should have come here from the creative Miriam Prantner.
Please note: this post has affiliate links, for which I receive a small percentage of sales generated by the link, at no extra cost to you.
The Holiday Sparkle release is full of wonderful new stamps, stencils, dies and special papers. Perfect for winter and Christmas crafting, but also for many other themes. You can find the whole release here. If you use the code CUTEBAG you will get the sweet Holiday Zipper Pouch FREE with any purchase of $50 or more (while supplies last)!! This promotion will expire at 11/13 at 11:59 pm EDT.
I made an art journal page, but you can easily turn it into a card instead.
I like to make some Christmas and winter pages in my art journals and the
Retro Layering Christmas Berries stencil is large enough to cover an entire page in my
Small Creative Journal, making it great for a background. I also did some dry embossing and used the new
Luxe Glitter Cardstock and
Pawsitively Velvet Luxury papers.
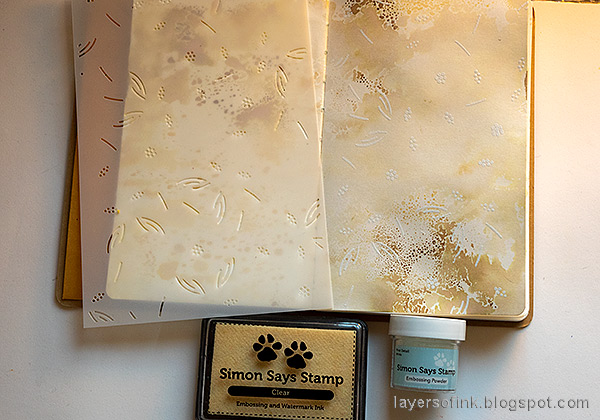
I wanted to start on a background which already had some color and texture. Smear Antique Linen and Frayed Burlap on a non-stick craft sheet. Mist with water and press the page into the ink.
When dry, apply embossing ink through one of the two stencils in the
Retro Layering Christmas Berries set and emboss with white powder. Always be careful when using a heat tool and do not touch the melted powder until it has cooled down completely.
Next, continue with the leaves using Salvaged Patina and Lucky Clover.
Dip Distress Watercolor Pencils in water and flick a paint brush against them to create splatters.
If you want the berries to stay the color of Lumberjack Plaid, skip this step. I wanted glossy berries and knew that the
Glossy Accents would alter the color of the berries a bit since they were inked with waterbased ink. However, I didn't think it would change their color quite as much as it did. I still like them, but might have preferred the darker shade. If the white dots become less visible, you can add them back with a white gel pen once the Glossy Accents is dry.
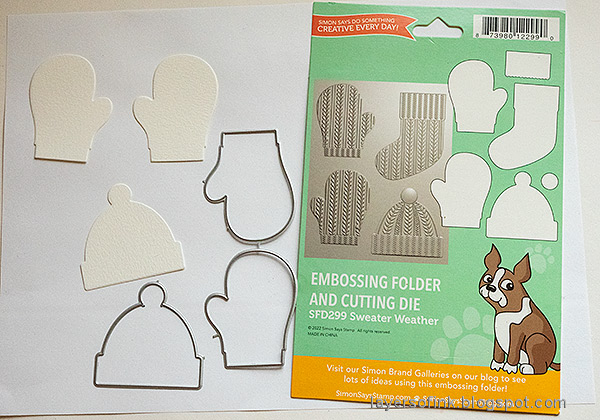
Color the design right on the embossing folder, using Distress Watercolor Pencils. Mist the paper with water and emboss.
Repeat for the gloves and let dry.
The new
Luxe Glitter Cardstock is stunning and so glittery. I love being able to get the look of glitter without any mess. I die cut the sentiments using an older Simon Says Stamp die called
Winter Snow.
The combination of glittery Luxe Glitter Vardstock, the soft Velvet paper, the dry embossing and the glossy berries adds a lot of interest to the page.
Don't miss all the inspiration along the hop. There are of course prizes to be won too, and at each stop on the hop SSS is giving away a $25 coupon, randomly drawn from those who leave a comment. The winners will be posted post on the
Simon Says Stamp store blog on Wednesday the 16th of November.
Your next stop on the hop is
Amanda Korotkova. Don't miss to see the stunning project she has created. If you get lost along the way, here are all the stops:
Thank you so much for stopping by here today!
Happy crafting!
Anna-Karin
Supplies:
* Please note: the links are affiliate links, for which I receive a small percentage of sales generated by the link, at no extra cost to you.


Love your page.
ReplyDeleteI LOVE the layers and texture! STUNNING!
ReplyDeleteThe embossing looks great. This whole thing is so cool. I love the shading, everything
ReplyDeleteWhat a fabulous art journal page. Love it.
ReplyDeleteOh wow! Love that you created an art journal page. It's beautiful!
ReplyDeleteLovely journal page, love all the texture!
ReplyDeleteLove the vintage feel!
ReplyDeletei love the pages you created. That stencil is so fun!
ReplyDeleteBeautiful journal page! I love the texture of the mittens and hat, along with the pretty embellishments! Great stencil design too!
ReplyDeleteGreat ideas for incorporating into a journal!
ReplyDeleteSo happy to see the tips about coloring right on the embossing folder with the Tim Holtz watercolor pencils! I bought all 3 sets but haven't tried that technique yet. Love it!
ReplyDeleteThis is Gorgeous!!!! I love it!!!
ReplyDeleteGreat journal page. Thanks for sharing!
ReplyDeleteFantastic art journal page!!! Wow!
ReplyDeleteVery cool! Love the vintage feel.
ReplyDeletefabulous love the vintage look to your page
ReplyDeleteI can see this art page as a card too! Love your color choices!
ReplyDeleteLove the vintage look of ;your journal page!
ReplyDeleteI love that you combined so many elements. Its just so retro & fun! My Christmas Art Journals are so important to me, as they will be passed down to our kids! This is how my pages like to look;). And your detailed instructions are greatly appreciated!
ReplyDeleteLove all the elements in this. So very pretty!
ReplyDeleteBeautiful stenciling !!
ReplyDeleteInteresting point about the glossy accents. Love that hat and gloves! Thanks so much!
ReplyDeleteLove the vintage look, you're right it can easily be turned in to a card!
ReplyDeleteThanks for the inspiration!
What a terrific journal page. I love the hat and mittens dies. Great job ❤🧡💛
ReplyDeleteLove your art journal page. The colors you chose as well as the hat and mitten dies make a wonderful journal page.
ReplyDeleteWhat a fabulous project.
ReplyDeleteLove the art on your journal page. That hat and mittens die is fantastic
ReplyDeleteAll the elements come together wonderfully.
ReplyDeleteOh mercy, I need this cap and glove set. It is so cute. Love the pattern. NEED it. [Bunny]
ReplyDeleteBeautiful! You have inspired me to pull out my art journal again!
ReplyDeleteGorgeous journal page. Love the colors.
ReplyDeleteThanks for sharing.
What amazing journaling.
ReplyDeleteLove that you made a journaling page! Nicely unexpected! Great job.
ReplyDeleteReally fun journaling page.
ReplyDeleteLove your journaling page
ReplyDeleteWonderful journaling page...love the new stencil and the embossed die cut.
ReplyDeleteI'm so glad I ordered the stencil! Can't wait to apply your techniques! xo
ReplyDeleteI think I have to have that toque (Canadian giveaway LOL!)
ReplyDeleteSuper cool, love all these elements, and that sparkly cardstock is to die for!
ReplyDeletethanks for the idea of coloring before
ReplyDeleteembossing. The hat and mittens look
vintage. thanks for sharing
Thank you so much for sharing you wonderful card with us! I love the lovely classic feel of the card's and all the layers!
ReplyDeleteVery pretty journal page! I love all the layers!
ReplyDeleteLove the layers upon layers of detail. TFS!
ReplyDeleteyour cards are beautiful - so vintage and gorgeous. thanks for the details to get this look
ReplyDeleteBeautiful work! I love what you did with the hat and gloves.
ReplyDeleteWonderful inking of embossing folder.
ReplyDeleteFantastic journal page! I love all the different elements!
ReplyDeleteI love the vintage look of your journal page! That glitter cardstock is yummy!
ReplyDeleteSo many cool things! I'm so so so so impressed that you can die cut that glitter paper without ANY mess! Wow... Outstanding! It is really pretty! Such a beautiful journal page, now I dont do a journal, but I cannot image not ripping that page out to use as a background, vintage stunning yumminess.
ReplyDeleteI was really looking forward to getting to your blog in the hop, as I knew you would have something special for us! I love your journal pages, especially that vintage background! Well done, as always, Anna-Karin!
ReplyDeleteAlways so good! so versatile in what you can make with this release.
ReplyDeleteBeautiful. Love the distressed look and the layers.
ReplyDeleteVery vintage colors and look. I love the mittens and hat. Those dies are so, so cute!
ReplyDeleteGreat art journaling page! This new release is so versatile.
ReplyDeleteBeautiful journal pages! I love that hat & mitten die & embossing folder!
ReplyDeleteI just love Mittens!!!! Thank you for sharing your wonderful card making techniques. I look forward to your next creation!
ReplyDeletewow, great design!
ReplyDelete