Hi and welcome to my blog! I am so happy to take part in the Simon Says Stamp Blog Hop to celebrate the new Cozy Hugs release. If you are following along in the hop, you should have come here from the wonderful Cheiron Brandon.
Please note: this post has affiliate links, for which I receive a small percentage of sales generated by the link, at no extra cost to you.
The Cozy Hugs release is full of wonderful new stamps, stencils, dies and other products. Perfect for winter and Christmas crafting, but also for so much more. You can find the whole release here. If you use the code COZY you will get the Giant Hugs Card Wrap FREE with any purchase of $75 or more!! This promotion will expire at 10/9 at 11:59 pm EDT.
I made a fall-themed tag and a Christmas/winter art journal page, with tutorials below.

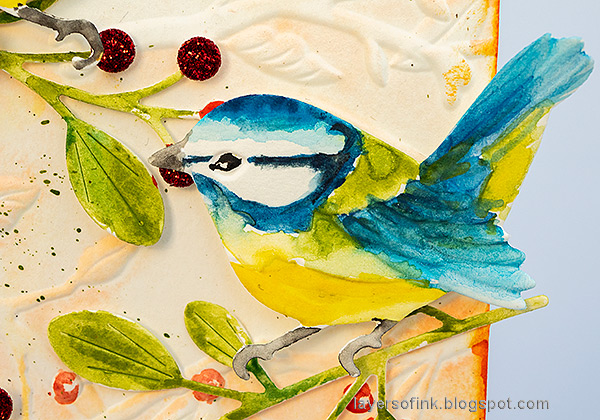
When dry, add more ink to deepen the colors and frame the birds. I painted the berries red using a Distress Watercolor Pencil.
The two birds were die cut from watercolor paper and then embossed in the same folder. I love how versatile these emboss and cut folders are. You can find a whole bunch of them in the
Cozy Hugs release.
Dip a pencil into water and flick a paint brush against it to create splatters.
I added a piece of Design Tape Trims at the top to hide the part that wasn't embossed.
Don't worry about getting a perfect result when painting the birds. You can also get the colors to blend more by using a paint brush and water. The birds were adhered with Simon Says Stamp Pawsitively Perfect Foam Tape.
Next I made an art journal page with a Christmas theme, since I wanted to use the beautiful
Painted Christmas Wreath stamp and to turn the birds into bullfinches. I worked in my Dina Wakley White Journal which is 6 x 6 in and if you rather want to make a card instead, that works just as well.
Start by smearing Antique Linen and Frayed Burlap on a non-stick craft sheet. Mist with water and press the page into the ink. This gives us a nice neutral background as a base.
The Distress Watercolor Pencils are great to stamp with. Wet the tip of the pencil and color right onto the
Painted Christmas Wreath rubber stamp. Don't worry about getting it perfect. I used a Sizzix cutting pad as my stamping block.
Mist with water and stamp on the background. The white journal has quite rough watercolor paper and you will get a different result depending on the paper you use and the amount of water.
Dip a pencil in water and flick a paint brush against it for splatters.
The bullfinches die cut from watercolor paper and then embossed with
Friendly Birds. They were colored in the same way as the blue tits.
When they were dry, I added highlights with a white gel pen. The branches from
Berry Stems were die cut from kraft cardstock.
The splatters and glitter add texture and interest to the background.
I splattered extra much yellow in the center of the Poinsettias.
The bullfinch is the quintessential Christmas bird in Sweden and it is always such a joy to see one.
Don't miss all the inspiration along the hop. There are of course prizes to be won too, and at each stop on the hop SSS is giving away a $25 coupon, randomly drawn from those who leave a comment. The winners will be posted post on the Simon Says Stamp store blog on Wednesday the 12th of October.
Your next stop on the hop is
Lisa Addesa. Don't miss to see what she has created. If you get lost along the way, here are all the stops:
Thank you so much for stopping by here today!
Happy crafting!
Anna-Karin
Supplies:
* Please note: the links are affiliate links, for which I receive a small percentage of sales generated by the link, at no extra cost to you.

%20copy.jpg)


Beautiful project. Love the distressed look and your birds are beautiful.
ReplyDeleteSuch an amazing job
ReplyDeleteThis is beautiful. I love tags.
ReplyDeleteThese are so pretty. I love the wreath and the birds are fabulous!
ReplyDeleteAbsolutely stunning. You are so talented and creative!
ReplyDeleteLove the birds and vintage look you created!
ReplyDeleteGreat water coloring. Love the bright colors.
ReplyDeleteWonderful projects, Anna Karin! LOVE those little birds!
ReplyDeleteWow! Stunning examples!
ReplyDeleteThanks for the step by step! Gorgeous birds!
ReplyDeleteBeautiful projects! I love the hint of gold sparkle.
ReplyDeleteLove your creativity!
ReplyDeleteBeautiful tag and journal page, thanks for sharing.
Lovely coloring! Thank you for sharing.
ReplyDeleteOMGosh, Karin!! Both projects blew me away. They are truly works of art! WOW!! What talent!
ReplyDeleteLori S in PA
What amazing projects. You are so artistic, Karin! thanks for sharing your ideas.
ReplyDeleteWhat amazing projects. Thanks for the inspiration.
ReplyDeleteBeautiful! Love that you used the distress watercolor pencils. Your colors came out beautiful.
ReplyDeleteThese are all awesome! Thank you for the inspiration today.
ReplyDeleteSuch an inspiring post! Your projects are gorgeous!
ReplyDeleteWonderful artsy coloring. I need lots more practice to achieve this look.
ReplyDeleteMelissa
"Sunshine HoneyBee"
Beautiful! Your water coloring is gorgeous!
ReplyDeleteI really love your tag with it's fall-colored background. Beautiful.
ReplyDeleteGorgeous tag and journal page. Love the amazing colors.
ReplyDeleteThanks for sharing.
I love how you colored those birds and stamp!! Gorgeous projects!!
ReplyDeleteYour birds are so amazing. Wow just wow
ReplyDeleteGorgeous colors and details! I love the birds and the wreath stamp!
ReplyDeleteOh my gosh!!! Your colouring of those birds is INCREDIBLE!!!
ReplyDeleteTruly works of art! Your birds are wonderful!!!
ReplyDeleteBoth creations are fabulous, the colors are awesome! I adore Tags and yours is AHmazing! Just wonderful!
ReplyDeleteThe tag is spectacular. Thanks for the
ReplyDeletetip on coloring the stamp before stamping.
Great card. txmlhl(at)yahoo(dot)com
You make it look so easy. Your cards are amazing. Thanks for sharing your process and for the wonderful inspiration. This release is AMAZING.
ReplyDeleteThis tag is an eye catcher. I love what you have done with the products and totally sold me on getting these myself.
ReplyDeletePretty ink work!
ReplyDeleteWow! I love what you did with these and so glad I ordered these!
ReplyDeleteGreat colors!
ReplyDeleteThe tag is so beautiful. Thanks for the instructions.
DeleteThese are so beautiful. I love the effect with the pencils, and the designs, oh, how I love the bird and branches, and berries, OH MY!
ReplyDeleteyour work is gorgeous! You're truly an artist!
ReplyDeleteLovely projects and such helpful information about the distress watercolor pencils!
ReplyDeleteAbsolutely adore your style! That art journal page is the best!
ReplyDeleteWow, fantastic! The way you coloured those birds is perfection!
ReplyDeleteBeautiful! Love how you used the new Tim Holtz pencils.
ReplyDeleteWow!!!! Absolutely Gorgeous cards!!!
ReplyDeleteMy favorite is actually the art journal page (I am a cardmaker so I find that surprising). There is just such a peaceful feeling to it.
ReplyDeleteWhat lovely projects! The artistry is amazing!
ReplyDeleteI really like the blue and yellow birds as well as the bullfinches. Sensational artwork.
ReplyDeletewow, love the colors!
ReplyDeleteLove the awesome colors!
ReplyDelete