
Hi stampers! Last weekend we saw the Aurora Borealis here, which is rare in this part of the country. I had only seen it once before, when I was a child. It was magical and I was inspired to create a card based on it.
Please note: this post has affiliate links, for which I receive a small percentage of sales generated by the link, at no extra cost to you.

This scene was created on glossy cardstock using Distress Ink, stamps and a white gel pen. I am happy that Simon Says Stamp now has glossy cardstock, since that is one of my favorite surfaces. Dye ink looks so vibrant on glossy card.

Start with the lightest shade and gradually build up darker colors. I made the colorful area large on this card, you can also make is smaller and have more of the black sky showing. When I was happy with the look, I used Fantastix to pull out the lines that you see.

Stamp trees from Simon Says Stamp Forest Scenery along the foreground. Use second and third generation stamping on some of the smaller trees - stamp them once or twice on scrap paper before stamping on the card. This makes them look like they are further into the background. Stamp sentiments using the same set.
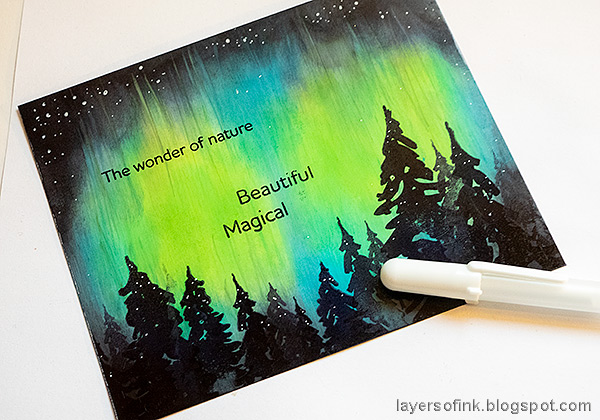
Add stars to the sky and a few highlights to the trees with a white gel pen.

The fainter trees look like they are further away. You can also try to stamp the trees with a dark blue ink.
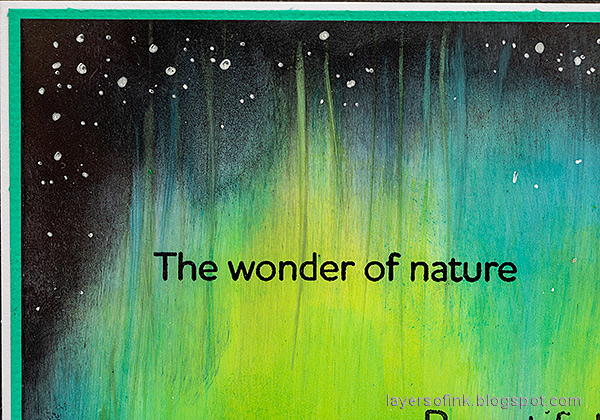
Add ink to a Fantastix and pull across the already inky area to create the lines. You can also use a Q-tip or the handle of a paint brush.


I might add this card to an art journal instead, as a memory of the evening when we saw the Aurora Borealis.

Thank you so much for taking the time to stop by here today!
Happy crafting!
Anna-Karin
Supplies:
* Please note: the links are affiliate links, for which I receive a small percentage of sales generated by the link, at no extra cost to you.
* Please note: the links are affiliate links, for which I receive a small percentage of sales generated by the link, at no extra cost to you.
Amazing that you have seen the Aurora Borealis for real.
ReplyDeleteYou made a wonderfull card wih those colours, thank you for telling how you made it.
Greetings from the Netherlands.
Such a stunning card! You captured the aurora borealis so beautifully - love it 😁. Thanks for the inspiration and Happy January! Hugs Jo x
ReplyDeleteThis is the best aurora borealis card I've ever seen made. It is gorgeous! I've seen the a.b. in person also & it truly makes one feel awed & somewhat insignificant. Thanks for showing us this along with an explanation of how you accomplished it.
ReplyDelete