Sunday, May 30, 2021

Spring Village

Hi friends! I hope you are all well. After a rainy and cold week, we had great weather today and my walk was a real joy. Today, I have a fun 3-D tutorial to share with you.

Please note: this post has affiliate links, for which I receive a small percentage of sales generated by the link, at no extra cost to you.

Layers of ink - Spring Village Tutorial by Anna-Karin Evaldsson.

During winter I made a winter village with Tim Holtz Paper Village die set and I thought it was time to do a spring or summer version. I used only two houses this time, to leave more space for a little flower garden. The base is a wood disc, which was meant to be a coaster, but which instead became a perfect base for a project.

Layers of ink - Spring Village Tutorial by Anna-Karin Evaldsson. Die cut with Tim Holtz Village dies.

Die cut houses from heavystock paper and roofs from kraft-stock paper.

Layers of ink - Spring Village Tutorial by Anna-Karin Evaldsson. Ink with Distress Ink.

Ink the red house with Candied Apple.

Layers of ink - Spring Village Tutorial by Anna-Karin Evaldsson. Stamp with Simon Says Stamp Wood Planks background.

Ink the grey house with Pumice Stone and Hickory Smoke. For a wood effect, I stamped the houses with the Simon Says Stamp Wood Planks stamp, using slightly darker inks. 

Layers of ink - Spring Village Tutorial by Anna-Karin Evaldsson.

Fold the houses along the score lines.

Layers of ink - Spring Village Tutorial by Anna-Karin Evaldsson.

For the windows I used pieces of acetate, colored with Latte alcohol ink.

Layers of ink - Spring Village Tutorial by Anna-Karin Evaldsson.

Assemble the houses and glue on the roofs.

Layers of ink - Spring Village Tutorial by Anna-Karin Evaldsson.

I also glued cheese cloth / mummy cloth curtains on the inside of the windows. 

Layers of ink - Spring Village Tutorial by Anna-Karin Evaldsson.

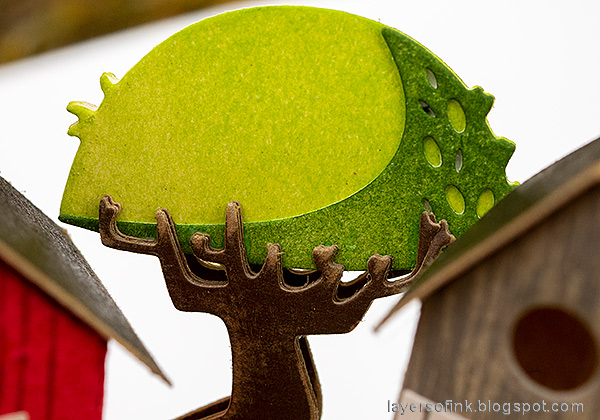
I wanted a tree and picked the toadstool with the thickest stem from Tim's Funky Toadstools set, so that it would have more stability. Die cut it five times from heavystock and five times from neutral kraft-stock paper.

Layers of ink - Spring Village Tutorial by Anna-Karin Evaldsson.

Glue the pieces together. I glued three together and two together. Ink with green Distress Inks.

Layers of ink - Spring Village Tutorial by Anna-Karin Evaldsson.

Glue the two green pieces together and add one trunk piece on each side.

Layers of ink - Spring Village Tutorial by Anna-Karin Evaldsson.

Mix Rustic Wilderness and Twisted Citron paint into texture paste. Don't mix the colors completely. Apply to the base with a palette knife. Press the tree, flowers and houses into the paste. I added the red house later, since I didn't want the red ink to bleed into the paste. The Heirloom Roses were inked with alcohol ink.

Layers of ink - Spring Village Tutorial by Anna-Karin Evaldsson.

I like how the ink colored them partially, making the white look porcelain-like. 

Layers of ink - Spring Village Tutorial by Anna-Karin Evaldsson.

When the paste was basically dry, I added the red house, with the door slightly ajar.

Layers of ink - Spring Village Tutorial by Anna-Karin Evaldsson.

I few Clippings Stickers finished the houses.

Layers of ink - Spring Village Tutorial by Anna-Karin Evaldsson.

And a Mini Flair Button.

Layers of ink - Spring Village Tutorial by Anna-Karin Evaldsson.

The grey house is meant to look like old weathered, unpainted wood planks. 

Layers of ink - Spring Village Tutorial by Anna-Karin Evaldsson.

Although this is a toadstool, it works like a tree too. For another project using this die set, check out my Mushroom Forest tag.

Layers of ink - Spring Village Tutorial by Anna-Karin Evaldsson.

From the back the little village looks like this.

Layers of ink - Spring Village Tutorial by Anna-Karin Evaldsson.

The winter version also uses a wood disc as a base. You can find the Winter Village Tutorial here.


Thank you so much for taking the time to stop by here today! I will see you again tomorrow.

Happy crafting!

Anna-Karin

Supplies:

* Please note: the links are affiliate links, for which I receive a small percentage of sales generated by the link, at no extra cost to you.

1 comment:

  1. Oh my goodness! Your little houses are so sweet! I love the texture paste base and the gorgeous details like the ink on the window panes and the burlap curtains. I see another detail every time I stop and look at the photos. Amazing! Thank you so much for sharing. :)

    ReplyDelete

Thank you so much for leaving a comment! Happy Crafting!