I did a video on this technique recently, but for a different card. I am adding it here if you want to have a look, since the technique is the same. It is only the background stamp and the ink colors that are different. Click here to watch it in HD.
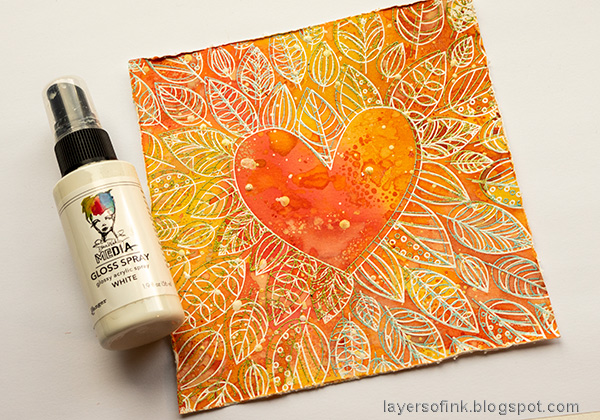
Smear Distress Inks on a non-stick craft sheet, mist with water and press the paper into the ink.
When dry, add more ink in the same way, for a textured effect. This time, I also used two Distress Oxide Inks.
Splatter with a little
White Gloss Spray. It will pick up some color from the ink and get shades of yellow and orange.
Layer the sentiments together, placing the gold letters inside the orange/red die cut. I also added a gold piece in the background, which just shows a little bit.
Here you can see the fun double embossing effect, if they are closer together, it creates more of a 3D shadow effect.
You can also leave the heart stamp inside the background stamp when stamping, for a different effect. But here I wanted the heart to stand out by being different from everything else.
My second project is a sketchbook/notebook/journal. I love to make my own sketchbooks and they are also great gifts. I always carry a sketchbook when I am out in nature and by making my own, I can add my favorite paper inside, use different books for different themes or seasons and make them just the right size. You can easily turn this design into a card instead, if you would rather make a card.
For the base of the book, I used
mat board, which is perfect for book covers and can handle paint and ink very well. Cut two covers. Mine are about 4.3x6 in. Coat with gesso and let dry.
Stamp leaves from the pretty
Autumn Leaves set on watercolor paper with Archival Jet Black ink.
Smear squares of Distress Ink on a non-stick craft sheet and mist with water. Don't add too much water.
Cut the leaves apart roughly and press lightly into the puddles of ink. Use two or three ink colors on each leaf and you can also leave some of the white paper showing. This is a quick and easy way of getting a watercolor look on the leaves.
Let the leaves dry and cut them out. There are also
coordinating dies to the Autumn Leaves set. I repeated the inking process with just a tiny bit of Distress Oxide ink. They give a nice chalky look combined with the Distress Ink.
When the paste is dry, paint the covers with Distress Paints. I watered the paints down a little.
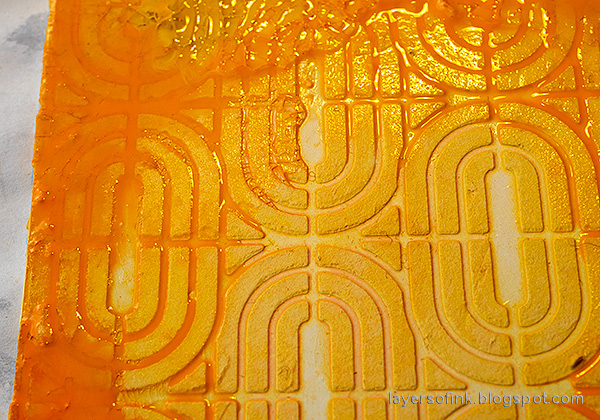
When the crackle paint is dry, crackles will appear. Paint watery Carved Pumpkin paint over the crackle paint and mist heavily with water. Some of the paint will run into the grooves created by the stencil, as you can see here. This gives a great look as it dries.
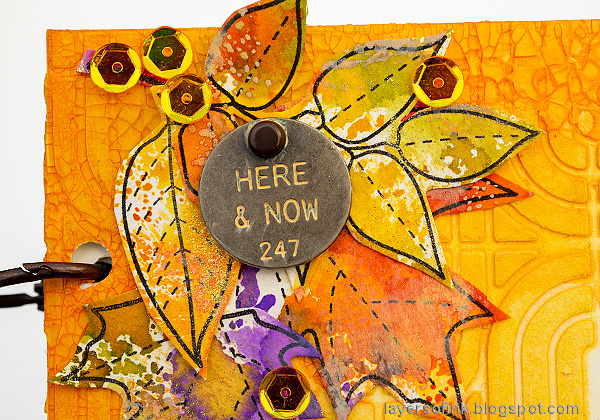
Die cut
Thankful For You from cardstock and a leftover inky paper. Cut off the 'for you' part.
Assemble leaves under the title panel until you are happy with the look.
Here you can see the shimmery effect of the Opal Blaze Polish better.
The crackle paint has a glossy finish, which contrasts nicely with the matte look of the texture paste. The paint sinks into the crackles, making them more visible.
The leaves from the
Autumn Leaves set are so pretty. They would also look great on their own on a card. I have a bunch of leftover to use for other projects.
I left the back cover as it was, but you can add leaves there too if you want to.
Don't miss all the inspiration along the hop. There are of course prizes to be won too, and at each stop on the hop SSS is giving away a $25 coupon, randomly drawn from those who leave a comment. The winners will be posted post on the
Simon Says Stamp store blog on Wednesday, the 14th of October.
Your next stop on the hop is
Bibi Cameron and she will show you wonderful card inspiration.
Here are all the stops along the hop:
For more
Make Merry inspiration, remember to check out the
Make Merry gallery at SSS, and if you make something with products from the range, it is fun if you post it in the gallery too. There are
galleries for all releases, and for the card kits, full of inspiration.
Part one of the Make Merry blog hop was yesterday, so don't miss all the inspiration there.


Wow beautiful Autumnal colours, I love your first Thankful card and the sketchbook is stunning!
ReplyDeleteYour mixed media is amazing! I LOVE the colors and the double embossing!
ReplyDeleteHow creative! I like the mixed media and the first card with the double embossing. Something new to try! TFS
ReplyDeleteYou really did an amazing job with the new products. So talented. I am loving the background stamps with the center cut out. They are all must haves.
ReplyDeleteThank you so much for sharing these fab projects, I'm looking forward to the video for the double embossing!
ReplyDeleteSo many cool looks. I am going to watch the video...Great colors!
ReplyDeleteINCREDIBLY AMAZING projects!! I am blown away by your creativity and such an inspiration!! WOW!
ReplyDeleteWow, just Wow!!! So beautiful!
ReplyDeleteI feel like I've been touched with many rays of sunshine! Stunning colors and designs.
ReplyDeleteSo beautiful! You have so much talent, thanks for sharing these projects!
ReplyDeleteThe Mixed Media is so Beautiful! I love the stunning colors!! Absolutely Beautiful!
ReplyDeleteHave a wonderful day,
Migdalia Rodriguez
Migdalia's Crafts
OMGOODNESS! Your work is truly beautiful! I felt like I was looking at pure sunshine! I applaud your creativity and enjoyed reading your steps. Thank you for sharing.
ReplyDeleteSo much creativity in this blog post. The technique of double embossing is new to me and I'll have to give it a try.
ReplyDeleteBeautiful creations! Love the cover!
ReplyDeleteLove the journal! Would love to make one just like it.
ReplyDeleteLovely and I particularly love the sketchbook!
ReplyDeleteGreat color combos - love them all!
ReplyDeleteI love your journal cover. It is always fun to apply texture paste and play with paints
ReplyDeleteWow, your projects are awesome!! Love that orange!!!
ReplyDeleteBeautiful projects. Thanks for sharing
ReplyDeleteLove those leaves! Awesome techniques!
ReplyDeleteWhat beautiful and inspiring projects. Thanks for all the great ideas.
ReplyDeleteWow!!! Amazing cards!! I love the double stamped look!!!!
ReplyDeleteOMG the background is stunning - thanks for sharing
ReplyDeleteVery beautiful thank you for sharing your creativity and inspiration. I can't wait to try the double embossing.
ReplyDeleteI love the warm, fire filled colors of autumn and your cards capture that look so perfectly.
ReplyDeleteVery beautiful thank you for sharing your creativity and inspiration. I can't wait to try the double embossing.
ReplyDeleteVery beautiful thank you for sharing your creativity and inspiration. I can't wait to try the double embossing.
ReplyDeletelove the colors
ReplyDeleteYour card and book cover are stunning! I love the colors and different techniques you used!!
ReplyDeleteYou show cased these products in a new way.
ReplyDeleteWOW your project is gorgeous!!!!!
ReplyDeleteOh my goodness - I love the double emboss technique. So gorgeous!
ReplyDeleteGreat vibrant projects :) !!
ReplyDeleteAmazing projects Anna-Karin... love the neat double embossing technique... those leaves are so pretty! Oh, that crackle background is amazing! I want to reach out and touch it! Thank you for the inspiration! Be safe and God bless!
ReplyDeleteThese are just AWE-mazing and beautiful.
ReplyDeleteThese are beautiful! going to try your double embossing technique. Thank you for sharing.
ReplyDeleteI’ve just made a page of notes with all of your techniques to return here and give them a try. So inspiring! And just gorgeous.
ReplyDeleteLove these. The colors ans texture are awesome
ReplyDeleteBeautiful projects! Thanks for the inspiration!
ReplyDeleteLove these vivid colors & mixed media journal! I’ve never done anything like these & look forward to experimenting! Thank you for the inspiration!
ReplyDeleteLove these vivid colors & mixed media journal! I’ve never done anything like these & look forward to experimenting! Thank you for the inspiration!
ReplyDeleteBeautiful cards, wonderful techniques. I really love the first one -- the Center Cut Fall Leaves background stamp is one of my favorites from this fantastic release and your background coloring is gorgeous.
ReplyDeleteThanks for sharing your beautiful creations, Anna-Karin. Loved the colors you used.
ReplyDeleteLove the way you colored the leaves, they turned out so beautiful, thanks for sharing the technique. Your cards are awesome. Thanks for sharing.
ReplyDeleteGorgeous, love the oranges and yellows!
ReplyDeleteYour cards are stunning! I really like the double embossing!
ReplyDeleteThose leaves are just beautiful. Cool technique!
ReplyDeleteWow wow wow ! Those leaves 🍁 are so lovely.
ReplyDeleteI really like how you made the leaves for your second project. Very nice!!
ReplyDeleteWow it is all so beautiful and appreciate the closeups to see the AMAZING Detail. Thankyou for some AMAZING Inspiration. xxxooo
ReplyDeleteSuch beautiful projects, thank you for sharing!
ReplyDeleteWow! Spectacular! That technique is so neat. I’m going to try it.
ReplyDeleteLove,love,love the touch of purple in your leaves. You have me inspired to make some fall cards.
ReplyDeleteBright sunny cards that perked up my mood!
ReplyDeleteSuch wonderful vibrant colors has a wonderful artsy look.
ReplyDeleteMelissa
"Sunshine HoneyBee"
Very cool and unique looks your projects have!
ReplyDeleteI have never heard of double embossing so will have to check out your video to learn a fun new technique! Thanks for sharing!
really creative how you colored the leaves
ReplyDeleteAnna-Karin, this is my introduction to your creativity & I'm blown away by what you've done! I watched your video & bookmarked it so I can return. I also want to look back on your older posts when I have a bit more time. Thanks for sharing your uber talent!
ReplyDeleteBeautiful cards!
ReplyDeleteThe card and notebook/journal are stunning! Love the colors, and appreciate all the time you took to show us the step-by-step process you used.
ReplyDeleteI tried making leaves like that...didn’t turn out nearly as vibrant as yours! I will try again because yours are so pretty!
ReplyDeleteDear Anna-Karin,
ReplyDeleteThank you for sharing your beautiful work with all of us. Thanks, too, for the video you shared. I love the double embossing technique! You are a treasure and I appreciate your samples very much.
Blessings on you now and always!
Lori S in PA
That double embossing looks amazing, and I am in love with your cover. That stencil is my favorite item from this release!
ReplyDeleteFun fall colors! Beautiful! Thanks for sharing!
ReplyDeleteso pretty! love the double embossing technique!!
ReplyDeleteAll of the yellows and oranges are just stunning. Definitely makes me think of fall
ReplyDeleteI love the double embossing technique! Thank you for sharing your cards.
ReplyDeleteYour card is lovely, but the sketchbook cover is to die for, Love it!
ReplyDeleteLove this release! A hit out of the ball park! Lovin your Projects too!
ReplyDeleteLove your double embossing technique! Thanks for creating and sharing such beautiful colors and creations!
ReplyDeleteLove the double embossing technique, thanks for sharing. Both your projects are gorgeous!
ReplyDeleteJust beautiful. I especially like the first card with the offset stamping and embossing in different colors! Thanks for inspiring!
ReplyDeleteYour cards are wonderful! I'm pretty sure your book is my favorite on the entire hop though. (I have a thing for books.OL)
ReplyDeleteI'm lovin' the oranges and yellows!
ReplyDeleteThose colors are so beautiful! I am not finished with fall yet and really enjoyed this beauty! I threw out a moved off set emboss just last week thinking it was an oopsie, but I see how it is really pretty when done. Dang it wasted that for nothing.
ReplyDeleteGorgeous designs and colors on these beautiful creations! Love your card and sketchbook cover!
ReplyDeleteI love something about each of your cards! And those techniques too
ReplyDeleteBeautiful technique. I need to try it. I love the cut out stamps!
ReplyDeleteBeautiful! I love that double embossing technique!
ReplyDeleteWow! What beautiful cards! I love all the texture and the gorgeous fall colors!
ReplyDeleteBeautiful cards! I love the double embossing and the way you colored the leaves.
ReplyDeleteThanks for the inspiration with mediums I haven't used before. I want to try the double embossing.
ReplyDeleteWow wow wow! So many wonderful ideas on your projects. Thanks for all the inspiration.
ReplyDeleteVery beautiful and elegant! Thanks for the amazing inspiration!
ReplyDeleteThe amount of inspiration I got from your creations was out of this world! Everything turned out so beautiful and yes, new mediums to explore was a total bonus! Thank you.
ReplyDeleteBeautiful, I love the watercolored leaves.
ReplyDeleteThe cards are on fire.
ReplyDeleteFantastic. thanks for
sharing.
txmlhl(at)yahoo(dot)com
These were gorgeous. My favorite fall colors
ReplyDeleteBoth projects are just stunning! Love all the layers of ink & embossing
ReplyDeleteVery artsy, love the vibrant colors
ReplyDeleteVery cool! Love all the textures.
ReplyDeleteGreat projects - love the fall colors you achieved!
ReplyDeleteInspiration does not begin to say how feel about these projects! Double embossing omg! So excited to try this. Also your leave technique is a must. I have been hesitant to do projects with my mediums but this was the jump start needed. Thank you love the colors you choose! Bold bright and happy! Thanks!
ReplyDeleteGreat release! I love your creations, especially the beautiful leaves!
ReplyDeleteWow! You used so many cool techniques! I learned quite a bit from your two projects. Both turned out awesome!
ReplyDeleteGreat utilization of so many techniques. Beautiful pieces
ReplyDeleteThanks for sharing these gorgeous cards! You chose such lovely colors.
ReplyDeleteI absolutely adore the sketchbook cover!
ReplyDeleteI love the double embossing on the card and the layers on the sketchbook cover are so beautiful! Thank you for the detailed steps of how your created these stunning projects!
ReplyDeleteI love the sketchbook! You are so creative.
ReplyDeleteYour projects are awesome! Creative process. TFS
ReplyDeleteGreat autumn projects! Thank you for sharing your ideas.
ReplyDeleteLove how you created these colorful projects.
ReplyDeleteI really like the double embossing. I have done this many times by accident, lol! Love the texture on the sketchbook. Thanks for showing how you colored the leaves, so pretty!
ReplyDeleteI love your choice of colors for the center cut fall leaves card and the double embossing is inspired! Then I saw the art journal! It would be a perfect gift for my oldest son, so I am adding it to my to do list. Thanks for sharing your wonderful ideas!
ReplyDeleteGreat details on the process. I like the look of the leaves. Great page grouping.
ReplyDeleteThe colors are just sensational.
ReplyDeleteI wondered why they made a stamp with a heart & leaves. Thanks for showing me! Very nice card!!
ReplyDeleteReally great colors and TY for showing the thankful die. I can see myself scrapbooking with that one
ReplyDeletePretty cards. The textures and double embossing are very cool ideas.
ReplyDeletewow, so beautiful!
ReplyDeleteBeautiful projects. Thanks for sharing
ReplyDeleteWow, lovely projects using these new release products from SSS!
ReplyDeleteThanks for the double embossing technique - love it!
ReplyDeleteUnbelievable how stunning your card and sketchbook are with all the textures and double embossing. Thank you for sharing all the techniques of these two projects. So much inspiration here.
ReplyDeleteThis is a spectacular post!! I am sorry I missed the hop but so glad I'm making the rounds anyway!!! Thank you for the WoNdErFuLlY comprehensive photos ~ I am bookmarking this <3 (Merry Christmas <3 )
ReplyDeleteYour projects are very nice! I just love the vibrant colors. I really like you did the leaves with individual dipping in the ink and the great colors!
ReplyDelete