Hello friends! It is Monday and I have an autumn inspired tag to share with you.
We have a Dry Embossing theme at the Simon Says Stamp Monday Challenge Blog this week. So I hope you will take out your embossing folders or stencils and join us. Since it is the first Monday of a new month, the team is showcasing products from a specific company/designer and this week the turn has come to Tim Holtz and his fantastic range of products. You can find them all here. You don't have to use Tim's products to join, but it is always fun if you do.
Since it is a new month, we also have a new guest designer, and during October Alison Bomber will be sharing her wonderful projects with us. I hope you will visit her blog Words and Pictures, which is full of inspiration.
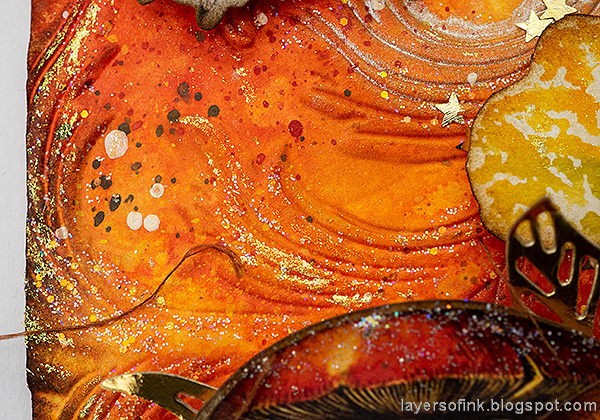
We have had beautiful autumn weather lately and I wanted to make a tag inspired by the autumn forest. I take lots of photos of mushrooms and leaves on my walks at the moment. I love embossing folders and can clearly remember how amazed I was the first time I got hold of one, a long time ago. There are so many techniques you can do with them.
Today, I used the beautiful
Elegant 3-D Texture Fade by Tim Holtz. The 3-D folders emboss extra deep and also with different depths within the same design. Mist the paper with water first to get an even better result. Isn't it pretty?
Mist the tag with Distress Spray Stains, using yellow, orange, coral and
a little metallic. The color will look darker in the grooves.
When dry, splatter the tag with a brown, red and yellow
Scribble Stick, by first dipping the stick in water and then flicking a paint brush against it.
Ink the edges with Ground Espresso.
I wanted some shine and smeared
Nebula Stickles, in particular on the embossed parts. This glitter glue also includes gold stars, which gives a great effect.
Pick out some images from the beautiful
Field Notes Ephemera pack and ink the edges. I ended up not using the label and the flower.
Shape the wings of the butterfly and staple to the background.
I have a bunch of old fibers on my desk and decided to add them to the tag. The sentiments from
Tim's Simple Sayings was stamped on a left-over piece from last week's
Autumn Blooms card.
The mix of embossing, spray, metallic spray, splatters, stickles and polish makes for an interesting background.
I hope you will join us this week in our Dry Embossing challenge. You have a chance to win a $25 gift voucher to do some fun shopping at Simon Says Stamp. You have until next Monday 8am Ohio time. 1pm UK time, 2 pm CET to join in.
Do you use Instagram? If so please add #sssmchallenge so we can see your entries there too.
Thank you so much for stopping by here today!
Happy crafting!
Anna-Karin
Supplies:
* Please note: the links are affiliate links, for which I receive a small percentage of sales generated by the link, at no extra cost to you.


Wow... this is such a stunning creation, Anna-Karin. Love the beautiful texture you created on the background. All the details on the embellishments and the color scheme are amazing! :)
ReplyDeleteThat background is absolutely gorgeous, and the mushrooms look so good layered up against it. A magnificent tag!
ReplyDeleteAlison x
Gorgeous tag Anna-Karin :-) the bright yellows and oranges are so pretty and I love the mushrooms, absolutely stunning!!
ReplyDeleteHope you have a great week!
luv
Lols x x x
Beautiful tag! Such warm colors!
ReplyDeleteThank you for a closer look and details on the project shared at SSS. I'd like to incorporate more mixed media into my projects. Thank you for the inspiration, it's something I'd like to try. Will sub for more!
ReplyDeleteThese warm colors and fabulous textures are so lovely! Thanks so much for sharing this wonderful project!!!
ReplyDeleteFantastic tag! Those colors just glow, I LOVE this!! Maura
ReplyDelete