

Recently, I ordered some Art Impressions watercolor stamp sets, which I hadn't used before, and they are such fun to stamp with. I love scenic stamping, and with these stamps you can easily create a very large number of different scenes. You can also use other media to color them, they don't have to be used with watercolors. I glued the page to one of the burlap pages in my Dina Wakley Media Journal, but you could also turn it into a card or frame it.

Start by trying out the scene you want to create on scrap paper. I usually do at least two scenes on scrap paper first, to see how to best place the different elements in relation to each other. Then I stamped them with Pumice Stone Distress Ink on watercolor paper. You can also use other light colored distress inks. I like that the Pumice Stone is more visible than Antique Linen, while also function as a subtle shade after the watercolors have been added. I used four stamp sets by Art Impressions: Winter Kids, Rustic Cabins, Tree Set 1, and Birds.

White emboss dots in the sky, and here and there on the background. You can also skip this step, if you want less texture. Draw a few lines with a pencil so that you know where you want hills and the horizon.
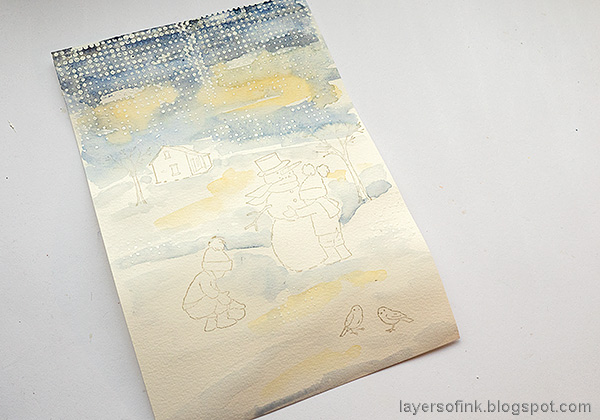
Mix up watercolour paint and then paint the sky and the snow areas. If you don't have watercolor paint, you can use Distress Ink instead.

Continue adding paint. Don't worry about perfection, but instead aim for a free look.

Paint the birds, and then add more shading. Ink the pine trees with two shades of green Distress Ink, mist with water about three times and then stamp on the page.

Stamp some branches in the front of the scene with the same technique. This step helps to frame the scene. Add more shading if needed. When the paint was completely dry, I used black pens to add details and to give the scene a pen and ink look. Lightly go over the stamped lines to bring some of them back, and add scribbles and other pen work here and there. If you want a softer watercolor look, you can skip this step.

Finally, I added some grass, dots and scribbles with a white gel pen.

The dots in the sky are meant to look like snowfall.

Here you can see the details of the black and white pen work better. Some of the Pumice Stone lines are still visible, looking almost like an initial pencil sketch. If you want more subtle lines, stamp with Antique Linen instead.
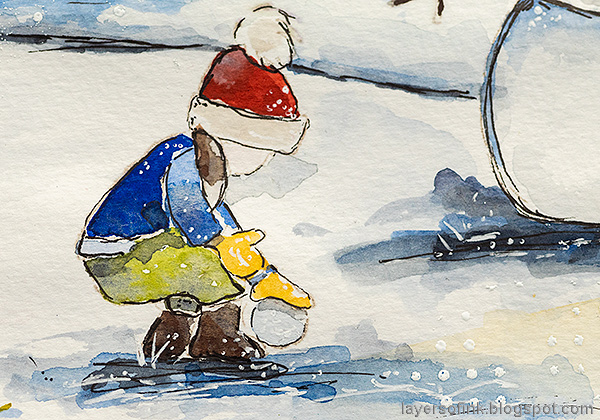
If you need to add highlights to a watercolor project, a white gel pen works very well. Aren't the stamps sweet?

I used a sentiment from Tim's Nature's Wonder set. One of the birds ended up being a bit weird, but that is okay. They are meant to be great tit birds.

Here you can see more of the black and white scribbles and grasses. You can also paint grasses with watercolor paint and a fine brush.

I love to add little houses to scenes, and this is the home of the two children.

It is a good idea to use the same blue color for the sky and the ground - and to use that same blue color when mixing up the shades of grey. It gives a unified look to the scene.

You can vary the scene in so many ways, by placing the stamps differently, using fewer stamps, stamping on a smaller or larger paper and of course by using other colors or media.

Thank you so much for taking the time to visit my blog today!
Happy crafting!
Anna-Karin
Supplies:
* Please note: the links are affiliate links, for which I receive a small percentage of sales generated by the link, at no extra cost to you.
* Please note: the links are affiliate links, for which I receive a small percentage of sales generated by the link, at no extra cost to you.
Awesome AJ page!!! LOVE any detail and the sentiment too!
ReplyDeleteBrilliant!
ReplyDeleteThis is absolutely charming - like a lovely illustration from a children's book. Beautiful delicate line work to go with your gorgeous watercolouring.
ReplyDeleteAlison x
Oh my goodness Anna-Karin you are a true artist! This is absolutely amazing, if I had this (or could do it), it would be framed and hung for all to see! Yes, those stamps ARE sweet and you have really shown just how much can be done with them.
ReplyDeleteAbsolutely AMZING work my dear and a fabulous tutorial, thank you for that.
This is such an adorable scene, and great watercolor page Anna-Karin!!!! Absolutely LOVE this.
ReplyDeleteI wish you a lovely winter time and happy crafting in 2020, with love, peace and wonderful moments with your family.
Hugs my friend!
Corinne
AWESOME what a different style with AI watercolor stamps
ReplyDelete