
Hello friends! I hope you are well! The snow is falling outside my window and I just got back from a walk. It's a winter wonderland outdoors and it was so peaceful and quiet, with almost no cars on the roads. I have an Eileen Hull Inspiration Team project to share with you today, made with two of her new dies by Sizzix.

I love to make my own storage containers, and have a lot of DIY storage containers in my studio, and the boys have some of them too. Today, I have a little chest of drawers to share with you, which is very easy to make with Eileen's: Stacking Drawer Box and Treasure Box dies. Both of these die sets are so versatile and I am planning to make lots of projects with them. They also coordinate perfectly with each other. The chest of drawers is about 5.3 in high and 3.2 wide and deep.
The drawers are a perfect place to store buttons, idea-ology embellishments, beads and other bits and pieces.

Start by die cutting three drawers from mat board. This is an XL die, so you need to use the Extended Cutting Pads, but it fits perfectly in an ordinary Big Shot or Vagabond machine. As you can see, the Scoreboards dies both cuts and scores the material.

For the base, I used the Treasure Box, but left out the lid part, since I wanted the drawers to be visible. You need to die cut two each of the pieces with the flaps, but only one square piece (I included two in the photo by mistake).

Coat everything with gesso. I normally leave the flaps uncoated, so that they will be easier to glue, but don't worry if you get some gesso on them.

When the gesso was dry, I painted the mat board with Ocean and Turquoise paints. Before the paint dries completely, rub some of it off through a stencil. I also rubbed quite a bit off here and there, for a shabby look.

You can stamp directly on the mat board, but today I was in the mood for tissue paper stamping, since it also gives a texture to the background. Stamp with Archival or another waterproof ink. I used beautiful Nature Walk stamps by Darkroom Door.

Add a layer of gloss medium to the surface, carefully place the tissue paper into the medium and add another layer of medium on top of the paper. Most of the tissue paper I have at home disappear almost completely on the background, but this particular paper was a little more opaque. It was a new paper that I hadn't used before or tested. Normally, I wouldn't have liked the look, but for this project, I liked how the bits of white texture added to the shabby look of the drawer unit. So it was a happy accident.

When dry, stamp with sentiment stamps, birds and a script background stamp.

Add more texture to the background by mixing a little Ocean paint into texture paste and applying it with a palette knife through a Mini Art Is text stencil and a bubble stencil. You can see that Tim's Bubble stencil is a favorite of mine.

Assemble the Treasure Box by using a strong adhesive along the flaps.

Add the back piece to the box. Once the parts were assembled, I dry brushed quite a lot of brown paint along the edges, and at the base. I wanted a grungy and dark look to contrast with the lovely turquoise. If you want a lighter look, dry brush with white paint instead.

Assemble the three pieces that fit around the drawers, and glue them to the box. I didn't place them all the way into the box, but left a small distance between the front of the box and the drawers.
Assemble the drawers in the same way, starting with the side flaps, and then place the base piece inside the drawers.

Place the drawers in the slots and your storage unit is done. This piece would also work great as a doll accessory.

I like the layers of paint, tissue paper, stamping and texture paste.

Here you can see the texture from the tissue paper, it is most visible on the darker parts of the project.
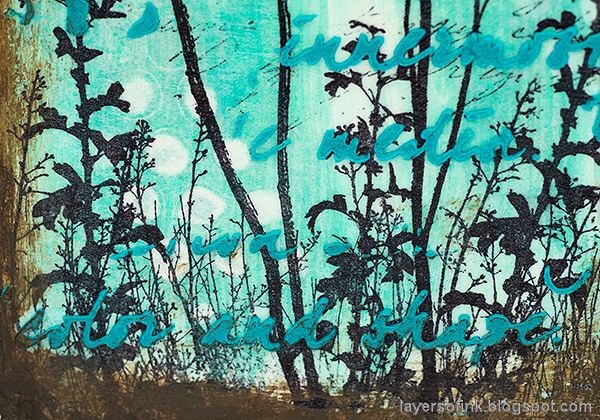
Some of the words from the stencils were chosen specifically, such as 'color and shape'.

Each drawer front is treated like a little canvas of its own.

I really like this grass stamp.

On this drawer, you can also see that extra texture from the tissue paper.

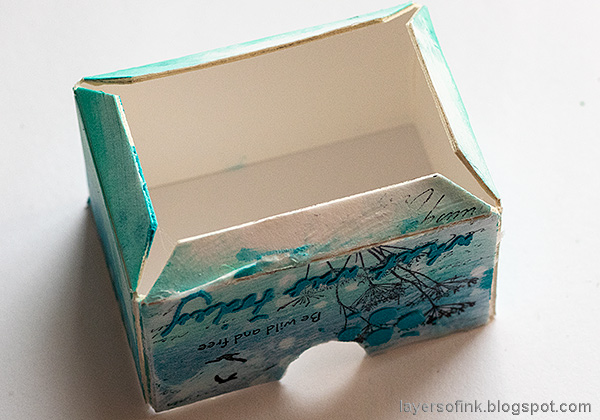
The other side of the box.

I am very fond of small sentiment stamps, such as these from the Nature Walk set.

At the top of the box, I stamped a sentiment from Darkroom Door's Majestic Mountains.

The chest of drawers unit was such fun to make. It also reminded me of my first homemade Chest of Drawers, also made with Eileen's dies. If you want more inspiration, you can find that post here. I still use that Chest of Drawers almost daily, and I can hardly believe that it was almost seven years ago that I made it.
Have a lovely weekend!
Anna-Karin
Supplies:
* Please note: the links are affiliate links, for which I receive a small percentage of sales generated by the link, at no extra cost to you.
* Please note: the links are affiliate links, for which I receive a small percentage of sales generated by the link, at no extra cost to you.
Other supplies:
Stamp: Darkroom Door French Script Texture Stamp
This is such a beautiful storage piece, it will be so nice to admire and being functional will just add to the wonderfulness (if that’s a word?!?) I love your layers, the colors, images and words are really uplifting. Thanks for sharing xx
ReplyDeleteso pretty, love the mix of colours and your flowery scenes on the great draw 3D project :)
ReplyDeleteThis is absolutely delightful, Anna-Karin - I love the colours and the meadow flowers, of course, and what a useful little die that is!
ReplyDeleteAlison x
Nice to read and your blog is good and it is very informative thanks for share it.
ReplyDeleteFlexographic Ink
Food Packaging Ink
Gravure Printing Ink
Solvent Ink Manufacturers
Flexible Packaging Ink
Packaging Ink
Plastic bag Ink
This is really nice to read the content of this blog. I really appreciate this blog too has such a kind of great knowledge for me. food packaging ink
ReplyDeleteThis looks awesome - totally my taste too! You've just convinced me to buy that drawer unit (I already have the treasure box).
ReplyDelete