
Hi friends! I hope your weekend was a great one! We went to a Christmas market yesterday and I was happy to find a ceramic Santa/gnome. Last year, at the same market, I bought one of the Santas, which were made maybe 50 years ago by a female artist and forgotten in a box in an attic. This year, they had only one Santa/gnome left, and now it is living in our living room with its friend. I love Christmas ornaments with a good story. I wrote Santa/gnome, because Swedish Santas are both of the more traditional Santa Claus kind, but sometimes even more what you might call gnomes. These were small santas, living especially in barns, and helping out at the farm, but they could be naughty too if you didn't treat them well. You can read more about them here.

This week at the Simon Says Stamp Monday Challenge Blog we have a 'B is for' theme. Since it is the first Monday of a new month, the team is showcasing a specific designer/company and this week it is Brutus Monroe, which has a wide range of very cool stamps, embossing powders, and other interesting products. You can find them all here. You don't have to use Brutus Monroe products to join, but it is always fun if you do.
Our guest designer for December is the very creative Ann Barnes, with her blog Aksbarchitect Creates. Don't miss her project!

I made a space wall-hanger for the boys, on the theme of being brave. This was such a fun project to make and it shines and glitters, and even glows in the dark. How cool is that!? It is the first time ever, I make a project which glows in the dark, something that always fascinated me as a child, and it will be a winner with many children. The finished wall-hanger is 8 x 9.5 in.

These are the Brutus Monroe products that I used: Flat Back Acrylic Bubbles, Glitter Flat Back Acrylic Bubbles, Abstract Art stamp set, Monster Party stamps, Milky Way Embossing Powder, and Glow in the Dark Seaglass. Unfortunately, the Abstract Art set is no longer in stock, and I didn't discover that until the project was done, but it isn't essential to completing the project.

I started with a left-over watercolor paper from my Misted Galaxy project, which had been misted with the Distress Resist Spray. It was misted with Distress Spray Stains. The Resist Spray resists the ink, forming stars and galaxies.

Mist with Brushed Pewter Mica Spray.
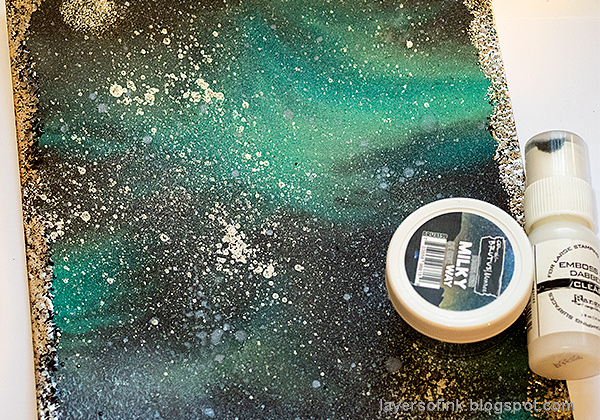
Apply Embossing Dabber Ink around the edges and emboss with the Milky Way powder. I used a chunky powder, but could only find a fine powder in the shop now. It will still work almost the same, you just need to add two layers if you want it to look thick. Remember to be careful when using a heat gun so that you don't burn yourself.

Stamp the fun monsters on watercolor paper. I thought they made perfect aliens. I always stamp more than I need, in case I mess up coloring. And as you can see, I dropped a stamp on the paper.

Watercolor them with Distress Inks, by smearing the inks on a craft sheet, misting once with water and picking it up with a paint brush.

Die cut three circles using the Sizzix Circle Framelits set. My paper was already inked with Antique Linen. Smear the ink on a craft sheet, mist with water and press the papers into the ink.

Continue using Frayed Burlap and Hickory Smoke, aiming for a splotchy and textured look.
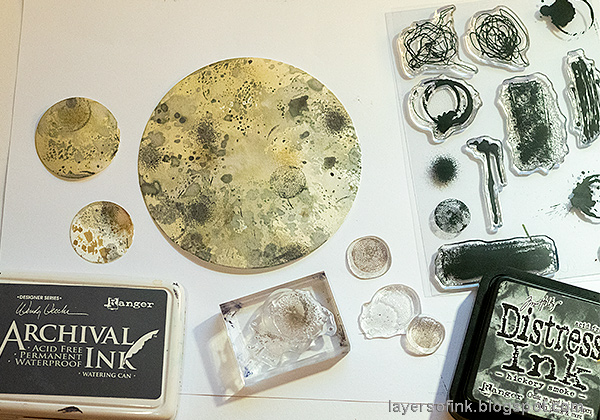
Stamp with Abstract Art shapes. You can skip this step, if you don't have the stamp set. I even thought the planets might have looked better without the extra stamping.

The title letters were die cut from white mat board using Tim Holtz's Letterboard die. Inked with Lucky Clover and covered with sparkly Crystal Stickles. I used the same stickles here and there on the background, it glows almost in a green shade.

Now for the really fun part, glue Glow In The Dark Seaglass to the background, so that they look like asteroids. Add Flat Back Acrylic Bubbles here and there. They actually do glow in the dark and the panel looks really cool with the glowing asteroids. I can't wait to hear what the boys say when they get the panel.

This little character is such fun, and got a whole planet for himself. I planned to add white circles to the background, but forgot to do it before having glued the seaglass, which made it hard to trace the circles with a plate. Instead, I just scribbled faint uneven circles with a white gel pen.

The aliens are a lot of fun to color. I added Glossy Accents to their eyes and a little Stickles here and there.

The combination of the clear Flat Back Acrylic Bubbles and the Glitter ones is very cool. The glitter ones are very sparkly. Anton has been using some of both of these to craft with, and will enjoy seeing them on this project too.

Two aliens are peeking out from behind the planet.

The seaglass pieces are dimensional and I love their uneven shapes. So cool. Brutus Monroe also has a glow in the dark embossing powder, which I am going to get in my next order.


Do you use Instagram? If so please add #sssmchallenge so we can see your entries there too.


Thank you so much for taking the time to visit my blog today!
Happy crafting!
Anna-Karin
Supplies:
* Please note: the links are affiliate links, for which I receive a small percentage of sales generated by the link, at no extra cost to you.
* Please note: the links are affiliate links, for which I receive a small percentage of sales generated by the link, at no extra cost to you.

This is absolutely fabulous! I love how you created the background and added the glow-in-the-dark seaglass!!! Thanks for the inspiration!
ReplyDeleteI love so much about this panel that you have created, especially the glow in the dark aspect, what a wonderful use of that glass to look like asteroids and space junk! The monsters were a perfect fit! I bet your children will just adore this. Thanks for sharing
ReplyDeletei bet the boys love this hanging in their room! I love it! It is so filled with whimsy and fun with the cute monsters peeking out. Wonderful galactic background! Happy you found your gnomish Santa at the market - what a great little story! hugs, Maura
ReplyDeletewhat a cool and genious idea!!!! I'm impressed!!!
ReplyDeleteLove the magical journey into outer space here - such depth and delight in the star-spattered sky, and such fun with those little aliens peeking out.
ReplyDeleteAlison x
Gorgeous panel, Anna-Karin! The galaxy background is amazing, and love the fabulous planets. The aliens are so cute. Hugs, Sandra
ReplyDelete