


Don't miss the free gift! If you use the code DCMBR27, you will get a free Nutty & Bright stamp set (while supplies last!) with any purchase. The code will expire Sunday, 12/9 at 11:59 pm EST.
I made a winter panel and a spring tag, to mix up the seasons a little, and there are step photos for both. So let's start!

The background is sort of the main thing on this winter project, and It was such fun to make. The technique works for any season or theme and for lots of different types of projects. For the wall-hanging, I wanted to use a fun Christmas color-combo of turquoise, pink, red and white, which by total coincidence coordinates with the banner for the DieCember release. It's 6 x 6.3 in big.
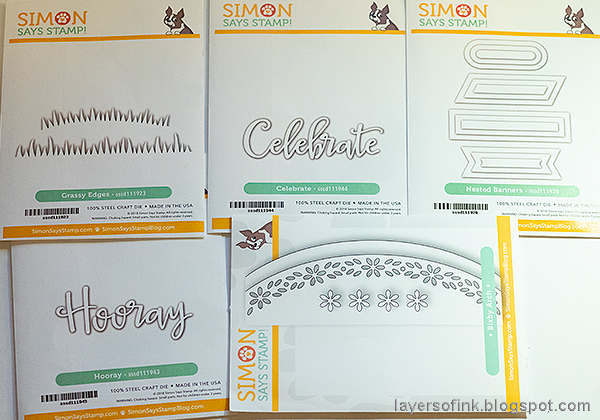
I used these five DieCember dies on my projects: Grassy Edges, Celebrate, Nested Banners, Hooray, and Bixby Arch.

The Nested Banners set is so versatile, and you get a lot of dies, which can all be used in many different ways. When I saw the Nested Banners, I immediately thought the rectangular banners would look great for a background. Instead of separating the three dies, I kept them intact and die cut lots of nested rectangles from watercolor paper. This gives you two frames and one thinner center piece. If you have already separated the dies, you can use the Sizzix Magnetic Platform to keep them in place when die cutting.

Smear Distress Inks on a craft sheet, mist with water and press the papers into the ink.

When dry, I started applying them to a piece of mat board. You can use a sheet adhesive, such as this one by Sizzix, but I couldn't find mine, and instead used my ATG gun. Vary the colors and the placement until you are happy with the lock.

When you are done, cut the mat board at the bottom and cut off the overhanging rectangles on the sides. I almost didn't want to cover any of this background up.
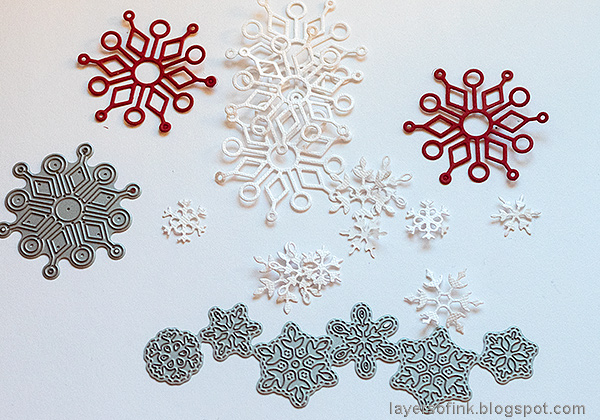
Die cut snowflakes from White Diamond glimmery cardstock and from Schoolhouse Red cardstock, using the Kinley Snowflake and Stitched Flakes dies from earlier releases.

I also die cut a snowman from felt, using the Picture Book Snowman. The scarf was cut by hand, but there is a die for the scarf too.

Splatter the background with white paint for texture and sand the edges of Tim Holtz idea-ology Christmas Quote Chips.

Glue the snowflakes to the background with SSS glue, and add the snowman. I also placed dots of White Opal Liquid Pearls on some of the snowflakes.

Use the Celebrate die to die cut a title from White Diamond glimmery cardstock. This cardstock has a lovely shine, but it was a grey day when I took these photos, and I however much I turned the panel around, there wasn't enough light to catch the glimmer.
Now to the spring tag.

Sometimes in the midst of winter, it is nice to do a spring or summertime project and to use some bright flowers. My favorite part of this tag, was creating the overlapping hills and grass, which were all done with DieCember dies.

Start by coating a tag with gesso.

When dry, paint the sky with Distress Paints and mist with water.


Ink with shades of green by smearing the ink pad directly onto the paper. The lower parts of the larger die cuts won't show, so I didn't ink them.

Mist with water droplets.

When dry, stamp with the Good Reading background stamp and Fern Green and Leaf Green Archival inks.
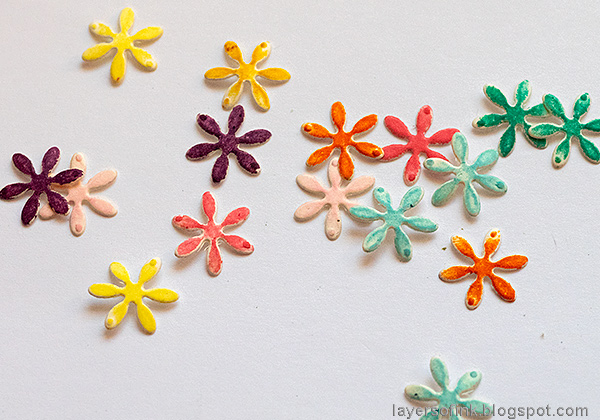
Color the flowers by pressing them into the ink pads. This is such a quick coloring method and gives lovely vibrant colors.

Stamp the sky with a sentiment from Uplifting Thoughts and smaller words from Tabbed Sentiments. Add birds and a border with a white gel pen.

Glue flowers here and there with the fabulous fine-tipped SSS Tacky Glue. I love these tiny flowers. Add a dot of White Opal Liquid Pearls to each flower. When it dries, the Liquid Pearls will take up some of the color of the ink, which is not always an effect I want, but in this case, I liked the tone-on-tone look it created. If you want to avoid it, color the flowers with acrylic paint instead.

Die cut the Hooray sentiment from White Diamond and Baby Blue glimmery cardstock and glue to the background.
There are of course prizes to be won and at each stop on the hop SSS is giving away a $25 coupon, randomly drawn from those who leave a comment. The winners will be posted post on the Simon Says Stamp store blog on Wednesday, the 12th of December.
Your next stop on the hop is Gayatri Murali, and I hope you won't miss the inspiration she has in store for you. If you get lost along the way, this is the hop list:
Anna-Karin Evaldsson (you are here)
For more DieCember inspiration, remember to check out the DieCember gallery at SSS, and if you make something with products from the range, it is fun if you post it in in the gallery too. There are galleries for all releases, and for the card kits, full of inspiration. There was also a part one of this blog hop last week, with even more wonderful projects.
Tomorrow we are going to do bake gingerbread cookies and make Christmas sweets with some friends. It is going to be fun and I bet the kids will eat a lot of cookie dough.
Thank you so much for visiting today and I hope you will have a lovely weekend!
Happy crafting!
Anna-Karin
Supplies:
* Please note: the links are affiliate links, for which I receive a small percentage of sales generated by the link, at no extra cost to you.
* Please note: the links are affiliate links, for which I receive a small percentage of sales generated by the link, at no extra cost to you.
These are really cute! :) Love all the detail you put into them.
ReplyDeleteLove how you used the banners to create the background. So clever!!
ReplyDeleteWow, your winter scene panel is amazing and beautiful.
ReplyDeleteI love your panel! I like how you kept the dies together for cutting. I probably would have cut them apart immediately...... Of course they still could have been used the same way, but keeping them together makes it so much easier. Love your tag too!
ReplyDeleteLoving the colors you used on your winter scene panel. The Big Picture Book snowman is so cute.
ReplyDeleteWOW! The background on your first project is absolutely fabulous. Love it. And, the spring tag is equally fab, love the dies you used for it, too.
ReplyDeleteCute projects and the versatility of these dies shows through. Love your creativity with these.
ReplyDeleteAwww!!! Your projects are totally cute and your colouring simply amazing!!!
ReplyDeleteLove the banner usage! Very unique... I agree that sometimes you do not want to cover the background! lol... The snowflakes were a great addition.
ReplyDeleteSuch fun cards and tags! So many wonderful textures and colors!
ReplyDeleteAwesome projects
ReplyDeleteWow, these are amazing. Your creativity is inspiring.
ReplyDeleteWow! So many elements and details used to create great projects!
ReplyDeleteLots of work but ohhhhh so stunning! I love the layering you are doing - goodness gracious - you are very talented - lovely lovely! Thanks for the hop and for showing us how it is done!
ReplyDeleteFabulous cards and tags!
ReplyDeleteBeautiful projects!
ReplyDeleteWow! Love the variety of your projects!! Even the felt snowman is absolutely adorable!!
ReplyDeleteYou really put a lot of work into your projects, and it was well worth it to get such awesome results!
ReplyDeleteThe felt is such a good idea. The tag is adorable, too!!
ReplyDeleteWonderful showcase of creations. Like the style & coloring.
ReplyDeleteMelissa
"Sunshine HoneyBee"
What an awesome way to use the banner dies. Very creative!
ReplyDeleteKaren Berry
Love the colours, and the way you used the dies for the background on your first project is fantastic - very creative and effective! Worth the effort for sure. Thanks for sharing!
ReplyDeleteLove your array of creations!! So beautiful and colorful!!
ReplyDeleteA lot going on and so many god insights into what you're doing. Especially loved the snowflakes. : )
ReplyDeleteLovely projects!
ReplyDeleteSQUEAL!! I LOVE your Creations!! So BEAUTIFUL!! THANKS for sharing and have a FABULOUS WEEKEND!!
ReplyDeleteWOW ! Would never have thought outside the box like these projects. Both are amazing, that background is so funky, cute snowman & awesomely pretty snowflakes. That tag needs popping in a frame & showing to the world. Thank you for sharing your work.
ReplyDeleteGorgeous Projects! I love all the beautiful details you added to the panel and to the tag. Thanks for the inspiration.
ReplyDeleteI love your details and how you combine product!
ReplyDeleteWonderful projects, great inspiration!
ReplyDeleteWow!!! Really Fabulous projects!!!
ReplyDeleteLove these!! Such fun projects!
ReplyDeleteYou are so talented!
ReplyDeleteGreat projects! You put a lot of work into them. Awesome!
ReplyDeletethese projects are both full of such fabulous details and creativity! Well done!!
ReplyDeleteOMG the snowman is amazing! So much texture and layers! I LOVE IT!!!!!
ReplyDeleteYou are one patient woman!! I don't have the patience to create like you do. Snowman is so darn cute :) TFS Merry Christmas, and I love a gingerbread cookie :)
ReplyDeleteWonderful to see Spring in the midst of winter! And how cool is it to use the nested banners to create a background!
ReplyDeleteWhat delightful creations, Anna-Karin! Love the unique way you've used these new products. tfs
ReplyDeleteWhat a great couple of projects - I love how you add colour and layers to make art. I love that tag the most!
ReplyDeleteOh my goodness! These projects are beautiful!
ReplyDeleteGreat work! Love the color combination on the first card. The tag looks like such fun. Thanks for sharing your art.🐧
ReplyDeleteFABULOUS - so many wonderful examples. I love those stacked banner dies - gotta put them on my wish list.
ReplyDeleteWOW what a gorgeous layout!!
ReplyDeleteWow! love how you have used lots of dies in a single project. love the unique color combo
ReplyDeleteAnna-Karin your panel is awesome and I am CRAZY about pretty tags and this one is certainly pretty. Thanks for the great how to tutorial on how you made each.
ReplyDeleteHave fun baking tomorrow, that's what I have planned myself and looking forward to it.
So creative! From the nested banner background to the spring design; there are so many great new design ideas here. Thanks!
ReplyDeleteYour winter panel is such fun and the spring makes me wish it wasn't just December!
ReplyDeleteWonderful projects! Such a cool background.
ReplyDeleteWhat an interesting perspective you took on these products! It's kind of like an "I Spy" piece: can you name all the new dies in this layout? (Spoiler: I could not.) Thanks for sharing your creativity with us!
ReplyDeleteYour work is just brilliant!
ReplyDeleteFabulous winter panel love all the intricate detail, love the spring tag too !!
ReplyDeleteWow!! Fabulous work! You are super creative!
ReplyDeleteLove both the creations, they are beautiful
ReplyDeleteSuch wonderful creations!
ReplyDeleteWhat a great project. Lots of patience but well worth your effort!
ReplyDeleteYour layout is wonderful.
ReplyDeleteLove the felt snowman.
Lots of work went into
the blocking but it was
worth it. Gorgeous tag.
thanks for sharing
txmlhl(at)yahoo(dot)com
WOW your projects are amazing!!!
ReplyDeleteWonderful projects. I already had the Nested Banner dies on my wish list, and now you've given me a new way to use them!
ReplyDeleteGreat layout and tag. Thanks for sharing these great projects.
ReplyDeleteWow, wow, wow and more wow!! Love your gorgeous projects. The wall hanging is a stunner and the colors are perfection together.
ReplyDeleteBeautiful panel and tag! Love that snowman!
ReplyDeleteLove your projects, the snowman card is my favorite!
ReplyDeleteWow! Amazing projects. The backgrounds are stunning!
ReplyDeleteWhat a clever way to use the nested banner dies. Your projects are all fantastic. Thanks for sharing.
ReplyDeletestunning work - thanks for sharing your creativity!!
ReplyDeleteBoth are so great, the winter panel aswell as the spring tag. Great idea using the tag dies for you awesome background. Love it.
ReplyDeleteThank you so much Anna-Karin for sharing.
so many layers
ReplyDeleteI enjoyed the demo of the gradation colors- greens especially.
ReplyDeleteNot sure which piece I like best. I think your Spring Tag is so interesting and clever!
ReplyDeleteAna, such fantastic creations! Wow, I am blown away!
ReplyDeleteBoth of your projects are fabulous! The wall hanging is amazing and the background is so creative. The Spring tag is very detailed and the layers are so lovely. Thanks for sharing!
ReplyDeleteFABULOUS winter panel and FUN tag!
ReplyDeleteWOW - LOVE your CREATIVE designs!
Thank You for sharing your RECIPE FOR AWESOMENESS :)
Great use of so many of the dies.
ReplyDeleteThese are beautiful, wonderful works of art.
ReplyDeleteWow, you outdid yourself with these cards, they’re all so colorful and vibrant!
ReplyDeleteWow! These projects are so unique and fabulous. I love the winter scene. Such a clever wsy to use the nested banners. Thanks!
ReplyDeleteAll the layers on your x-mascard llok great, but my favorite is the tag...longing for dryer weather I think :)... Hugs, Gerrina
ReplyDeleteBoth are gorgeous!! I love to see how it all came together.
ReplyDeleteWhat amazing backgrounds you created for both of these! I love that felt snowman!
ReplyDeleteThank you for showing how you made your wonderful backgrounds. I love it.
ReplyDeleteSuch fabulous projects! I love the winter panel!
ReplyDeleteYour first two designs are definitely winter themed. With your last one, spring burst upon the scene with green grass and flowers. I like all of them!!
ReplyDeleteWhat fabulous creations!!! I LOVE that winter panel; it is just gorgeous!!
ReplyDeleteI love the mixed media elements to your creations. So much inspiration that I thank you for.
ReplyDeleteWonderful cards, so festive! Love this new release!
ReplyDelete