Wednesday, October 5, 2016

Halloween Manor House Tutorial

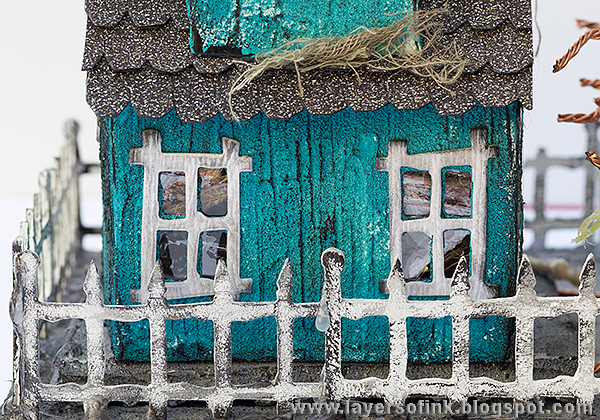
Hello friends!! Today I have a really fun post for you, for a Sizzix Halloween project, but which could easily be turned into something fitting for a different theme all together. It's another house to add to my collection of homemade houses.
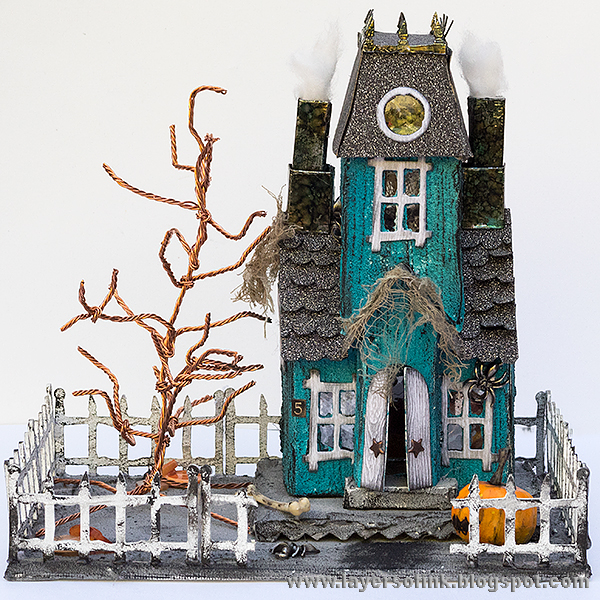
Layers of ink - Halloween Manor House Tutorial by Anna-Karin with Sizzix dies by Tim Holtz.
I used the new Village Manor die by Tim Holtz to create this house - together with the original Village Dwelling die, which you need to make the lower part of the house. I painted it in non-traditional Halloween colours, since I've been in the mood to add some teal to several of my Halloween projects this year (one example is my Halloween Stamped Passport Book). It looks so nice together with the orange.

Layers of ink - Halloween Manor House Tutorial by Anna-Karin with Sizzix dies by Tim Holtz.
I really had fun making that wire tree, with a new Sizzix tool by Eileen Hull, the Twist & Style tool.

 Layers of ink - Halloween Manor House Tutorial by Anna-Karin with Sizzix dies by Tim Holtz.
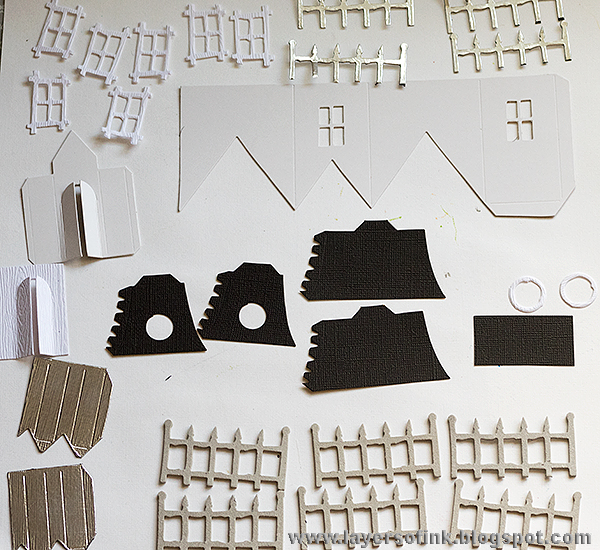
Start by die cutting the pieces that you need. These are the pieces needed from the Village Dwelling die. That is an XL die, so you need the Extended Cutting Pads. The Village Dwelling is the base for several of Tim Holtz house-themed dies, so if you like to make houses, you definitely need it. I die cut the two house parts, the base and the step, from the cover of one of Tim's patterned paper pads. The roof parts are die cut from black kraft-core cardstock. The chimneys were die cut from cardstock covered in metallic tape.

Layers of ink - Halloween Manor House Tutorial by Anna-Karin with Sizzix dies by Tim Holtz.
These are the pieces I die cut using the Village Manor die, except for the windows, which come from the Village Surf Shack die. Windows and the extra door are from Ranger's Woodgrain paper, roof pieces from black kraft-core, and chimney same as above. The door part and house structure is also die cut from patterned paper packaging. The fence is die cut from grungeboard (I later needed another three pieces) and the top of the fence (for the roof) from paper covered in foil tape

Layers of ink - Halloween Manor House Tutorial by Anna-Karin with Sizzix dies by Tim Holtz.
Coat the above pieces with gesso.

Layers of ink - Halloween Manor House Tutorial by Anna-Karin with Sizzix dies by Tim Holtz.
Then coat them in Distress Grit-Paste, dragging a palette knife through the paint to create something looking like rough wooden boards. Leave to dry. 

Layers of ink - Halloween Manor House Tutorial by Anna-Karin with Sizzix dies by Tim Holtz.
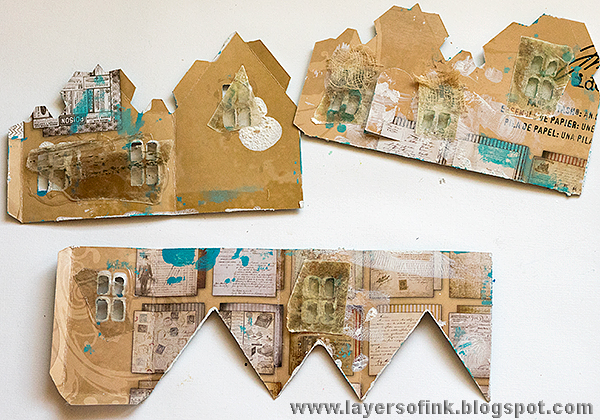
When the paste is dry, paint with Peacock Feathers and Mermaid Lagoon. Paint the step with Hickory Smoke. Do you see that I made a mistake here, and somehow ended up using two front pieces for the house? What happened was that I completely covered the door on the first front piece that I die cut, and thought I had two back pieces. So I prepared a second front piece, only to end up with two front pieces instead. Pretty funny.

Layers of ink - Halloween Manor House Tutorial by Anna-Karin with Sizzix dies by Tim Holtz.
 When the paint is dry, dry-brush with Black Soot, for a distressed look.

Layers of ink - Halloween Manor House Tutorial by Anna-Karin with Sizzix dies by Tim Holtz.
I always add windows to my houses and my favourite material for that is mica. You can also colour a piece of acetate with alcohol inks. Curtains were made from stained cheese cloth. Some of the windows look broken.

Layers of ink - Halloween Manor House Tutorial by Anna-Karin with Sizzix dies by Tim Holtz.
I coloured the metallic pieces with alcohol inks. Dab with an ink blending tool and felt tip until you are happy with the look.

Layers of ink - Halloween Manor House Tutorial by Anna-Karin with Sizzix dies by Tim Holtz.
Cut the pieces for the roof as shown here.

Layers of ink - Halloween Manor House Tutorial by Anna-Karin with Sizzix dies by Tim Holtz.
The window frames and door were inked with Distress Ink. It brings out the great woodgrain pattern.

Layers of ink - Halloween Manor House Tutorial by Anna-Karin with Sizzix dies by Tim Holtz.
Paint the fence with white and then with Hickory Smoke and Black Soot.

Layers of ink - Halloween Manor House Tutorial by Anna-Karin with Sizzix dies by Tim Holtz.
For the roof, I used the Village Rooftops die and adhered black Deco Sheet to cardstock to make it stronger. Die cut enough pieces (you might need a few more than shown).

Layers of ink - Halloween Manor House Tutorial by Anna-Karin with Sizzix dies by Tim Holtz.
Assemble the Village Dwelling first, which is the base of the house. Check out my Autumn House if for another version of this house. Add the extended door part from the Manor House die. It fits right on top of the step. There are also instructions on the packaging of both dies. I used star brads as door handles. The Village Dwelling is also the base for my Winter Church Tutorial.

Layers of ink - Halloween Manor House Tutorial by Anna-Karin with Sizzix dies by Tim Holtz.
Adhere the roof tiles. To make it easier, you can do this before gluing the smaller roof in place. I die cut a piece of Deco Sheet for the smaller roof too. 

Layers of ink - Halloween Manor House Tutorial by Anna-Karin with Sizzix dies by Tim Holtz.
Assemble the upper floor and glue it to the roof, as well as the chimneys. I also die cut Deco Sheet pieces for the upper part of the roof. At first I was going to cover it with tiles, but I changed my mind. Glue the spikes in place first, then you can cover up any glue with the Deco Sheet die cuts.

Layers of ink - Halloween Manor House Tutorial by Anna-Karin with Sizzix dies by Tim Holtz.
I really wanted a spooky tree next to my house and thought of a bunch of different options. Then I got the idea of constructing one out of copper wire using the Twist & Style tool. To read more about how to use this tool, have a look at my Felt and Wire Flowers tutorial. I made strands of four copper wires twisted together.

Layers of ink - Halloween Manor House Tutorial by Anna-Karin with Sizzix dies by Tim Holtz.
Add branches to the tree by twisting wires around the trunk and pinching them with pliers to make sure they are stuck. Twist and bend the branches until you are happy with the look. 
Layers of ink - Halloween Manor House Tutorial by Anna-Karin with Sizzix dies by Tim Holtz.
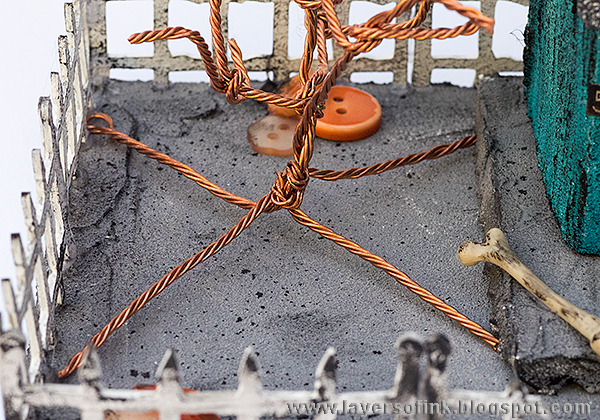
I gave the tree four legs to stand on, and made them pretty large, so that it wouldn't fall over. I didn't glue the tree down since I might use it for non-Halloween decorations too. 

Layers of ink - Halloween Manor House Tutorial by Anna-Karin with Sizzix dies by Tim Holtz.
The base and a 5 x 7 canvas board were covered in Grit-Paste. When the paste was dry, I painted it to look like cement or gravel, and splattered some extra paint here and there.

Layers of ink - Halloween Manor House Tutorial by Anna-Karin with Sizzix dies by Tim Holtz.
I painted a very rough face on the idea-ology pumpkin

Layers of ink - Halloween Manor House Tutorial by Anna-Karin with Sizzix dies by Tim Holtz.
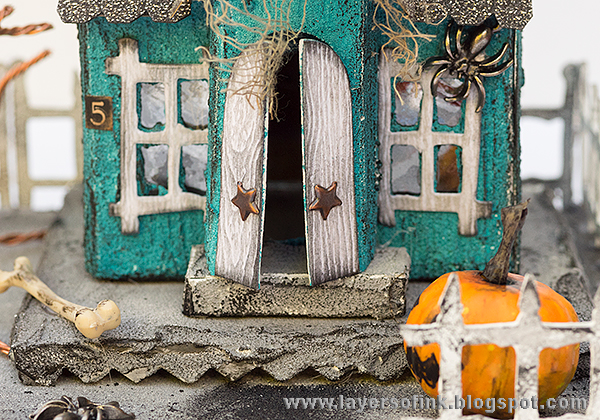
The house and the tree are standing lose, but you could of course glue them in place. I wanted to be able to add a battery-driven tea light inside the house. I painted a path leading up to the house.

Layers of ink - Halloween Manor House Tutorial by Anna-Karin with Sizzix dies by Tim Holtz.
Glue the fence in place and remember to be very careful if you work with hot glue so that you don't burn yourself.

Layers of ink - Halloween Manor House Tutorial by Anna-Karin with Sizzix dies by Tim Holtz.
The door was left ajar and I removed the inside door (from the original Vintage Dwelling, so that you can look into the house. That was actually Anton's idea, he didn't like that there were two doors.

Layers of ink - Halloween Manor House Tutorial by Anna-Karin with Sizzix dies by Tim Holtz.
All my houses have numbers. Here you can also see the cool effect of the mica windows.

Layers of ink - Halloween Manor House Tutorial by Anna-Karin with Sizzix dies by Tim Holtz.
There is dyed cheese cloth here and there.

Layers of ink - Halloween Manor House Tutorial by Anna-Karin with Sizzix dies by Tim Holtz.
Here you can see the cheese cloth curtains through the window.

Layers of ink - Halloween Manor House Tutorial by Anna-Karin with Sizzix dies by Tim Holtz.
Glue the chimneys in place, layering the thinner one inside the thicker one. I used cotton wool as smoke.


Layers of ink - Halloween Manor House Tutorial by Anna-Karin with Sizzix dies by Tim Holtz.
Here and there, you'll find a spider crawling around.

Layers of ink - Halloween Manor House Tutorial by Anna-Karin with Sizzix dies by Tim Holtz.
I wanted a few more orange elements and added some 28 Lilac Lane Pumpkin Spice buttons.

Layers of ink - Halloween Manor House Tutorial by Anna-Karin with Sizzix dies by Tim Holtz.
This fence will be useful for lots of different projects.

Layers of ink - Halloween Manor House Tutorial by Anna-Karin with Sizzix dies by Tim Holtz.
I was really happy with the look of my twisted wire tree. If you want to, you can distress the tree with black paint, or maybe add some embellishments to it.

Layers of ink - Halloween Manor House Tutorial by Anna-Karin with Sizzix dies by Tim Holtz.
This is the back of the house. The Vintage Dwelling normally has only one window at the back, but since I by mistake used two front pieces (the door being totally covered up by paste), my house has two windows.

Layers of ink - Halloween Manor House Tutorial by Anna-Karin with Sizzix dies by Tim Holtz.
I like the look with the two windows, so it was a happy mistake. To get this look, all you need to do is to cut off the triangular upper part of the back of the house (the part above the door at the front).

Layers of ink - Halloween Manor House Tutorial by Anna-Karin with Sizzix dies by Tim Holtz.
Here's another spider. You can add as many or as few details as you'd like to your house, and it really doesn't need to be a Halloween house. If you'd remove the Halloween embellishments on my house, it would look just like a grungy house.

Layers of ink - Halloween Manor House Tutorial by Anna-Karin with Sizzix dies by Tim Holtz.
Fold out some of the roof tiles. I really love the look of the glittery Deco Sheet roof, against the matte textured surface of the house.

Layers of ink - Halloween Manor House Tutorial by Anna-Karin with Sizzix dies by Tim Holtz.
I took a quick photo of the house with a battery-driven tea light inside. It looks nicer in real life. 

Layers of ink - Halloween Manor House Tutorial by Anna-Karin with Sizzix dies by Tim Holtz.
This house was such fun to make and it will be fun to display. Anton thought it needed some greenery, so he added some to this photo. A little branch leaning against the house. There is plenty of space for more embellishments around the house.

I hope you enjoyed this tutorial!! I'll be back soon with another house, and that one looks totally different than this one.

Happy crafting!

Anna-Karin

Supplies:


Monday, October 3, 2016

Friendly Ghost Card with Quilling


Hello friends!! October is here, and I can hardly believe it. The autumn colours are absolutely stunning outdoors and this weekend we went on four different walks, just to capture as much of it as possible. Beautiful sunny weather and quite warm.

This week at the Simon Says Stamp Monday challenge, we have a Halloween theme. Since it is the first Monday of the month, we are showcasing a specific company/designer and the turn has come to Memory Box. You don't have to use Memory Box products, but it is always fun if you do.

Layers of ink - Friendly Ghost Card with Quilling Tutorial by Anna-Karin
I made a card this week, although I actually started doing something different, but I will post that another day because it didn't end up being a Halloween project. For this card I used the Memory Box Swirling Ghosts and Goofy Halloween Decor die sets, as well as the Pensive Alphabet background stamp. 

Years ago, I did a lot of quilling, and I still do now and then, and I was happy to see that Simon Says Stamp now carries quilling paper. So you can expect more quilling tutorials coming along here, and maybe also a video. Speaking of videos, I have some news coming soon in that regard, and my new light and tripod set up is almost done. If Leo just stays healthy, I'll be doing videos very soon (he has been sick an awful lot lately, poor guy). 

Layers of ink - Friendly Ghost Card with Quilling Tutorial by Anna-Karin
I used this Bright White quilling paper by Quilled Creations, and it can easily be coloured with Distress Inks as you can see above. I made a graduated strip, which is lighter on one side and gradually becomes darker. It is easiest to start with the lightest ink, since the inks tend to blend more smoothly then. 

Layers of ink - Friendly Ghost Card with Quilling Tutorial by Anna-Karin
Here's a little trip about quilling paper. Cut a slit at the top of the bag, through just one layer of the plastic, leaving the other side intact and the label in place. You can then easily remove a strip of paper from the one side (from the inside edge), without taking the papers out of the bag and pull it out. This leaves the papers nicely organised and you don't have to handle the strips that you won't use.

Layers of ink - Friendly Ghost Card with Quilling Tutorial by Anna-Karin
You can roll quilled coils with your fingers alone, but I like to use a needle tool, at least to start with. I often take the coil off the tool and finish rolling it using just my fingers. The needle tool leaves a nice round center, which you can see to the left. A slotted quilling tool works great too, and is easier to use. To the right you can see the one by Tim Holtz (included in the Tiny Tattered Florals set). You can see me use it in my Quilled Flowers in a Mason Jar Video Tutorial. Quilled Creations also has a slotted tool. The slotted tool leaves a small notch in the center.

 Layers of ink - Friendly Ghost Card with Quilling Tutorial by Anna-Karin
For this card, I just make simple open circles, not gluing the ends down. I'll show you how to make more complicated shapes soon.

Layers of ink - Friendly Ghost Card with Quilling Tutorial by Anna-Karin
Die cut the Swirling Ghosts from White Wool Felt, and a shadow piece from a black Deco Sheet. On this photo, you see black cardstock instead, because I changed my mind and forgot to take a new photo. The bat was die cut from black Deco Sheet and from black kraft-core cardstock. I adhered the Deco Sheet to a piece of cardstock before die cutting.

Layers of ink - Friendly Ghost Card with Quilling Tutorial by Anna-Karin
I found a piece of watercolour paper that had been coloured with Brusho Crystals in my stash and decided to use it as the base for my card. Ink the Pensive Alphabet stamp with Distress Inks, mist with water about five times and stamp. When dry, the edges were distressed.

Layers of ink - Friendly Ghost Card with Quilling Tutorial by Anna-Karin
The ghosts were layered and adhered with foam tape. Here you can see the glittery black Deco Sheet, which looked more interesting than just black cardstock. I left the eyes in for the Deco Sheet ghosts, so that they shine through. The ghosts are so cute, and not very spooky.

Layers of ink - Friendly Ghost Card with Quilling Tutorial by Anna-Karin
I also added rub-on words to the background. 

Layers of ink - Friendly Ghost Card with Quilling Tutorial by Anna-Karin
To glue down the quilling circles, hold with a pair of tweezers and carefully apply a tiny bit of white glue to the back. You can use a tooth pick for this, or a Precision Tip Applicator Bottle filled with glue. The quilled circles add a really fun element to the card.

Layers of ink - Friendly Ghost Card with Quilling Tutorial by Anna-Karin
 Layer the bat with the kraft-core peeking out underneath.


Layers of ink - Friendly Ghost Card with Quilling Tutorial by Anna-Karin
You don't have to use holiday background stamps for holiday projects, this background stamp was totally unrelated to Halloween, but still worked great.

I hope you will join us in our Halloween challenge. As every week, you have a chance to win a $50 gift voucher from Simon Says Stamp. You have until Monday 8am Ohio time. 1pm UK time, 2 pm CET to join in.

If you want to, follow Simon Says Stamp on Instagram, they post great stuff daily. 


new-instagram-icon22

Do you use Instagram ? If so please add #sssmchallenge so we can see your entries there too.


Thank you so much for visiting my blog today!

Happy crafting!

Anna-Karin

Supplies: