Monday, April 16, 2012

Just Fabulous tag-card

I hope everyone’s weekend was great! Today I have a ‘tag-card’ to share. It is inspired by three challenges: the Play Date Café Challenge #127, the Inspiration Journal April challenge to use a watercolour techniques (a favorite of mine) and the April Hero Arts challenge (shaped card theme). Here’s the Play Date Café inspiration board:


People sometimes wonder what to do with tags. I keep many of my tags as technique inspiration, but sometimes I make them into cards, and this is one of those tags:


Cut a length of manila cardstock 12 in long and just wide enough to fit the Tag & Bookplates die. Fold it in half and place the cardstock on the die, just below the top cutting line of the tag. Then you will get a tag which is folded at the top. This tag is also a bit shorter than the ordinary size, which fits nicer into an envelope. I used the Zig Zag pop-up die for the base of the tag, place the tag just across the one zig zag end and die cut. I held the tag in place with a small piece of repositionable double-sided tape.

The tag was sponged with Mustard Seed, Scattered Straw, Bundled Sage and Evergreen Bough Distress Ink and misted with water. After it dried I stamped it with French Ultramarine Archival Ink, swiping the ink across the stamp to get a distressed look. The woman was stamped with Archival Ink Jet Black on watercolour paper and coloured with Distress Inks smeared on my craft sheet and misted with water and Perfect Pearls (Barn Door and Scattered Straw). I used a watercolour pencil for the skin. The spool was cut from grungeboard and streaked first with Sail Boat Blue paint dabber and then with Snow Cap. I added some bits and pieces from my scraps to the card (the doily, tissue paper, cheesecloth and sticky-backed canvas).

Here you can see how the tag becomes a card (don't tie the knot at the top too hard, otherwise it doesn't open nicely):


And another close-up:


Thank you so much for stopping by!!

Anna-Karin
Supplies: Hero Arts stamps: Sew Stylish CL452, Painted People Background CG402; Sizzix Tag & Bookplates, Sewing Room, and Zig Zag 3D Pop-up Bigz dies; Distress Ink: Barn Door, Scattered Straw, Mustard Seed, Bundled Sage, Everygreen Bough, Frayed Burlap; Adirondack paint dabber Sail Boat Blue and Snow Cap; Ranger Archival Ink Jet Black and French Ultramarine; Tim Holtz terminology tissue paper and grungeboard; Ranger manila cardstock and white sticky-backed canvas; Derwent watercolour pencil; cheesecloth; twine; buttons.

Saturday, April 14, 2012

Card Patterns sketch #161 - Bundle of Joy

Time for another fun Card Patterns sketch! This week we are sponsored by Clear & Simple Stamps and the DT got to play with some newly released stamps. My set Special Bundle has very cute welcome baby images and a lot of sentiments. I particularly like that the sentiments are small, since I prefer small sentiments over large ones. Here’s the sketch designed by Tracy:


Here’s my card:

I stamped the bird with Archival Ink French Ultramarine and the legs with Versafine Onyx Black. Then I stamped the text repeatedly over the background using Malted Milk ink. The basket was stamped on patterned paper, cut out and mounted with foam adhesive. The frame was stamped on patterned paper and the sentiment stamped inside with the blue ink. The doily was misted with Stormy Sky reinker, Perfect Pearls and water.

For the background I cut two pieces of printed kraft paper diagonally and then applied gesso on top through a stencil. I got it a bit too thick in places, but decided to use it anyway.


I even found a tiny clothes’ peg in my stash, same as on the sketch and fitting well with the baby theme.


Thank you for looking! I hope you can play along with us this week, check out all the DT cards here.

Supplies: Clear & Simple stamps Special Bundle; Archival Ink French Ultramarine; Jenni Bowlin Ink Malted Milk; Distress Ink Stormy Sky reinker; Perfect Pearls; Versafine Onyx Black; BasixGrey and MME patterned papers; The Crafter’s Workshop mini Cherry Blossoms stencil; doily; DMC embroidery floss; gesso; twine.

A fairy tale

This week we have another awesome case file at CSI: Color, Stories, Inspiration. Here’s the link to the challenge, where you can see the work of the rest of the DT. Case file #15:

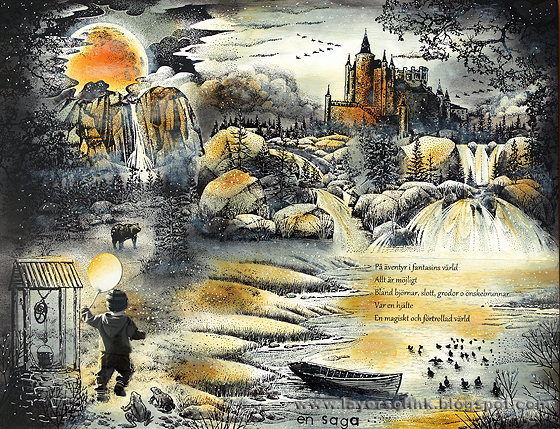
I was inspired to do another scenic stamping piece as the base of my layout. From the evidence items I used: moon, something transparent and foliage. From the testimony I was inspired by the adventure and imagination themes, and I also wrote a little free poem. Here’s my layout:


The scene is done on glossy cardstock (8.5x11 inches) and coloured with dye inks using a Colorbox Stylus tool and Ranger craft nibs (for the small areas). Such a large scene using so many stamps (more than 20) requires a bit of planning, and I planned it out on scrap paper first. I knew I wanted to use the large moon stamp and the castle and needed to figure out a nice setting for the castle. All the stamping is done with Archival Jet Black ink. I use torn pieces of paper as masks where necessary. Since this is supposed to be a fairy tale setting, I left some items a bit out of proportion (the frogs are pretty big and the well is a bit small). As usual, I coloured it starting with the lighter inks and gradually building up darker colours. I started with Lemonade, which is a light yellow and then switched over to Weather Wane. For the orange shades Wild Honey and Spiced Marmalade were used. Then darker tones were added with Slate and Pitch Black. I left quite a lot of the white paper showing because I didn’t want the scene to be too dark. The moon is a yellow/orange harvest moon.

Highlights were added with a white gel pen, lots and lots of dots. Then white pigment ink was dry brushed onto the scene to create shine around the moon, and mist here and there. The title was stamped with alphabet stamps and the journaling was printed on a transparency and placed on the water.

I have a lot of photos of my son running, often away from me, so I was happy to use one of them. On this particular photo, he is carrying a balloon, which fit nicely with the scene. The light was also coming from the right direction. I cut him out and then applied a little bit of yellow and orange ink to the photo to make it blend in with the rest of the scene.

The journaling translates:
'On an adventure in the world of fantasy
Everything is possible
Among bears, castles, frogs and wishing wells
Be a hero
A magical and enchanted world'

Let me know if you have any questions about scenic stamping, it is lots and lots of fun to be able to create your own stamped landscapes.

Thank you for stopping by! Have a fabulous weekend!

Anna-Karin

Supplies: Stampscapes stamps: Cascading Falls 015G, Cloud Cumulus 018E, Ducks in Formation 027A, Meadow Lg. 057G, Reeds 067B, Side Falls Lg. 075G, Tall Rock with Falls Lg. 082G, Waterside Bluff (left) 148F, Waterside Bluff (right) 149G, Bear 167A, Cloud with Rising Moon Lg. 198G, Oak Branch 203G, Flock in Water 225D, Water Pattern 231C, Sedge Filler 251C, Pebbles 256A, Prickly Branches 272G, Cloud Strips Sm. 296C; Sutter stamps: Castle #2 H-1539, Old Well G-965; Beeswax stamps: Row Boat, Frogs; Hero Arts alphabet stamps; Adirondack dye inks: Lemonade, Slate, Pitch Black; Distress Ink: Wild Honey, Spiced Marmalade; Jenni Bowlin ink Weather Wane; Colorbox Frost White; white gel pen; Kromekote glossy cardstock; transparency.

Thursday, April 12, 2012

One of a kind

This card is for Kimber’s Saturday sketch challenge on Two Peas. Here's my card:


The skyline was stamped with Versafine and clear embossed. I pressed the stamp a bit hard, but decided to keep the image anyway because I really like the look of the watercolour background paper (a scrap from Distress Inks and water misted on my craft sheet and the paper being dragged into it). The travel related stamps were stamped on kraft paper and cut out.

The background is kraft resist cardstock which was embossed with a postal folder and then sanded. The sentiment is stamped on a tattered banners die cut.

Thank you for stopping by! Happy stamping!

Anna-Karin

Supplies: Hero Arts stamps: International Skyline H5470, Untitled Heart AC002, Carte Postale CL535, Past Times AC007, Anytime Messages CL129; Sizzix Tim Holtz Distressed Frame & Postal set texture fade, Tattered Banners Sizzlits; Distress Ink: Tumbled Glass, Stormy Sky, Faded Jeans; Versafine Onyx black; Core’dinations Tim Holtz kraft core cardstock; watercolour paper; twine; mini attacher.

Wednesday, April 11, 2012

Colourful resist

Today I have another card for the Hero Arts April challenge to share, this time using one of the challenge sketches.


The alphabet pattern was clear embossed on watercolour paper. The paper was cut into four panels and each panel was coloured with Distress Stains (Broken China, Mustard Seed, Peeled Paint, Spiced Marmalade) and then misted with Perfect Pearls and water.

Four gears were cut from grungeboard, painted white and stamped with a text stamp using Archival Ink. Then the gears were painted with Distress crackle paint Rock Candy. After they dried, a bit of Mustard Seed Distress Stain was added to the cracks.


They were glued together and to the card with Glossy Accents. The base gear is hardly visible, but adds dimension to the card by lifting the other gears up.

Thank you for looking!

Anna-Karin

Supplies: Hero Arts: Alphabet Pattern ST501, Anytime Messages CL129, Happy Definition CG268; Sizzix Tim Holtz Gadget Gears Bigz and Mini Gears Movers & Shapers; Distress Stain: Broken China, Mustard Seed, Peeled Paint, Spiced Marmalade; Spiced Marmalade Distress Ink; Archival Ink Aquamarine; Distress crackle paint Rock Candy; white acrylic paint, grungeboard.

Tuesday, April 10, 2012

Sunshine and smiles

Hello! I hope you had a great Easter! This card is for the April Craft a Scene challenge (use silhouettes) and for the April Hero Arts challenge (Sunshine & Showers theme). I wanted to do a kind of fairy tale/children’s book scene using the It’s a Parade silhouette stamp, here’s the result:


The scene is done on glossy cardstock (17x12 cm) and brayered with dye inks. First, the two clouds were clear embossed. Then a circle was cut from masking paper and taped partly overlapping the one cloud, so that the sun would peak out from behind the clouds. The ground was masked off and the sky was brayered with the following inks: Summer Sky, Stonewashed and Danube Blue, making it darker at the top. The ink was wiped off from the clouds. The sky was masked and the ground was brayered with Willow. Then I used three torn papers as masks to make the hills, brayering in the following order: Lettuce, Meadow, Peeled Paint, Forest Moss, making each hill darker as it came closer to the front of the scene. This gives a sense of depth to the scene.

The mask for the sun was removed and the sun was sponged with Lemonade, Lemon Drops and Wild Honey, making it darker in the centre. The yellow ink was wiped off from the cloud.

The children were stamped with Archival Ink Jet black. For the trees, I used a flower stamp, to add to the whimsical feeling of the scene. I like how the big flower trees make the children look pretty small. The trees were stamped with Archival Ink Olive, masking and restamping until the covered the length of the card. The grasses were stamped with the same ink. Then the sentiment and the birds were stamped with Jet Black.

Highlights and flowers were added with gel pens (white, yellow and pink). I added a white dot in the centre of every flower in the trees. Finally, the children got a little kite cut from a dictionary book (page about ‘wind’) and I added another little strip from the dictionary as a path.

Here's a close-up:


This card has similarities with these two cards of mine: Autumn Silhouette Scene and Winter Children.

Thank you for looking!! Have a day full of smiles & sunshine!

Anna-Karin

Supplies: Hero Arts Three Flower Balls K5598, It’s a Parade G5469, Sending Smiles Messages CL490, Halloween Moon CG369; Stampscapes: Ducks in Formation 027A, Reeds 067B; Adirondack ink: Stonewashed, Willow, Lettuce, Meadow, Lemonade; Distress Ink: Peeled Paint, Forest Moss, Wild Honey; Jenni Bowlin: Lemon Drops; Memento: Summer Sky, Danube Blue; Ranger Archival Ink Jet Black, Olive; clear embossing powder; Speedball brayer; Kromekote glossy cardstock; white, yellow, pink gel pens; old dictionary; baker’s twine.

Monday, April 9, 2012

Spring Birch Trees

I love trees and birds and the card I am sharing today has both. It is for the Play Date Café Challenge #126. Here’s the gorgeous inspiration board:


I was of course inspired by the photo of the fabric with the Birch trees. Here’s my card:


The trees were inked with Versamark and then grey was added here and there to the edges with a grey marker before stamping on glossy cardstock. The trees were clear embossed, burying the grey marks underneath the embossing. The same grey marker was used to add the grey marks to the tree. I sponged the following inks on the sky (first masking the ground off): Aqua, Speckled Egg, Stormy Sky, Slate, using a ColorBox Stylus tool. Wipe the ink off the trees. For the grounds I used these inks: Willow, Bamboo Leaves, Peeled Paint, Forest Moss.

Flowers were added to the ground with a white gel pen. The Friend Definition was stamped on white paper using Weather Wane ink and the birds come from a border punch. The sentiment was white embossed on a piece of glossy cardstock which had been inked with Weather Wane.

It is really fun to work with dye inks on white glossy cardstock, you should try it out if you haven’t yet.

Thank you for stopping by!

Anna-Karin

Supplies: Hero Arts stamps: Tree Trunks S5477, Friend Definition CG125; Anytime Messages CL129; Adirondack inks: Aqua, Slate, Willow; Distress Ink: Stormy Sky, Peeled Paint, Forest Moss; Jenni Bowlin: Weather Wane, Speckled Egg; Memento: Bamboo Leaves; Memento Marker London Fog; Colorbox Stylus tool; white gel pen; Martha Stewart Birds on a Wire border punch; Kromekote glossy cardstock.