Hi friends! I hope you are well this last day of the month. We have chilly weather and even some snow, but I have a spring project to share.
Please note: this post has affiliate links, for which I receive a small percentage of sales generated by the link, at no extra cost to you.
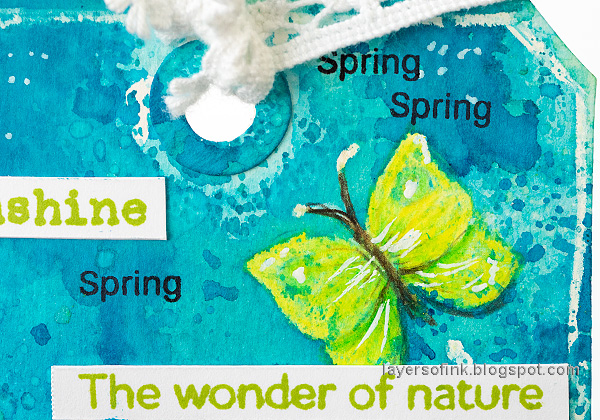
The snowdrops started to flower here some weeks ago, being the very first sign of spring. I wanted to make a tag featuring one of these little flowers, together with a lemon butterfly. I used a fun no-line resist technique with colored pencils. Not all colored pencils have the same effect, which probably depends on the binder used in the pencils. Test on a small piece of paper first. Watercolor pencils will not work.
Start by stamping the snowdrop and one of the butterflies from
Simon Says Stamp Thoughtful Flowers with Antique Linen ink. I used watercolor paper, but you can also experiment with other papers.
Color the flower and the butterfly. Use white for the flower itself and be careful to cover it as well as possible. Add some grass too. I also scribbled a white frame around the tag. I used
Faber-Castell Polychromos pencils.
Smear Distress Inks on a non-stick craft sheet and mist with water. Press the tag into the ink. If you want a light and bright look, leave the background as it is.
Or you can continue adding more layers of Distress Ink, letting the paper dry in between.
My last layer was Distress Oxide Ink, but only here and there.
Add some shading and details to the flower with colored pencils. And a few highlights and strands of grass with a white gel pen.
Stamp the foreground with the Simon Says Stamp Crackle Background stamp and Library Green ink.
White flowers are a challenge to color, since they won't show well unless there is some color in the background. I added a little bit of shading to make it stand out more.
The green shades might disappear a bit against the green background. You can add back details and draw and outline with a pencil.
It started snowing when I photographed this project. I with this was the last snow of for now. I hope you enjoyed this tutorial.
Thank you so much for taking the time to stop by here today!
Happy crafting!
Anna-Karin
Supplies:
* Please note: the links are affiliate links, for which I receive a small percentage of sales generated by the link, at no extra cost to you.


Amazing- you show us a beautiful spring
ReplyDelete