Monday, March 14, 2022

Shabby Chic Tag Tutorial

Hello friends! Today I have a tag to share with a fun background and lots of pink.

Please note: this post has affiliate links, for which I receive a small percentage of sales generated by the link, at no extra cost to you.


We have a Feminine theme at the Simon Says Stamp Monday Challenge Blog this week. I hope you will join us! Don't miss the stunning project by our March guest designer Deborah Emmons aka designingdiva_73


Layers of ink - Shabby Chic Tag Tutorial by Anna-Karin Evaldsson.

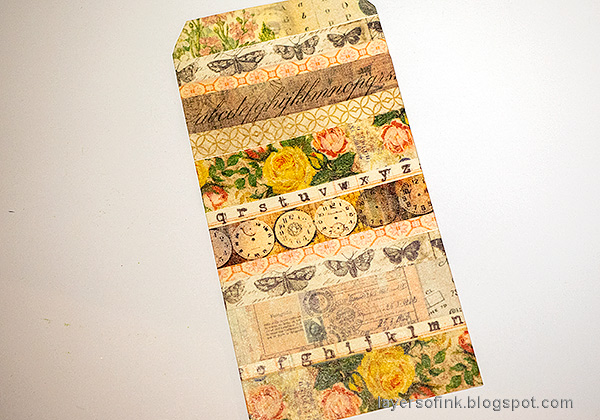
I didn't use pink for a while and created a shabby chic tag with lots of pink and a fun background created with design tape.

Layers of ink - Shabby Chic Tag Tutorial by Anna-Karin Evaldsson. Cover with design tape.

Start by covering the whole background with Tim Holtz Design Tape. I applied a layer of matte medium to the tag first, to make sure the tape stuck down well. I used Butterfly, Rose and Vintage tape.

Layers of ink - Shabby Chic Tag Tutorial by Anna-Karin Evaldsson.

Apply some white paint to the tag.

Layers of ink - Shabby Chic Tag Tutorial by Anna-Karin Evaldsson. Add dots with Simon Says Stamp Mix and Match Circles stencil.

Apply Worn Lipstick Distress Crayon through some of the circles on Simon Says Stamp Mix and Match Circles stencil.

Layers of ink - Shabby Chic Tag Tutorial by Anna-Karin Evaldsson.

Add more white paint and apply Sizzix Gold Luster Wax around the edges of the tag.

Layers of ink - Shabby Chic Tag Tutorial by Anna-Karin Evaldsson. Stamp with Simon Says Stamp Stained Glass Background.

Die cut Tim Holtz Perspective Butterfly from Heavystock paper. Stamp and white emboss the wings with Simon Says Stamp Stained Glass Background.

Layers of ink - Shabby Chic Tag Tutorial by Anna-Karin Evaldsson.

Ink with Distress Ink. I only inked one side since I wasn't going to use the whole butterfly.

Layers of ink - Shabby Chic Tag Tutorial by Anna-Karin Evaldsson.

I got some vintage buttons in a second hand shop this weekend, since I was running short on white and pearl buttons. Three of them were tied to the background.

Layers of ink - Shabby Chic Tag Tutorial by Anna-Karin Evaldsson.

The Stained Glass background gives nice texture to the butterfly wings.

Layers of ink - Shabby Chic Tag Tutorial by Anna-Karin Evaldsson.

The labels were stamped with Simon Says Stamp Mixed Labels and pink ink, while the sentiments were stamped with brown ink. This one comes from Laugh In Flowers.

Layers of ink - Shabby Chic Tag Tutorial by Anna-Karin Evaldsson.

Here you can see the shine from the luster wax better.

I hope you will join us this week in our Feminine theme. You have a chance to win a $25 gift voucher to do some fun shopping at Simon Says Stamp. You have until Monday 8am Ohio time. 1pm UK time, 2 pm CET to join in.


Do you use Instagram? If so please add #sssmchallenge so we can see your entries there too.


Thank you so much for visiting my blog today! 

Happy crafting!

Anna-Karin

Supplies:

* Please note: the links are affiliate links, for which I receive a small percentage of sales generated by the link, at no extra cost to you.

No comments:

Post a Comment

Thank you so much for leaving a comment! Happy Crafting!