Hello and welcome to my blog! I am happy to take part in the blog hop to celebrate the new Simon Says Stamp release, which is called Handmade Holiday. If you are following along the hop you should have arrived here from the very creative Keisha Charles.
Please note: this post has affiliate links, for which I receive a small percentage of sales generated by the link, at no extra cost to you.
The Handmade Holiday release is full of wonderful new stamps, stencils, dies, ink, glitter glues and other products. It is perfect for holiday crafting, but also for many other themes. You can see the whole release here. If you use the code DMADE4U you will get a Salvaged Patina Distress Oxide ink pad FREE with any purchase! This promotion will expire 11/14 at 11:59 pm EST or while supplies last.
I am also very happy to have designed two of the stamp sets in this release, namely Mixed Labels and Real Leaves.
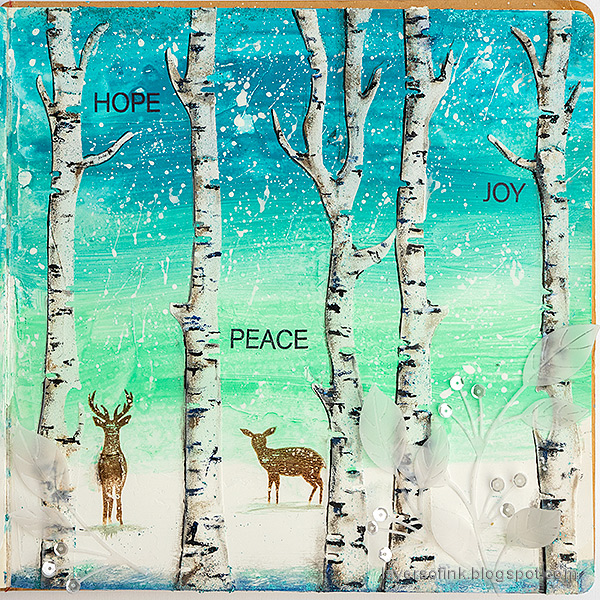
I made an art journal page, but it could just as well be a card, tag or canvas instead.
Start by coating the page with gesso and don't make it too smooth, we want some texture.
Paint with Distress Paint - I used white at the bottom, but forgot to include it in the photo. Mist lightly with water to blend and create spots. I painted both sides, so the one to the left is ready if I want to do another winter project there.
When dry, place the Birch Trees stencil on the background and apply Texture Paste through it with a palette knife. Let dry and then add two more trees.
The texture paste is slightly translucent and I like to either mix a little white into the paste, or paint it afterwards. Here I sponged on the paint with a mini-round ink blending tool, adding texture to the trees.
Start with light shades of grey and brown. Decide from which direction the light is coming and make the trees darker on the opposite side.
Continue, adding darker shades as you go along. I mixed Blueprint Sketch and Black Soot to make a very dark blue, but also used both of them as they are.
Stamp two deer from the Simon Says Stamp Forest Scenery set, with Potting Soil ink. Wipe the ink off their feet before stamping, so that it looks like they are standing in the snow.
Stamp sentiments on the page, from the Love, Joy, Peace, Rainbow set.
Cover the words with post it notes and splatter the page with white paint to create the look of a snowy sky.
Add shadows under the deer and some blue and grey in the foreground.
The new Glitz Glitter Gels are fabulous! I really like glitter gels since they are so mess-free, compared to lose glitter. I applied just a little at the bottom, at the top and on the trees.
Then I realised that I had forgotten to add shadows to the trees. Paint a thin shadow at the one side of the tree with grey and black.
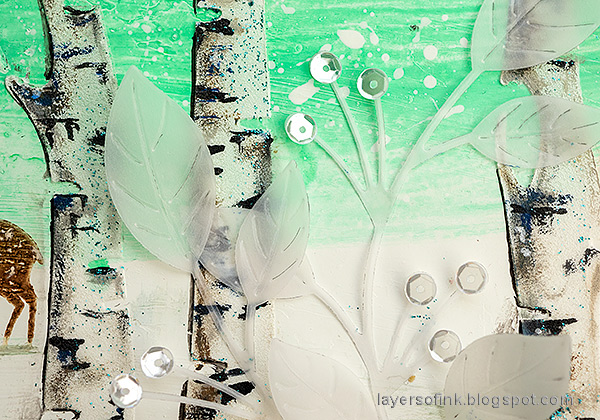
The Etched Berry Branch is so pretty. I will be using it a lot. Here I die cut it from vellum.
I cut two of the branches slightly and rearranged the leaves. Add sequins as berries.
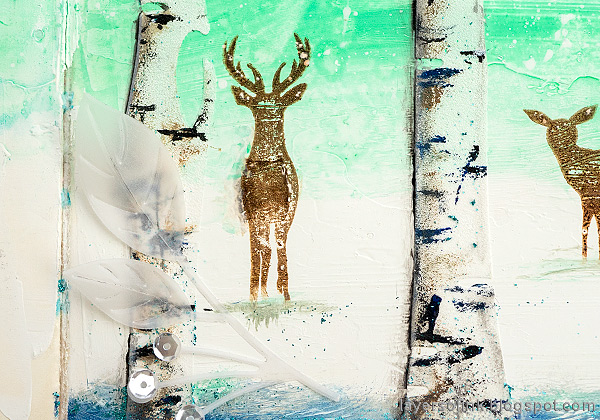
The stamping will pick up some of the background texture, which adds a nice worn look to the deer.
Here you can see the mix of splatters and glitter and paint on the trees.
Up close you can see how simple the paint marks are on the trees, but together they make the trees look like birch trees.
Don't miss all the inspiration along the hop. There are of course prizes to be won too, and at each stop on the hop SSS is giving away a $25 coupon, randomly drawn from those who leave a comment. The winners will be posted post on the Simon Says Stamp store blog on Wednesday, the 17th of November.
Your next stop on the hop is Vicky Papaioannou who will share beautiful inspiration with you.
Here are all the stops along the hop:
Anna-Karin Evaldsson (you are here)
For more Handmade Holiday inspiration remember to check out the Handmade Holiday gallery at Simon Says Stamp, and if you make something with products from the range, it is fun if you post it in the gallery too. There are galleries for all releases, and for the card kits, full of inspiration. Part one of the blog hop was yesterday, so don't miss all the inspiration there.
Thank you so much for taking the time to stop by here today! I'll see you again tomorrow.
Happy crafting!
Anna-Karin
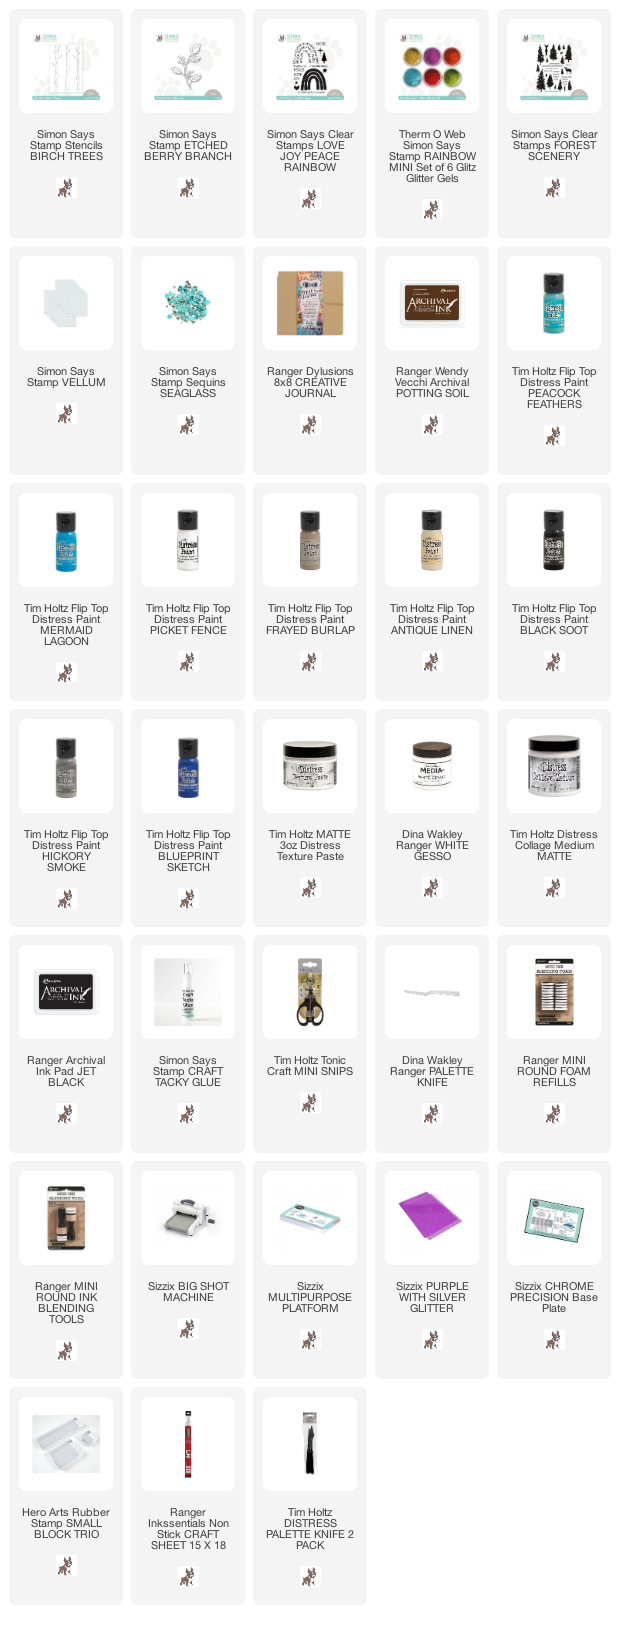
Supplies:
* Please note: the links are affiliate links, for which I receive a small percentage of sales generated by the link, at no extra cost to you.
* Please note: the links are affiliate links, for which I receive a small percentage of sales generated by the link, at no extra cost to you.







What a beautiful & serene scene. I enjoyed seeing the process, step by step.
ReplyDeleteWow what a fabulous scene you have created, your trees are stunning!
ReplyDeleteSuch a pretty winter scene
ReplyDeleteSo talented are YOU
ReplyDeleteBeautiful inspiration!
ReplyDeleteWOW! What a beautiful scene!
ReplyDeleteI really like the way you made the sky by sweeping the colors horizontally. NICE
ReplyDeleteGorgeous!
ReplyDeleteBeautiful!
ReplyDeleteWhat a wonderful winter scene!! Great colors and design!!
ReplyDeleteBeautiful project! Thanks for sharing your work!
ReplyDeletewow love how you created this gorgeous card - awesome technique
ReplyDeleteBeautiful journal page! I don't do journaling, but I follow several people who do. I love watching them come together.
ReplyDeleteWonderful forest/deer/tree scene.
ReplyDeleteMelissa
"Sunshine HoneyBee"
You made a lovely journal page. The way you colored the birch trees made them look real.
ReplyDeleteStunning! I love birch trees and you did a wonderful job highlighting them…
ReplyDeleteBeautiful! I love that you did a journal page instead of a card! Thanks for sharing!
ReplyDeleteYour layout is gorgeous!
ReplyDeleteThose birch trees are gorgeous!
ReplyDeleteWhat a BEAUTIFUL mixed media scene!
ReplyDeleteSuch a gorgeous art journal page. It calmed me just looking at it.
ReplyDeleteA lovely, tranquil woodland scene. Hanks for sharing your techniques!
ReplyDeleteThis is such a pretty scene. Love the Birch trees
ReplyDeleteI haven't been to your blog before. These are works of art! absolutely beautiful!
ReplyDeleteStunning! I've been thinking about starting an art journal and this has given me so much inspiration!
ReplyDeleteAmazing art journal page! Love those birch trees... so much added details... and those vellum die-cut pieces... just perfect! Thanks for the inspiration!
ReplyDeleteWhat a gorgeous journal page! I love how you created the trees!
ReplyDeleteHi, Anna - Karin -
ReplyDeleteWOW! Those birches look so life-like! Great job! This is one of my favorites of this hop! TFS!!
Lori S in PA
Your art journaling page is wonderful. All the added details are fabulous!
ReplyDeleteTerrific winter scene!
ReplyDeleteGorgeous winter scene!
ReplyDeleteThose trees look so real. A great journal page.
ReplyDeleteWow - this is amazing!
ReplyDeleteI love your color sense. Beautiful!
ReplyDeleteLove your gorgeous journal page! So creative.
ReplyDeleteI love this journal page. So peaceful.
ReplyDeleteBeautiful -- your birch trees are amazing!
ReplyDeleteThis is a beautiful journal page.
ReplyDeleteSo cool, love the process of making this scene.
ReplyDeleteBeautiful scene with the deer! Love your pages!
ReplyDeleteMy goal is to make my trees look real by following your clear examples. Mahalo for sharing your serene card.
ReplyDeleteThis comment has been removed by the author.
ReplyDeleteBeautiful scene! All the extra details on trees and deer look like real life scenery. Fabulous job!
ReplyDeleteWow!! This is gorgeous with all the colour and texture!! A stunning scene! Thanks so much for the great inspiration! Stay safe! :)
ReplyDeleteBeautiful job - those birch trees turned out amazing!
ReplyDeleteWow, this turned out absolutely amazing!
ReplyDeleteGorgeous Winter scenes!
ReplyDeleteThanks for walking us through your creative process.
Thanks for tips like wiping the ink off the deer feet. Little touches like that make a difference.
ReplyDeleteOh my goodness this is gorgeous! I would love to grab a cuppa and relax flipping through your art journal. Gorgeous!
ReplyDeleteStunning journal page!!
ReplyDeleteWow, this is a beautiful nature scene!
ReplyDeleteVery beautiful and inspirational! Love this release!
ReplyDeleteI love the colors and the trees.
ReplyDeleteThis is so lovely, and I enjoyed seeing the step by step process!
ReplyDeleteFabulous scene! The birch trees look amazing!
ReplyDeleteI LOVE this journal page! Thanks for sharing your amazing talent.
ReplyDeleteLove the journal page. I was hoping someone would use that stencil. Thanks for the inspiration.
ReplyDeletethe birch trees are amazing!!
ReplyDeleteOh wow! Your trees are amazing!!!
ReplyDeleteWow!!! Your trees are Fabulous!!! Gorgeous pages!!!
ReplyDeleteSpectacular page. So much depth and
ReplyDeletedetail. thanks for sharing.
txmlhl(at)yahoo(dot)com
Thank you for a lovely tutorial and journal spread. I love it. Bren
ReplyDeleteI like the peaceful scene you created.
ReplyDeleteWhat a pretty scene.
ReplyDeletelove the gorgeous texture of your fab page!!
ReplyDeleteWhat a beautiful journal page, so much detail. Thank you so much for sharing.
ReplyDeleteI love this page. Nothing better than snowy woods and wildlife.
ReplyDeleteI admire your lovely artwork.
ReplyDeleteGreat job on making the birch trees. I’ll Very unique & inspiring!
ReplyDeleteGreat job on making the birch trees. Very unique & inspiring!
ReplyDeleteSuch a wonderful scene. Love the way you did the birch trees.
ReplyDeleteamazing birch trees!
ReplyDeleteLove those blue greens
ReplyDelete