
Hello stampers! I am very happy to take part in the Simon Says Stamp Rainbows blog hop, to celebrate the new collection. If you follow along in the hop, you should have come here from the very creative Heather Hoffman.
Please note: this post has affiliate links, for which I receive a small percentage of sales generated by the link, at no extra cost to you.


I made an art journal page and a card for the blog hop and you can find tutorials for both below.

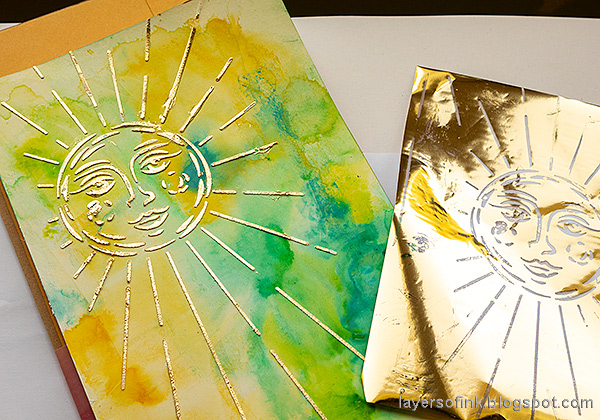
I created a sunny and happy art journal page using the Slimline Sunburst stencil. You can easily turn this design into a card instead. I didn't originally plan to add all the sentiments along the rays, but got that idea when I had stamped the first couple of sentiments.


I cut the leaves and flamingo out and glued them to the background. There is a coordinating die set which would work great for this.


Start by coating a page with gesso, let it dry and then paint it with Distress Paints. Mist with water so that the paints flow and blend. I worked in the Small Creative Flip Journal.

Place the Slimline Sunburst over the page and apply texture paste through it with a palette knife. Let dry.

Place the stencil back over the design and apply Sizzix 3-D adhesive with a palette knife. Leave to dry for a short while.

Place foil over the design with the shine side up. Press down on the design or rub it with a bone folder. This transfers the foil to the 3-D adhesive.

I stamped 'sunny days ahead' from the Hello Sunshine set first, and then just continued adding sentiments all around the sun. I used stamps from Tropical Silhouettes, also from the Rainbows release, and from a bunch of previous Simon Says Stamp sets.

Add some texture with the Halftone Background and High Dive ink.

This sun stencil is so fun and it looks really nice with the combination of texture paste and foil.

I had missed a couple of places when I applied the glue and went back later to add more glue, even though I knew there was a risk that it would get a little messy, which it also did. But I was okay with that.

I also stamped the two clouds from Hello Sunshine on white paper and cut them out.

A few circles were added with a white gel pen.

The The Best die is such a great die and very versatile since you can add lots of different words both before and after. I wrote the word 'time'.

If I had planned to fill the sun with words, I would have made sure they all started at about the same place, but the slightly larger sentiment stamps didn't fit as close to the sun as I needed to be.

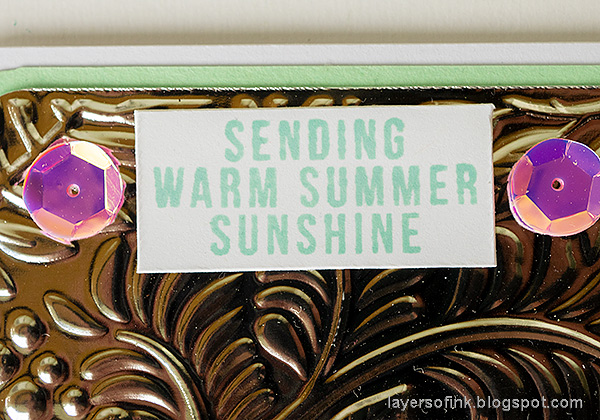
My second card is super shiny and uses the gorgeous Vine Canopy embossing folder together with silver metallic paper for the background. It is a quick way of adding lots of interest. Delicious Monster leaves are a favorite of mine, so I was happy to find them on the Tropical Silhouettes set.

Adhere Sizzix Silver Aluminium Adhesive sheet to white cardstock to give it stability. Emboss in the Vine Canopy folder.

Ink the flamingo and leaves from Tropical Silhouettes with various Distress Inks. Mist with water and stamp on watercolor paper.

The sentiment was die cut from another piece of watercolor paper which had first been colored with the two pink Distress Inks that were used for the flamingo.

The sentiment was stamped with Spring Rain ink.

It is difficult to catch the shiny effect of the foil and all the wonderful details on this embossing folder. The leaves have gorgeous embossed veins.

Don't miss all the inspiration along the hop. There are of course prizes to be won too, and at each stop on the hop SSS is giving away a $25 coupon, randomly drawn from those who leave a comment. The winners will be posted post on the Simon Says Stamp store blog on Wednesday, the 9th of June.
Your next stop on the hop is Bibi Cameron who will share wonderful inspiration with you.
Your next stop on the hop is Bibi Cameron who will share wonderful inspiration with you.
Here are all the stops along the hop:
Anna-Karin Evaldsson (you are here)
For more Rainbows inspiration, remember to check out the Rainbows gallery at Simon Says Stamp, and if you make something with products from the range, it is fun if you post it in the gallery too. There are galleries for all releases, and for the card kits, full of inspiration. Part one of the blog hop was yesterday, so don't miss all the inspiration there.

Thank you so much for taking the time to stop by here today!
Happy crafting!
Anna-Karin
Supplies:
* Please note: the links are affiliate links, for which I receive a small percentage of sales generated by the link, at no extra cost to you.
* Please note: the links are affiliate links, for which I receive a small percentage of sales generated by the link, at no extra cost to you.
WOW, the sun idea is so cool. I love the look of the inks in the background. And the sentiments all around the sun is so cool. Great ideas..
ReplyDeleteI love how each sun ray has a message. This is an amazing design.
ReplyDeleteAwesome embossing detail!
ReplyDeleteBeautiful cards!! I particular love the sun with sentiments and the 3D embossed. Thank you for sharing your creativity!
ReplyDeleteI LOVE the way you did the words as rays! Gorgeous 3D embossing too!
ReplyDeleteStunning journal page. Love the addition of the words!
ReplyDeleteLove the sentiments added to the sun rays.
ReplyDeleteVery unique approach. Lovely!
ReplyDeleteBoth these projects are amazing!! I love that you put all the sentiments between the rays on your journal page...awesome idea! Love that silver cardstock on your flamingo card. These 3D folders that companies are coming out with are amazing!!
ReplyDeleteSuch a clever idea putting sentiments between the sun rays!! Your cards are gorgeous!
ReplyDeleteWow! all of your cards are gorgeous! I really LOVE that sun card! Beautiful!
ReplyDeleteI love your sun and how you used the sentiments. I love the foil card as well, great job
ReplyDeleteThese are both stunning. The sun image is my fave of the release. It's spectacular!
ReplyDeleteI especially love the sun design with the foil. I'm not familiar with the 3D Adhesive effectz and will check it out. Thanks for the inspiration!
ReplyDeleteSo very creative - I love how you used the sun!
ReplyDeleteVery cool use of the sun stencil with foil and stamping between the rays!
ReplyDeleteThat sun is so amazing! WHat a wonderful vision. Thanks so much for sharing :)
ReplyDeleteGorgeous projects. I especially love the card. The embossing folders in this release are amazing.
ReplyDeleteI love your idea and design with the sun card. Cool!
ReplyDeleteDonna de Gale-Kalloo
Incredible projects!! I love them!! So awesome!
ReplyDeleteAmazing work on the sun!!!
ReplyDeletegorgeous cards - love how you created the yummy metallic look on the second card
ReplyDeleteLOVE your sun beams with sayings -- and each seems just right for this card. And the embossing on metallic is stunning. All good!
ReplyDeleteThey are both amazing but I truly love your 2nd card.
ReplyDeletelove the cards, very beautiful
ReplyDeleteI love your journal entry! Great use of the sun stencil!
ReplyDeleteCool way of using the stamp!! Going to CASE this dies lol
ReplyDeleteI love the techniques that you used!! New things to investigate!
ReplyDeleteCool cards!!
ReplyDeleteSo neat to use a variety of positive sentiments for the sun rays. Love the art Journal page. Great creativity.
ReplyDeleteI am so impressed by your fabulous sun ray card! Fantastic job!
ReplyDeleteThis comment has been removed by the author.
ReplyDeleteSimple and elegant and fun! All wrapped into one!
ReplyDeleteSo much texture and detail in these creations! I love the art journal page with the mix of colors and foil and I love the added dot background.
ReplyDeleteThis sunburst is one of my favorites! Love how you used the various sentiments in the rays.
ReplyDelete2 lovely projects but I especially like the Journal page! Thanks for the inspiration.
ReplyDeleteI wasn't a fan of the Slimline Sunburst stencil or the Shine On stamp until I saw you stamped sentiments around it. I like that idea! Thanks for sharing!
ReplyDeleteNice background created. I like the idea on how to use the words to fill inbetween the rays.
ReplyDeleteLove the inking techniques on the sun card!! I will have to give this a try. It looks so neat!
ReplyDeleteThat art journal page is amazing ... I love all the sentiments along the rays
ReplyDeleteWow! The art journal page is off the charts and the card is lovely. Great job!
ReplyDeleteThanks for the tutorials! Love the art journal page!
ReplyDeleteI love both the projects! They are beautiful!
ReplyDeleteLove your sun rays card. The use of the foil really sets the card off! Spectacular.
ReplyDeleteAwesome projects! I love the journal page with the sun!
ReplyDeleteWhat creativity: in making an art journal page and using the space between the rays but also in combining metallic cardstock and watercolor stamping. I love the colors you chose.
ReplyDeleteI wasn’t sure if I liked the sun stamp. But what you did with it is amazing.
ReplyDeleteLove that sun card!
ReplyDeletelove the bold colors of the first card.
ReplyDeleteLoved both of your projects!
ReplyDeleteLove the sentiments among the sun's
ReplyDeleterays. Fantastic idea. The flamingo
is great. thanks for sharing
txmlhl(at)yahoo(dot)com
Your cards are so creative!
ReplyDeleteWowwwwww what an uplifting card design with the sun!!!! Love it
ReplyDeleteSo creative!
ReplyDeleteI LOVE the flamingo card, fantastic job on both cards!
Thanks for sharing your talent.
wow, your journal page is stunning!
ReplyDeleteTwo beautiful pieces!! The sun was my favorite due to the gold added!! Just beautiful!
ReplyDeletejordanbev5@yahoo.com
Beverly Jordan
@jordanbev5
That idea with the sentiments amongst the rays is simply genius!
ReplyDeleteWow! Your projects are amazing! I love the sentiments between the sun's rays- so clever and pretty!
ReplyDeleteGorgeous projects! I love your mixed media art journal page!
ReplyDeleteAwesome cards! Thanks for sharing...
ReplyDeleteWow, gorgeous examples used so many ways of this new release. I want to learn mixed media and this proves you can make any image any genre! Fun!
ReplyDeleteWas the gesso added for texture? I loved the page and especially the foiling in the rays, very *extra*!
ReplyDeleteI'm really enjoying looking at your beautiful cards.
ReplyDeleteGreat summer cards! The first is my favorite, and i love all the colors and images. The sun is one of my favorite stamps! Reminds me of the 60's.
ReplyDeleteoooh gorgeous art journal page!!
ReplyDeleteTwo amazing projects you shared. Your idea of putting sentiments around the sunburst rays is perfect for a journal page. The metallic paper worked really well with the design on the embossing folder.
ReplyDeleteYour sun journal page is AWESOME!! Thanks for sharing your ideas.
ReplyDeleteOh my gosh! That flamingo card! Stunning
ReplyDeleteYour projects are so amazing, Anna-Karin! That journal page is really awesome and your flamingo card is very creative! I love your work!
ReplyDeleteLove your happy sunshine creation!
ReplyDeleteAmazing projects! Thanks for sharing. Have a fabulous week! Hugs, Gloria
ReplyDeletehttps://purpleglocreations.blogspot.com
Love your creative designs!
ReplyDeleteWow!!! Your sun page is Amazing!!! Super cool card too!!
ReplyDeleteTalented!!
ReplyDeleteThanks for sharing your art.
ReplyDeleteLove the sentiments between the rays!
ReplyDeleteabsolutely stunning!
ReplyDelete