Monday, February 15, 2021

Textured Snowflake Card

Hello friends! I hope you are well and that you had a good weekend. We had our third weekend in a row with lots of snow and sunshine.


This week we have an Add a little texture challenge at the Simon Says Stamp Monday Challenge Blog. I hope you will join us! Texture is one of my favorite things and it can be created in so many different ways. 

Don't miss the project by our February guest designer Estelle Palumbo.

Layers of ink - Textured Snowflake Card Tutorial by Anna-Karin Evaldsson.

I was inspired by our very beautiful winter weather to do another winter project and I really wanted to use the beautiful Simon Says Stamp Filigree Snowflakes embossing folder. It has got such intricate and pretty snowflakes. 

Layers of ink - Textured Snowflake Card Tutorial by Anna-Karin Evaldsson.

I used a paper from my scrap folder. It was done by smearing Distress Inks on an acrylic block and misting with water. Then stamp the block on watercolor paper. I think I used Antique Linen, a little Frayed Burlap, Tumbled Glass and Mermaid Lagoon.

Layers of ink - Textured Snowflake Card Tutorial by Anna-Karin Evaldsson.  Emboss in the Filigree Snowflake folder.

Mist the paper with water. This gives a crisper and deeper look when you use 3-D embossing folders. For my Sizzix Big Shot I used this sandwich: Multipurpose Platform without any tab, embossing folder, one cutting pad. 

Layers of ink - Textured Snowflake Card Tutorial by Anna-Karin Evaldsson. Ink with Distress Ink.

When dry, ink lightly with Distress Inks, concentrating on the embossed parts.

Layers of ink - Textured Snowflake Card Tutorial by Anna-Karin Evaldsson.

I applied Cosmic Shimmer Teal Raspberry Opal Blaze Polish with my finger to all the snowflakes. I forgot to take a photo of that step. Then I dipped a blue and a brown Scribble Stick in water and flicked a paint brush against them to create splatters.

Layers of ink - Textured Snowflake Card Tutorial by Anna-Karin Evaldsson.  Die cut Simon Says Stamp Eliza snowflake.

Snowflakes were die cut with the Eliza Snowflake die and the Snow Flurries set. I die cut them from Whimsy Stamps Blurry Flurries paper and Simon Says Stamp Silver Holographic paper.

Layers of ink - Textured Snowflake Card Tutorial by Anna-Karin Evaldsson. Stamp with Simon Says Stamp Thoughtful Flowers tutorial.

Stamp the frame circle from Simon Says Stamp Mix and Match Circles with Deep Sea ink on one of the Whimsy papers. Stamp the dot circle inside. The stamp set is designed so that many of the circles fit inside one another. You can create numerous different designs. Stamp the sentiment in the middle with Soft Navy ink.

Layers of ink - Textured Snowflake Card Tutorial by Anna-Karin Evaldsson.

Layer the holographic, patterned paper and circle sentiment together. I used a foam dot for the sentiment circle.

Layers of ink - Textured Snowflake Card Tutorial by Anna-Karin Evaldsson.

For even more texture, distress the edges of the panel and stitch it to kraft cardstock with a sewing machine.

Layers of ink - Textured Snowflake Card Tutorial by Anna-Karin Evaldsson.

The combination of the Teal Raspberry Polish and the holographic paper is very cool, since the snowflakes shine and change color as you angle the card differently.

Layers of ink - Textured Snowflake Card Tutorial by Anna-Karin Evaldsson.

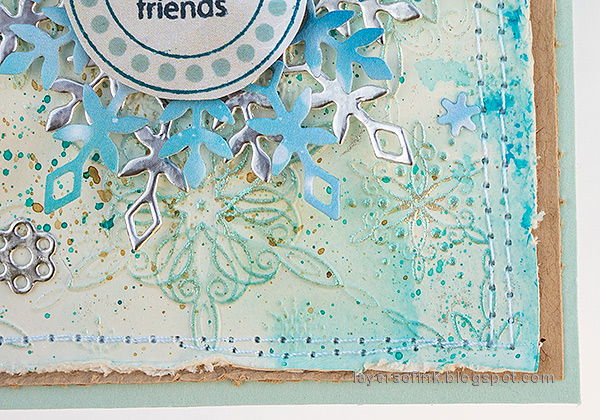
The embossed snowflakes have beautiful intricate details.

Layers of ink - Textured Snowflake Card Tutorial by Anna-Karin Evaldsson.

The smaller snowflakes were layered and glued here and there.

I hope you will join us this week in our Add A Little Texture challenge. You have a chance to win a $25 gift voucher to do some fun shopping at Simon Says Stamp. You have until Monday 8am Ohio time. 1pm UK time, 2 pm CET to join in.

Don't forget to follow Simon Says Stamp on Instagram, where they post great stuff daily. 


Do you use Instagram? If so please add #sssmchallenge so we can see your entries there too.


Thank you so much for taking the time to stop by here today! 

Happy crafting!

Anna-Karin

Supplies:

* Please note: the links are affiliate links, for which I receive a small percentage of sales generated by the link, at no extra cost to you.

1 comment:

Thank you so much for leaving a comment! Happy Crafting!