Wednesday, February 17, 2021

Floral Folio Tutorial

 Hello crafters! Today I have a floral folio notebook, journal or sketchbook to share with you.

Layers of ink - Floral Folio Tutorial by Anna-Karin Evaldsson.

The Eileen Hull Inspiration Team is sharing projects made with the new Folio Journal die this month and this is also the first time I used the die. Such a fun and versatile die! And I so love to make my own mini books, journals and sketchbooks.

Layers of ink - Floral Folio Tutorial by Anna-Karin Evaldsson.

Start by die cutting two Folio Journal pieces from mat board. This is an XL die so you need the Extended Cutting Pads, but it fits perfectly in an ordinary Big Shot or Vagabond.

Layers of ink - Floral Folio Tutorial by Anna-Karin Evaldsson.

Smear Distress Inks on a nonstick craft sheet, mist with water and press the covers into the ink. Let dry.

Layers of ink - Floral Folio Tutorial by Anna-Karin Evaldsson.

Repeat, but using Distress Oxide ink this time, but don't cover the Distress Ink completely. Let dry.

Layers of ink - Floral Folio Tutorial by Anna-Karin Evaldsson. Stamp with Simon Says Stamp Anna's Flowers.

Stamp the cover with stamps from Simon Says Stamp Anna's Flowers using various Distress Oxide inks. Mist lightly with water.

Layers of ink - Floral Folio Tutorial by Anna-Karin Evaldsson. Stamp with Simon Says Stamp Crackle Background.

Stamp a sentiment with Dark Chocolate ink and stamp the Simon Says Stamp Crackle Background here and there with Khaki ink.

Layers of ink - Floral Folio Tutorial by Anna-Karin Evaldsson.

You can make the folio journal very chunky or thin. If you want it thinner cut off one or two of the spine sections. If you want it thicker, don't overlap all the entire spine, as I did here.

Layers of ink - Floral Folio Tutorial by Anna-Karin Evaldsson.

Use a piece of elastic string as a binder.

Layers of ink - Floral Folio Tutorial by Anna-Karin Evaldsson.

This is what it looks like on the outside of the spine.

Layers of ink - Floral Folio Tutorial by Anna-Karin Evaldsson.

Cut paper for inserts. The best thing with making your own journals or sketchbooks is that you can pick your favorite papers for the inside. I made three signatures and stitched them down the center. I used different papers for each signature.

Layers of ink - Floral Folio Tutorial by Anna-Karin Evaldsson.

Slip the signature through the elastic strings.

Layers of ink - Floral Folio Tutorial by Anna-Karin Evaldsson.

You can bind the folio journal in different ways. I like how quick and simple it is to use an elastic string and you can also easily add new signatures when you have filled up the journal.

Layers of ink - Floral Folio Tutorial by Anna-Karin Evaldsson.

I tied two glass beads at the end of the elastic strings, but you can skip this too. My journal is tied with a piece of lace. I also added a few more sentiments.

Layers of ink - Floral Folio Tutorial by Anna-Karin Evaldsson.

The combination of transparent Distress Ink and opaque Distress Oxide Ink makes for an interesting look and adds a sense of depth.

Layers of ink - Floral Folio Tutorial by Anna-Karin Evaldsson.

You can use any color combo for the folio. Make it in your own favorite colors or give it to a friend.

Layers of ink - Floral Folio Tutorial by Anna-Karin Evaldsson.

This happens to be one of my favorite sentiments and I am looking forward to spring when the earth really does laugh in flowers. The stamp comes from the Simon Says Stamp Laugh In Flowers set.

Layers of ink - Floral Folio Tutorial by Anna-Karin Evaldsson.

Don't worry if some of your stamping isn't perfect. In fact, the imperfect teal flower that you see here, might be my favorite flower on the whole book.

Layers of ink - Floral Folio Tutorial by Anna-Karin Evaldsson.

The back cover was kept simple, with just one sentiment.

Layers of ink - Floral Folio Tutorial by Anna-Karin Evaldsson.

The book is pretty chunky, but you could fit quite a few more papeers in there.

Layers of ink - Floral Folio Tutorial by Anna-Karin Evaldsson.

The papers are kept safe with the two folded flaps. You can also cut these off, or turn them into pockets.

Layers of ink - Floral Folio Tutorial by Anna-Karin Evaldsson.

There is just something with crackles that I really like.

Layers of ink - Floral Folio Tutorial by Anna-Karin Evaldsson.

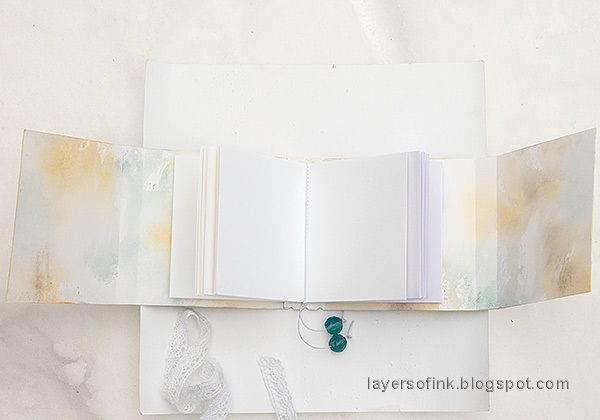
If you fold the entire folio open, it looks like this. As you can see, I only used Distress Ink on the inside covers.

Layers of ink - Floral Folio Tutorial by Anna-Karin Evaldsson.

I like that the spine and edges on the front are so thick that you can stamp and add details to them too.

Layers of ink - Floral Folio Tutorial by Anna-Karin Evaldsson.


Thank you so much for taking the time to stop by here today! 

Happy crafting!

Anna-Karin

Supplies:

* Please note: the links are affiliate links, for which I receive a small percentage of sales generated by the link, at no extra cost to you.

1 comment:

Thank you so much for leaving a comment! Happy Crafting!