
Hi everyone! It is the last day of January and I hope you are well! Here we have a lot of snow and it is very cold, but also sunny. I took this winter's most beautiful walk today.
I have a video tutorial to share with you today, for a very quick and easy background technique with Distress Ink, a stencil and water.

Let's jump right into the video. You can also find step photos below.
You can also watch the video on YouTube. You'll find the steps below too, including info on the rest of the tag.

Start by inking the tag with Distress Inks.

Mist the Simon Says Stamp Bubble Wrap stencil pretty heavily with water and place it on the tag.

Remove the stencil and you get this ghost effect, where the dots look darker since the stencil removed some of the ink.

Die cut the Simon Says Stamp Mini Interactive Envelope from scrap paper.

Stamp and emboss circles from Simon Says Stamp Mix and Match Circles. I used Ranger's Mixed Media powders. Always be very careful when heat heat-embossing and never touch the melted powder.

Cut the circles out and ink the edges. I also added some metallic idea-ology embellishments, such as this Thought Token.
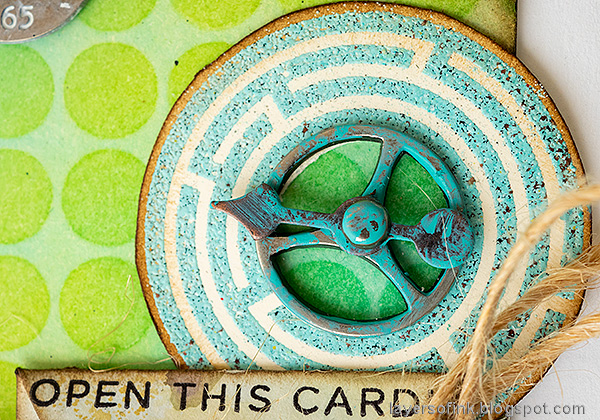
The labyrinth was cut out in the center too and I added a gear and a game spinner to it.

I also splattered some black Scribble Stick on the background.

The tiny envelope was inked and assembled. For another project using the Mini Interactive Envelope die check out my Scrap Paper Envelopes.

Inside the envelope is the little card with a stamped sentiment.

And on the inside of the card I stamped these two sentiments from Because of You.

Here you can see the effect from the stencil technique a little better.

The small dot border comes from Mix and Match Circles and the sentiment is from So Far So Good.

I colored the tip of the pen nib with a permanent marker and added some paint to the rest of the nib.


Thank you so much for taking the time to stop by here today!
Happy crafting!
Anna-Karin
Supplies:
* Please note: the links are affiliate links, for which I receive a small percentage of sales generated by the link, at no extra cost to you.
* Please note: the links are affiliate links, for which I receive a small percentage of sales generated by the link, at no extra cost to you.
whaouuu, quel magnifique tag, j adore!
ReplyDeleteThis comment has been removed by the author.
ReplyDeleteJust delightful - especially the tiny envelope.
ReplyDeleteAlison x
This tag made me happy! Colours as well as the message ❤
ReplyDeleteAnna-Karin, great technique and I love this cheerful tag. The colors are fab!
ReplyDelete