
Hello friends! It is dark early in the afternoons now and today I have a project to share which brings some light. It's a holder for a battery-operated tea light, with a stained glass effect. You can also do the technique on a card or a tag.

I thought the Poppy Stamps Stained Glass Angel die would work great for a battery tea light holder. You cannot use a real candle in this holder, only a battery-operated one. It can also hold other things and function as storage or you could place a small gift inside. The holder was colored with alcohol inks and I also used glitter paper.

Start by die cutting the Poppy Stamps Stained Glass Angel from Memory Box Frosted Glitter Paper.

Cut a piece of Clearly for Art Modeling Film to 11 x 4.7 in.

Fold it in half and then fold each half in half. Score along the fold lines. Modeling Film is very sturdy and holds up well.
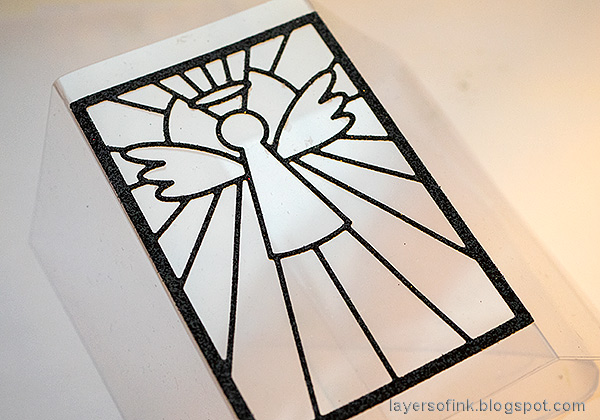
Glue the die cut to one of the two windows in the middle.

Turn it around and start coloring with alcohol inks. I used a felt applicator tool. The dots were made with a Q-tip and Alcohol Ink Blending Solution. Don't worry about perfection.

Color the remaining three windows with the same alcohol inks. I added some drops of ink into the others to create a nice effect.

Apply Diamond and Golden Rod Stickles to the angel.

Die cut one of the designs from the Simon Says Stamp Slimline Borders and Edges set from SSS Teal Glitter Paper.

Cut a piece of white glitter paper from the Memory Box Frosted Glitter pad and adhere to the back panel. You can skip this if you want the holder to be transparent from all sides, but I liked that it made the front window more visible and the glitter also gives a nice effect.

Glue the borders at the top and bottom as seen here. Leave about 0.6 in (1.5 cm) on one side, which will be used when we assemble the holder.

For stability I added a floor to the holder. It was made from SSS Ultra Thick White Cardstock. Measure a square of about 2.6 in (6.7 cm) and add about 0.4 in (1 cm) around it. Score, fold and cut as shown here.

Fold in the flaps and glue to create a small platform.

Glue the platform to the inside of the holder like this, making sure that it isn't visible above the edge of the scalloped border.

This would be a great gift and you can make it in lots of different colors.

I have had fun with glitter papers lately. These are both from SSS and from Memory Box. I love how glittery they are, without shedding any glitter. If you don't like the glitter border, use ribbon or washi tape instead.

The Stickles glitter glue on the back of the angel, helps her to stand out better from the background.

Here's a look at the back panel. I used the border strips to adhere the panel together at the back, as you can see here. There is still a small opening where they connect, but since you won't display the holder in this way, it isn't really visible.

The dots add an interesting look to the alcohol ink background.

If you don't want to have an ornate side, you could just make all the sides with the alcohol ink coloring.

To give you and idea of what it looks like with the battery-operated tea light inside. I made the little Santa elves you see at the sides when I was a teenager and loved polymer clay.


I hope you enjoyed this post and that it inspired you to do some make some Christmas gifts or to make something for yourself.

Thank you so much for stopping by here today!
Happy crafting!
Anna-Karin
Supplies:
* Please note: the links are affiliate links, for which I receive a small percentage of sales generated by the link, at no extra cost to you.
* Please note: the links are affiliate links, for which I receive a small percentage of sales generated by the link, at no extra cost to you.
Fantastic Anna-Karin!!! This is a super project, I love it!
ReplyDeleteThank you for all the detailed steps and pictures of your process as usual, always very interesting.
I wish you a wonderful Christmas with your lovely family, Stay safe my friend and have a great time.
Hugxxx, bises !! Coco