Wednesday, September 16, 2020

Stray Embossing Powder Splitcoaststampers Tutorial

Hi stampers! I am so happy to have a guest tutorial on Splitcoaststampers today, and I am sharing a fun stamping technique, with which you can't go wrong. We have all been annoyed at stray embossing powder at some stage and in this project we are going to embrace the stray powder, and even create some of it on purpose. 

Layers of ink - Stray Embossing Powder Video Tutorial by Anna-Karin Evaldsson.

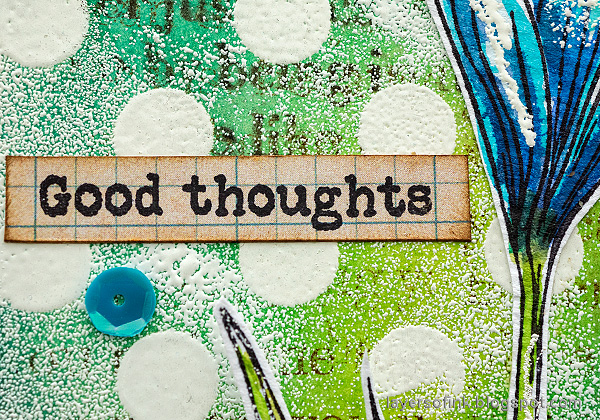
I made two tags, but you can also do a card or an art journal page instead. Stray embossing powder can give great texture and add highlights and interest to a project. Since it acts as a resist, the areas with powder will stay white when you ink the background or watercolor the flowers.

Layers of ink - Stray Embossing Powder Video Tutorial by Anna-Karin Evaldsson. Simon Says Stamp Thoughtful Flowers.

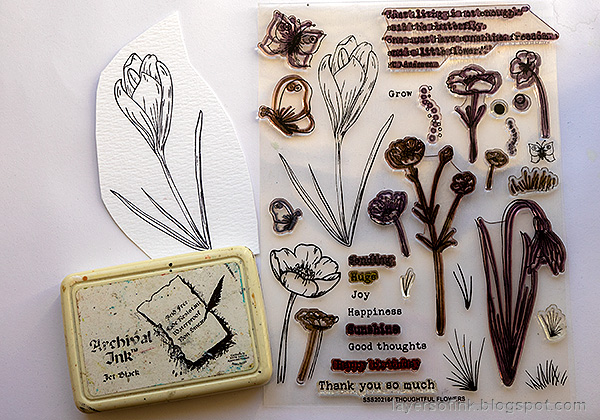
I used the Simon Says Stamp Thoughtful Flowers set, but any stamp with some open areas will work well. 

Here is the video showing you the process. You can also watch it directly on YouTube here. You will also find step-by-step photos and instructions over at Splitcoaststampers.


Layers of ink - Stray Embossing Powder Video Tutorial by Anna-Karin Evaldsson.

In the video, you see me color the purple flower. These are the inks that I used for the blue one. 

Layers of ink - Stray Embossing Powder Video Tutorial by Anna-Karin Evaldsson.

The result of this technique will be different each time you do it. I liked the background on my blue flower tag best. Note how the dots stand out even when there is powder almost all around them. 

Layers of ink - Stray Embossing Powder Video Tutorial by Anna-Karin Evaldsson. Watercolor crocus.

The powder will reserve some areas white when you color and give great highlights and texture to the flower.

Layers of ink - Stray Embossing Powder Video Tutorial by Anna-Karin Evaldsson.

The sentiment stamps also comes from the Thoughtful Flowers set. Stamp them on Tim Holtz Journal Cards and cut into strips. Ink the edges.

Layers of ink - Stray Embossing Powder Video Tutorial by Anna-Karin Evaldsson.

As a border, I die cut Crochet pieces from Journal Cards, inked and layered them together with a piece of lace trim and some twine.

Layers of ink - Stray Embossing Powder Video Tutorial by Anna-Karin Evaldsson.

Don't forget to add some powder to the leaves too.

Layers of ink - Stray Embossing Powder Video Tutorial by Anna-Karin Evaldsson.

This background has more solid areas of white on the background, probably because it is the one that I did on the video. I was a little too heavy-handed with the embossing ink, since I wanted it to show clearly on the video. 

Layers of ink - Stray Embossing Powder Video Tutorial by Anna-Karin Evaldsson. Watercolor flower, crocus.

The embossing powder gives such nice texture.

Layers of ink - Stray Embossing Powder Video Tutorial by Anna-Karin Evaldsson.

I also added sequins to the tags, from the Simon Says Stamp Blue Moon set.

Layers of ink - Stray Embossing Powder Video Tutorial by Anna-Karin Evaldsson.

You can find the tutorial at Splitcoaststampers here and you can also link your projects to the Stray Embossing Powder gallery.


Thank you so much for stopping by here today! 

Happy crafting!

Anna-Karin

Supplies:

* Please note: the links are affiliate links, for which I receive a small percentage of sales generated by the link, at no extra cost to you.


2 comments:

Thank you so much for leaving a comment! Happy Crafting!