
Hello stampers! I hope you are well. Today I have a favorite technique to share, combining watercolors, cling wrap and stamping. It is easy and makes for a wonderful textured background. I hadn't done it in a long time and had fun making a ton of backgrounds today. All you need is watercolor paint, cling wrap (you might call it saran wrap), stamps and some ink.

The stamps that I designed for the Simon Says Stamp® release arrived here on Tuesday and I have had such fun stamping with them. I wanted to start with a project made with the Laugh in Flowers set, which has some of my favorite flowers and was great for this technique. Any silhouette type stamp will work great for this project and it doesn't have to be floral.

The Queen Anne's Lace flower has a special place in my heart. When I was about six years old, I by mistake drove off the bike path and down a slope. I fell into a field of Queen Anne's Lace and was convinced that they had saved me from falling into the river. I have loved them ever since. For this card, I tried to make the background look like a field of grass and flowers.

The second card features the dandelion stamps from the Laugh in Flowers set. I also turned the blue-globe thistle into a dandelion here. The boys love to blow on dandelions.

Start by mixing up shades of green and yellow watercolor paint. I experimented with various mixes, but all of them contain Cerulean Blue, which is a granulating watercolor paint, giving extra texture. Before you paint, tear off a piece of cling wrap. Paint on watercolor paper.

Immediately place the cling wrap on top of the paper and press gently. You can shape it both before and after you put it on the paper.

I don't know how well you see the difference here, but by shaping and angling the cling wrap in different ways, you can get various textures and patterns. To the left, the cling wrap is pulled to create mainly vertical lines. To the right the cling wrap was just crumbled up, creating a different pattern. Put aside until the paper is dry. Be patient! Don't peek!


The patterns are so interesting and I love their organic nature and that you can't control the outcome completely.

Turn it the other way around and you will get a horizontal pattern instead.

When the cling wrap is crumbled up it creates these gorgeous random formations, looking like rocks or leaves.

My favorite part of the backgrounds are the areas where you can see a little of the blue paint. I love how it collected along the edges of the shapes.


When the paper was dry, I white embossed the Queen Anne's Lace from Laugh In Flowers on the background. A great thing with clear stamps is that you can easily angle the stem on the stamping block. Be careful so that you don't burn yourself when heat embossing.
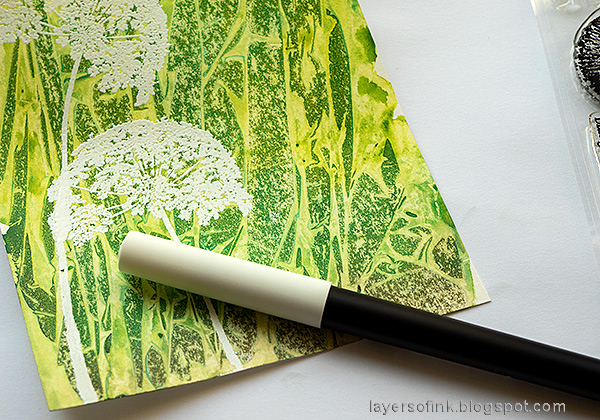
Stamp one more flower, overlapping slightly. If you need a longer stem to these types of floral stamps, it is easy to fix. When embossing, the best thing is to use an embossing pen. It makes it very easy to extend the stem. I used the Clear Medium Pens by Ranger.

Add a third flower and some grass. The grass stamps come from the SSS Thoughtful Flowers set.

The dandelion card was done in the same way, but using one of the 'crumbled' backgrounds instead. White emboss the flowers and extend the stems if needed.

Ink the stamps with green Distress Ink and mist about three times with water. Stamp over the embossed images, off setting the stamp a little. You can use a stamping platform or positioner, but I just eyeballed it. It doesn't have to be perfect. Use a paint brush to add a shadow to the extended stems too.

Splatter the background with a little green and yellow using Dina Wakley's Scribble Sticks and a little white with Dina's Gloss Acrylic Spray. I imagined the white splatters were seed flying away or flowers in the background.

The sentiment was stamped with dark brown ink. It is one of my favorite quotes. All the sentiments come from Laugh In Flowers.

The green shadow stamping makes the white flower stand out better from the background and creates dimension by acting as a shadow.

I also added a few pearls. Leo could not understand their purpose on the card and tried to remove them, as if they had gotten stuck to the card by mistake.

If there is stray white embossing powder, don't flick it off, leave it for extra texture. For more inspiration regarding stray embossing powder, check out the Stray Embossing Powder video tutorial I made earlier this week, for Splitcoaststampers.

The blue-globe thistle acting in disguise as a dandelion.

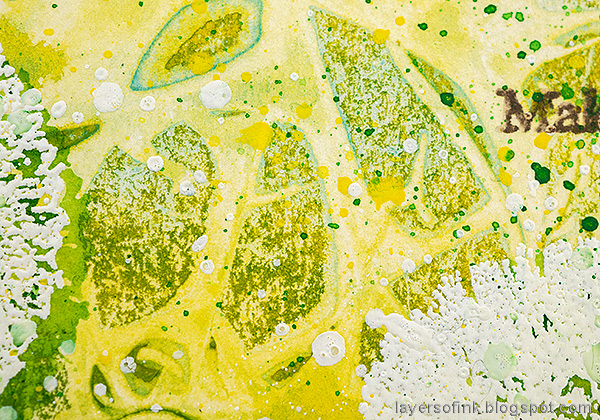
I love how the shapes almost look like leaves.


There is still time to join in the STAMPtember® celebrations. Don't miss all the inspiration and surprises.


Thank you so much for stopping by here today!
Happy crafting!
Anna-Karin
Supplies:
* Please note: the links are affiliate links, for which I receive a small percentage of sales generated by the link, at no extra cost to you.
* Please note: the links are affiliate links, for which I receive a small percentage of sales generated by the link, at no extra cost to you.
one of my favourite techniques, beautiful cards :)
ReplyDeleteStunning cards and a great tutorial - your flowers look just wonderful against those glorious organic backgrounds. How funny that something so organic and random and natural comes from something as artificial and manmade as clingfilm!!
ReplyDeleteAlison x
Beautiful cards - love those backgrounds! I had forgotten about cling wrap backgrounds. It's a great 'tool' for gel printing, too. Thanks for the reminder!
ReplyDeleteAmazing backgrounds! I've never tried this technique to thanks for sharing!
ReplyDeleteThis is one of my favorite techniques, but I don’t usually stamp over them (actually I usually just keep them and look at them instead of turning them into cards). You got great results.
ReplyDeleteI do this using the plastic some canvases are wrapped with and an acrylic wash - it makes a great beginning!
ReplyDeleteI haven't heard of this before, but boy, I am going to try it. I love the organic shapes you got.
ReplyDeleteFantastic creations and amazing technique, thanks for the info!
ReplyDelete